By: Team CS2103-AY1819S1-F10-4 Since: Sep 2018 Licence: MIT
1. Welcome to MeNUS
This Developer Guide is written by the MeNUS v1.4 team for the benefits of future developers and maintainers of the application.
-
This guide includes instructions for setting up the development environment.
-
This guide provides sufficient UMLs (unified model diagrams) to illustrate the architectural structure and design methodology.
-
This guide offers advice for troubleshooting some common issues.
MeNUS is an open-source project. If you are interested in contributing, see the
Contact Us page for more information.
1.1. Legend
The following 3 callouts will be used throughout the documentation which you may wish to pay attention to as it may contain important details:
| Just for your info, do not be alarmed. Be sure to read these notes as it might contain some important information. |
| Perhaps something can be done using another approach, but it is up to you to decide. Tips are often not important and can be safely ignored. |
| Some things might go wrong if you are not careful, or did not follow the instructions correctly. You are strongly advised to read whatever is in this block. |
2. Setting up
Follow this setup guide to get MeNUS up and running on your computer.
2.1. Prerequisites
-
JDK
9JDK 10on Windows will fail to run tests in headless mode due to a JavaFX bug. Windows developers are highly recommended to use JDK9which can be downloaded here -
IntelliJ IDE
IntelliJ by default has Gradle and JavaFX plugins installed.
Do not disable them. If you have disabled them, go toFile>Settings>Pluginsto re-enable them
2.2. Setting up the project in your computer
-
Fork this repo, and clone the fork to your computer
-
Open IntelliJ (if you are not in the welcome screen, click
File>Close Projectto close the existing project dialog first) -
Set up the correct JDK version for Gradle
-
Click
Configure>Project Defaults>Project Structure -
Click
New…and find the directory of the JDK
-
-
Click
Import Project -
Locate the
build.gradlefile and select it. ClickOK -
Click
Open as Project -
Click
OKto accept the default settings -
Open a console and run the command
gradlew processResources(Mac/Linux:./gradlew processResources). It should finish with theBUILD SUCCESSFULmessage.
This will generate all resources required by the application and tests. -
Open
XmlAdaptedAccount.javaandMainWindow.javaand check for any code errors-
Due to an ongoing issue with some of the newer versions of IntelliJ, code errors may be detected even if the project can be built and run successfully
-
To resolve this, place your cursor over any of the code section highlighted in red. Press ALT+ENTER, and select
Add '--add-modules=…' to module compiler optionsfor each error
-
-
Repeat this for the test folder as well (e.g. check
XmlUtilTest.javaandHelpWindowTest.javafor code errors, and if so, resolve it the same way)
2.3. Verifying the setup
-
Run the
seedu.restaurant.MainAppand try a few commands. -
Run the tests to ensure they all pass.
2.4. Configurations to do before writing code
2.4.1. Configuring the coding style
This project follows oss-generic coding standards. IntelliJ’s default style is mostly compliant with ours but it uses a different import order from ours. To rectify:
-
Go to
File>Settings…(Windows/Linux), orIntelliJ IDEA>Preferences…(macOS) -
Select
Editor>Code Style>Java -
Click on the
Importstab to set the order-
For
Class count to use import with '*'andNames count to use static import with '*': Set to999to prevent IntelliJ from contracting the import statements -
For
Import Layout: The order isimport static all other imports,import java.*,import javax.*,import org.*,import com.*,import all other imports. Add a<blank line>between eachimport
-
Optionally, you can follow the UsingCheckstyle.adoc document to configure Intellij to check style-compliance as you write code.
2.4.2. Setting up CI
Set up Travis to perform Continuous Integration (CI) for your fork. See UsingTravis.adoc to learn how to set it up.
After setting up Travis, you can optionally set up coverage reporting for your team fork (see UsingCoveralls.adoc).
| Coverage reporting could be useful for a team repository that hosts the final version but it is not that useful for your personal fork |
Optionally, you can set up AppVeyor as a second CI (see UsingAppVeyor.adoc).
| Having both Travis and AppVeyor ensures your App works on both Unix-based platforms and Windows-based platforms (Travis is Unix-based and AppVeyor is Windows-based) |
2.4.3. Getting started with coding
When you are ready to start coding,
-
Get some sense of the overall design by reading Section 3.1, “Architecture”.
2.5. Using Git with Sourcetree
We use Git with Sourcetree for distributed source control. See UsingGit.adoc if you find any difficulty when using Git with Sourcetree.
3. Design
3.1. Architecture
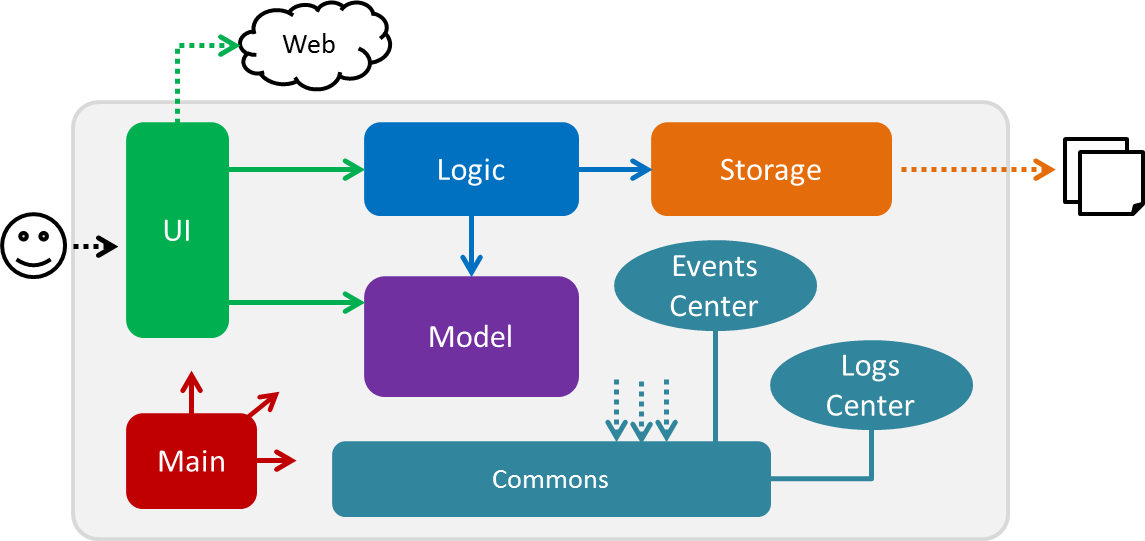
Figure 3.1.1: Architecture Diagram
The Architecture Diagram given above explains the high-level design of the App. Given below is a quick overview of each component.
The .pptx files used to create diagrams in this document can be found in the diagrams folder. To update a diagram, modify the diagram in the pptx file, select the objects of the diagram, and choose Save as picture.
|
Main has only one class called MainApp. It is responsible for,
-
At app launch: Initializes the components in the correct sequence, and connects them up with each other.
-
At shut down: Shuts down the components and invokes cleanup method where necessary.
Commons represents a collection of classes used by multiple other components. Two of those classes play important roles at the architecture level.
-
EventsCenter: This class (written using Google’s Event Bus library) is used by components to communicate with other components using events (i.e. a form of Event Driven design) -
LogsCenter: Used by many classes to write log messages to the App’s log file.
The rest of the App consists of four components.
Each of the four components
-
Defines its API in an
interfacewith the same name as the Component. -
Exposes its functionality using a
{Component Name}Managerclass.
For example, the Logic component (see the class diagram given below) defines it’s API in the Logic.java interface and exposes its functionality using the LogicManager.java class.
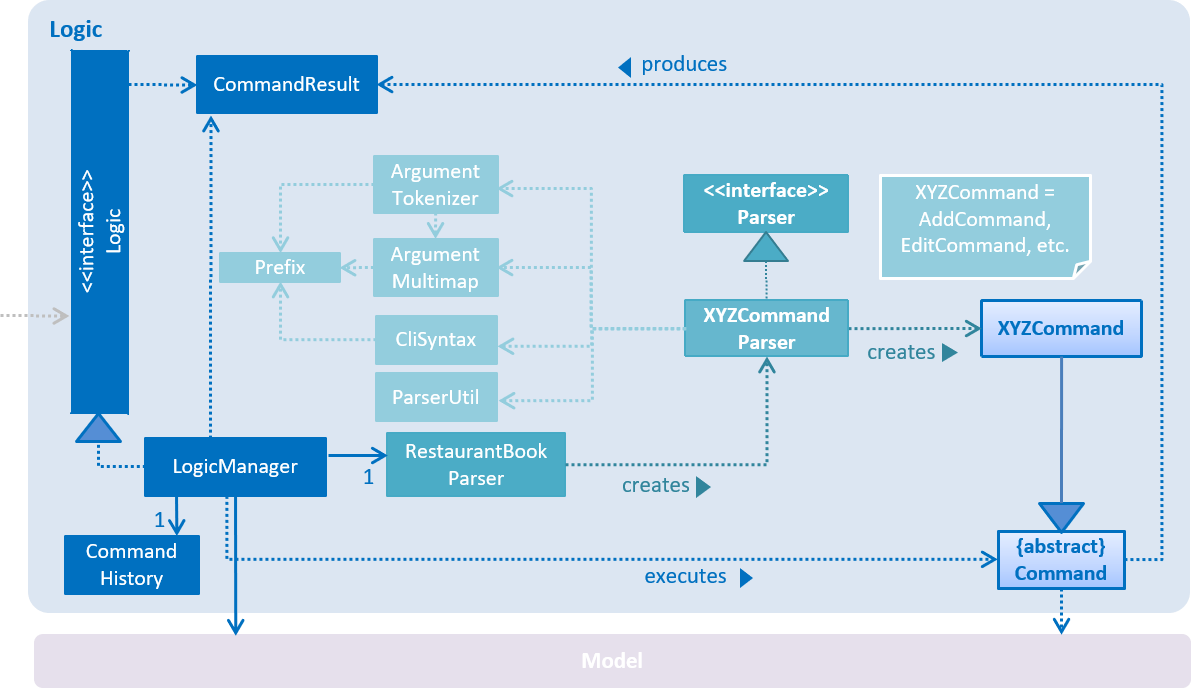
Figure 3.1.2: Class Diagram of the Logic Component
Events-Driven nature of the design
The Sequence Diagram below shows how the components interact for the scenario where the user issues the command delete 1.
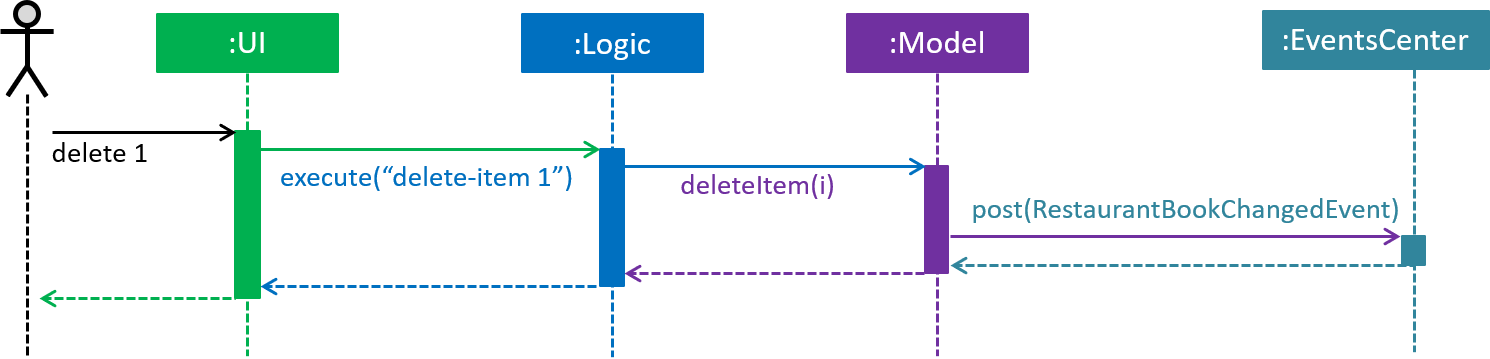
Figure 3.1.3: Component interactions for delete 1 command (part 1)
Note how the Model simply raises a RestaurantBookChangedEvent when the Restaurant Book data are changed, instead of
asking the Storage to save the updates to the hard disk.
|
The diagram below shows how the EventsCenter reacts to that event, which eventually results in the updates being saved to the hard disk and the status bar of the UI being updated to reflect the 'Last Updated' time.
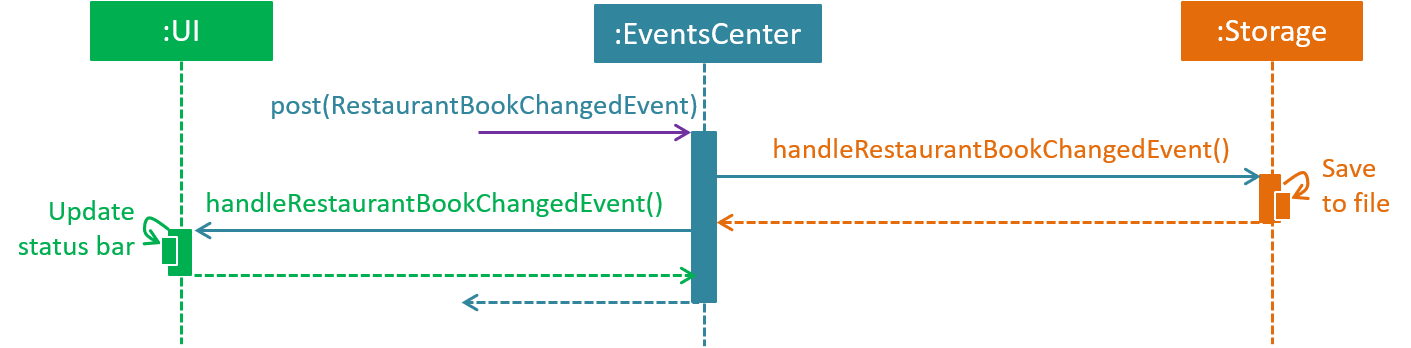
Figure 3.1.4: Component interactions for delete 1 command (part 2)
Note how the event is propagated through the EventsCenter to the Storage and UI without Model having to be coupled to either of them. This is an example of how this Event Driven approach helps us reduce direct coupling between components.
|
The sections below give more details of each component.
3.2. UI component
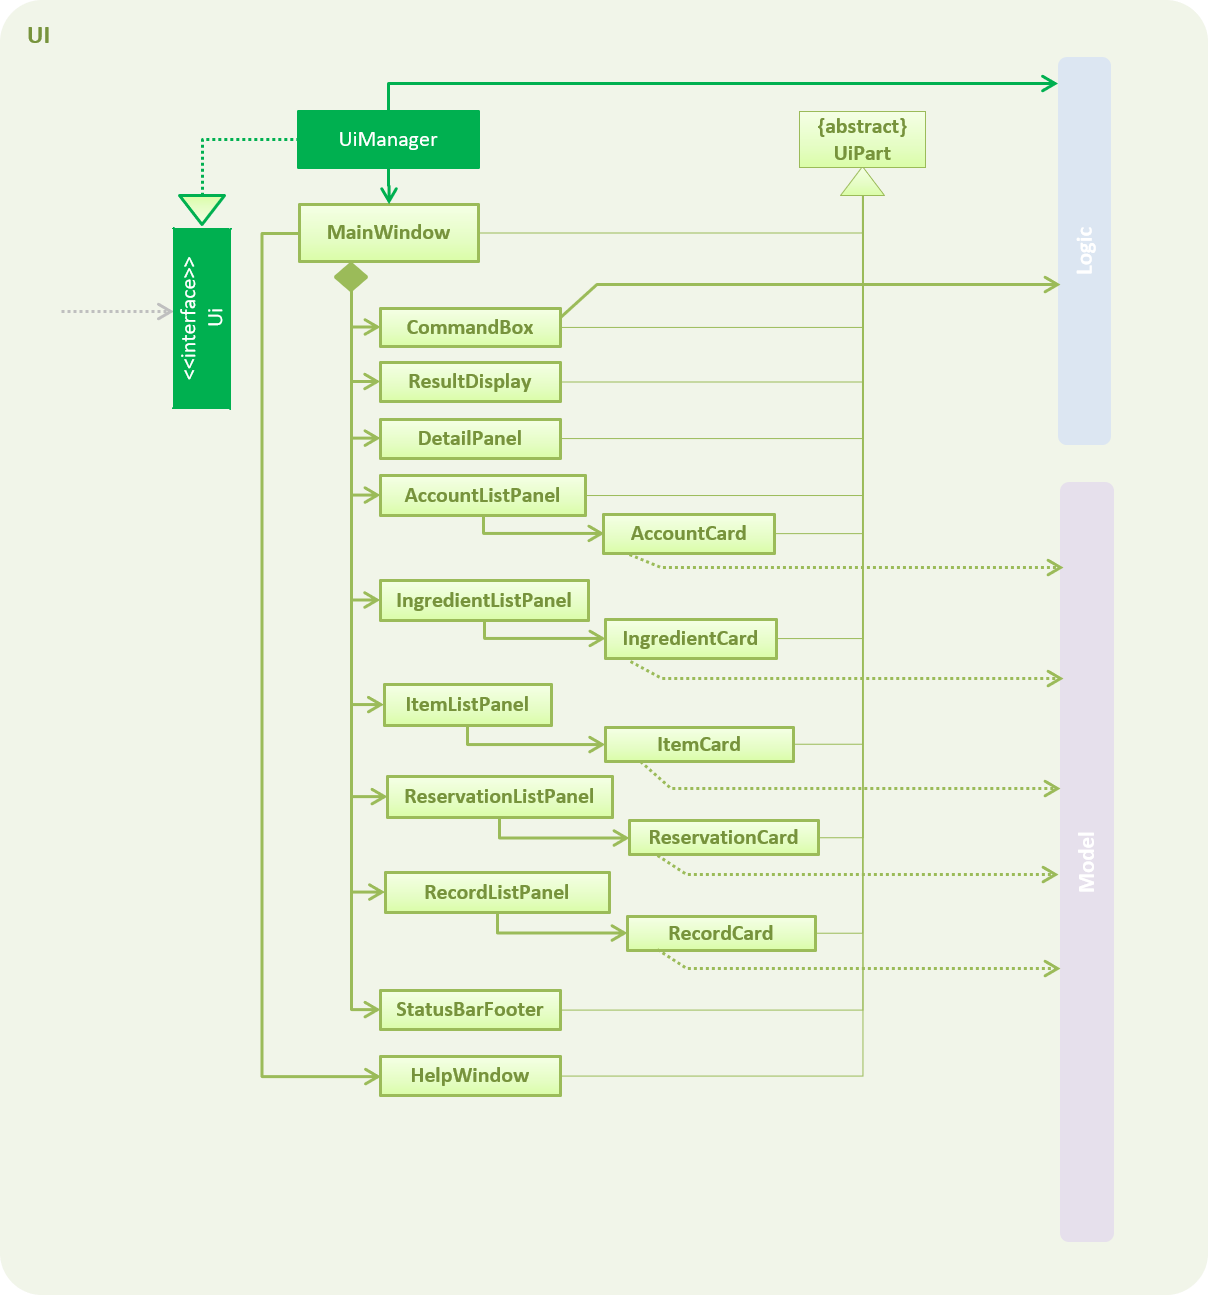
Figure 3.2.1: Structure of the UI Component
API : Ui.java
The UI consists of a MainWindow that is made up of parts e.g.CommandBox, ResultDisplay, AccountListPanel,
StatusBarFooter, DetailPanel etc. All these, including the MainWindow, inherit from the abstract UiPart class.
The UI component uses JavaFx UI framework. The layout of these UI parts are defined in matching .fxml files that are in the src/main/resources/view folder. For example, the layout of the MainWindow is specified in MainWindow.fxml
The UI component,
-
Executes user commands using the
Logiccomponent. -
Binds itself to some data in the
Modelso that the UI can auto-update when data in theModelchange. -
Responds to events raised from various parts of the App and updates the UI accordingly.
3.3. Logic component
Figure 3.3.1: Structure of the Logic Component
API :
Logic.java
-
Logicuses theRestaurantBookParserclass to parse the user command. -
This results in a
Commandobject which is executed by theLogicManager. -
The command execution can affect the
Model(e.g. adding an account) and/or raise events. -
The result of the command execution is encapsulated as a
CommandResultobject which is passed back to theUi.
Given below is the Sequence Diagram for interactions within the Logic component for the execute("register
id/azhikai pw/1122qq") API call.
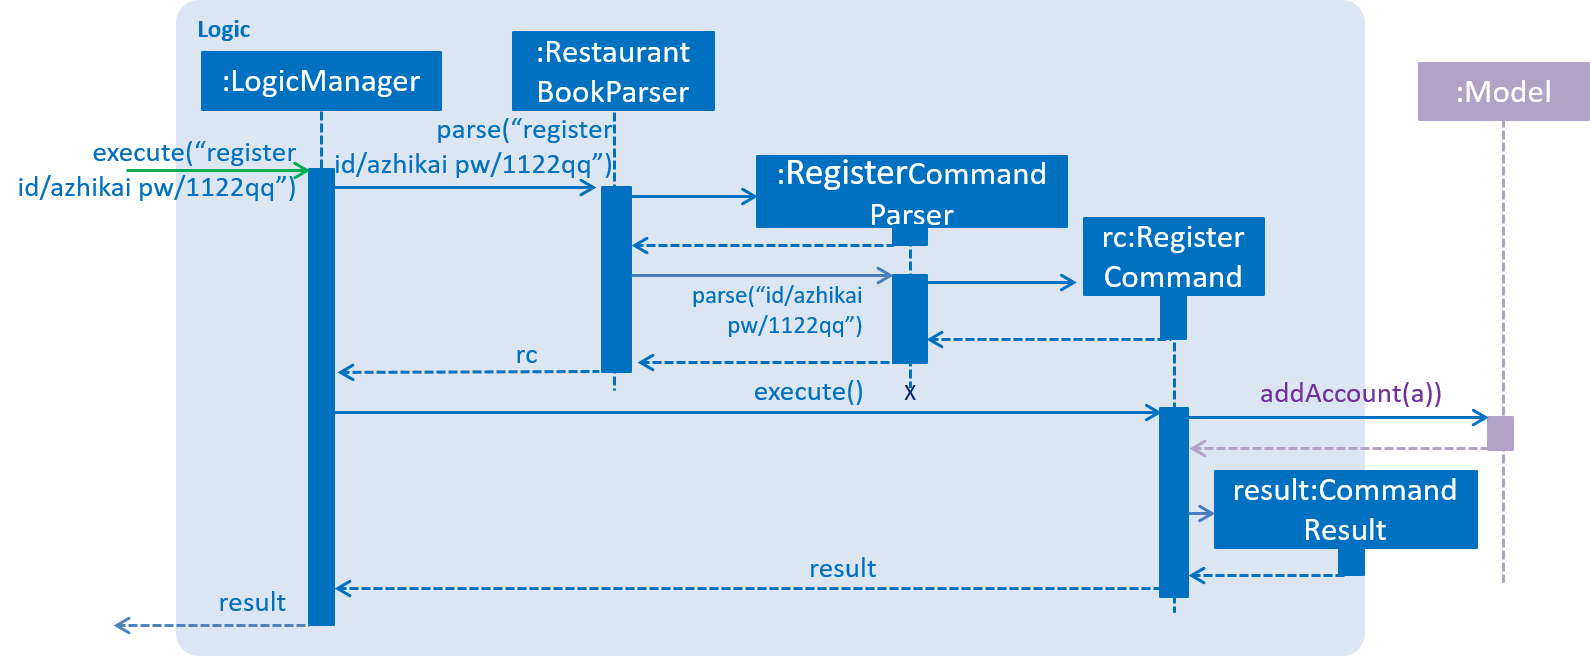
Figure 3.3.2: Interactions Inside the Logic Component for the delete 1 Command
3.4. Model component
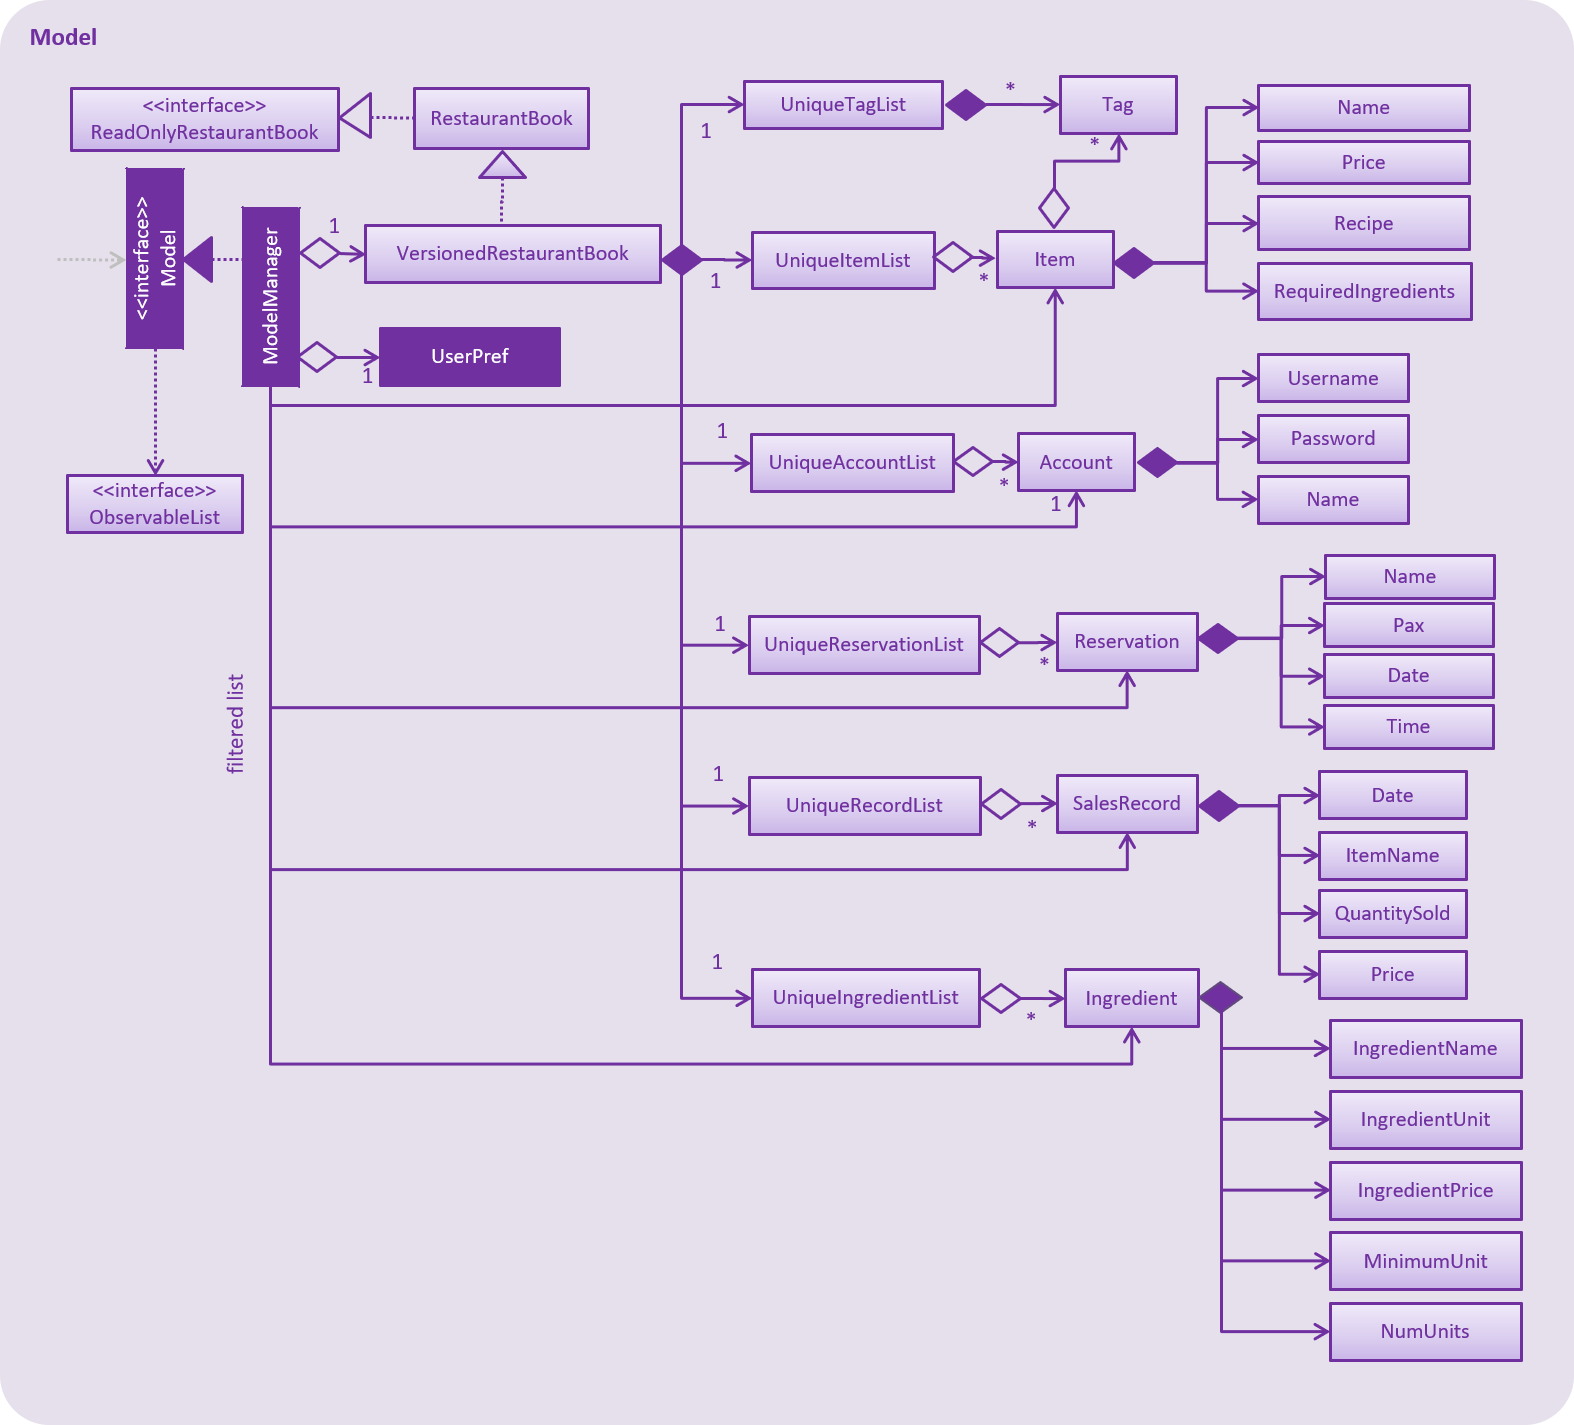
Figure 3.4.1: Structure of the Model Component
API : Model.java
The Model,
-
stores a
UserPrefobject that represents the user’s preferences. -
stores the Restaurant Book data.
-
exposes data via an unmodifiable
ObservableListthat can be 'observed' e.g. the UI can be bound to this list so that the UI automatically updates when the data in the list change. -
does not depend on any of the other three components.
3.5. Storage component
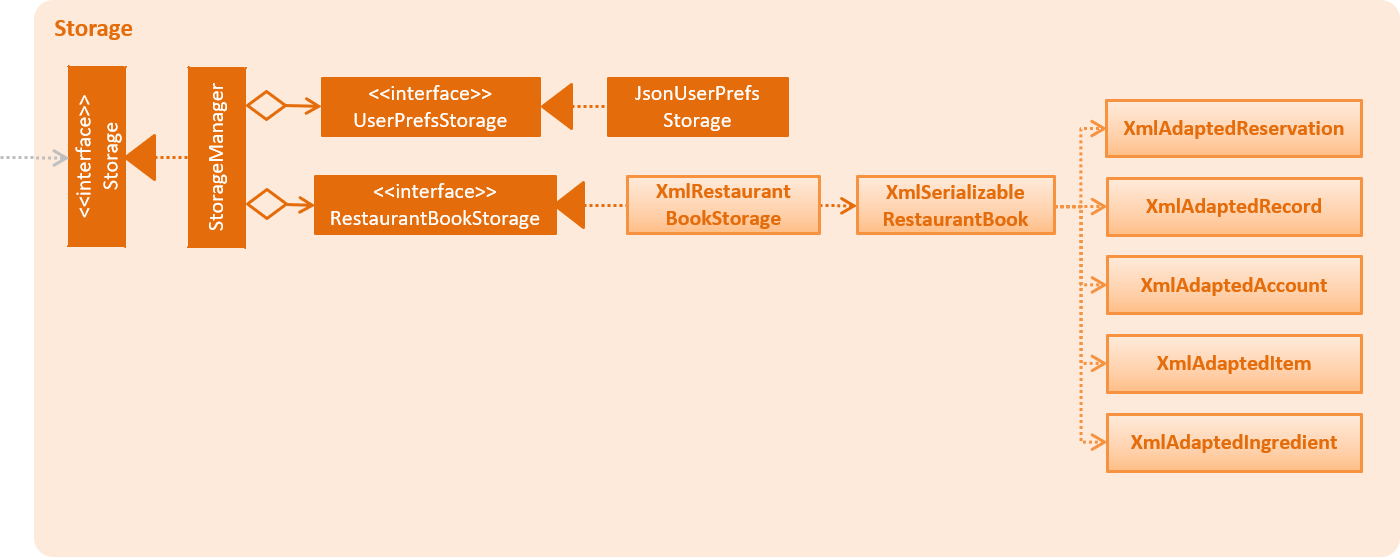
Figure 3.5.1: Structure of the Storage Component
API : Storage.java
The Storage component,
-
can save
UserPrefobjects in json format and read it back. -
can save the Restaurant Book data in xml format and read it back.
3.6. Common classes
Classes used by multiple components are in the seedu.restaurant.commons package.
4. Implementation
This section describes some noteworthy details on how certain features are implemented.
4.1. Undo/Redo feature
4.1.1. Current Implementation
The undo/redo mechanism is facilitated by VersionedRestaurantBook.
It extends RestaurantBook with an undo/redo history, stored internally as an restaurantBookStateList and
currentStatePointer.
Additionally, it implements the following operations:
-
VersionedRestaurantBook#commit()— Saves the current restaurant book state in its history. -
VersionedRestaurantBook#undo()— Restores the previous restaurant book state from its history. -
VersionedRestaurantBook#redo()— Restores a previously undone restaurant book state from its history.
These operations are exposed in the Model interface as Model#RestaurantBook(), Model#undoRestaurantBook() and
Model#redoRestaurantBook() respectively.
Given below is an example usage scenario and how the undo/redo mechanism behaves at each step.
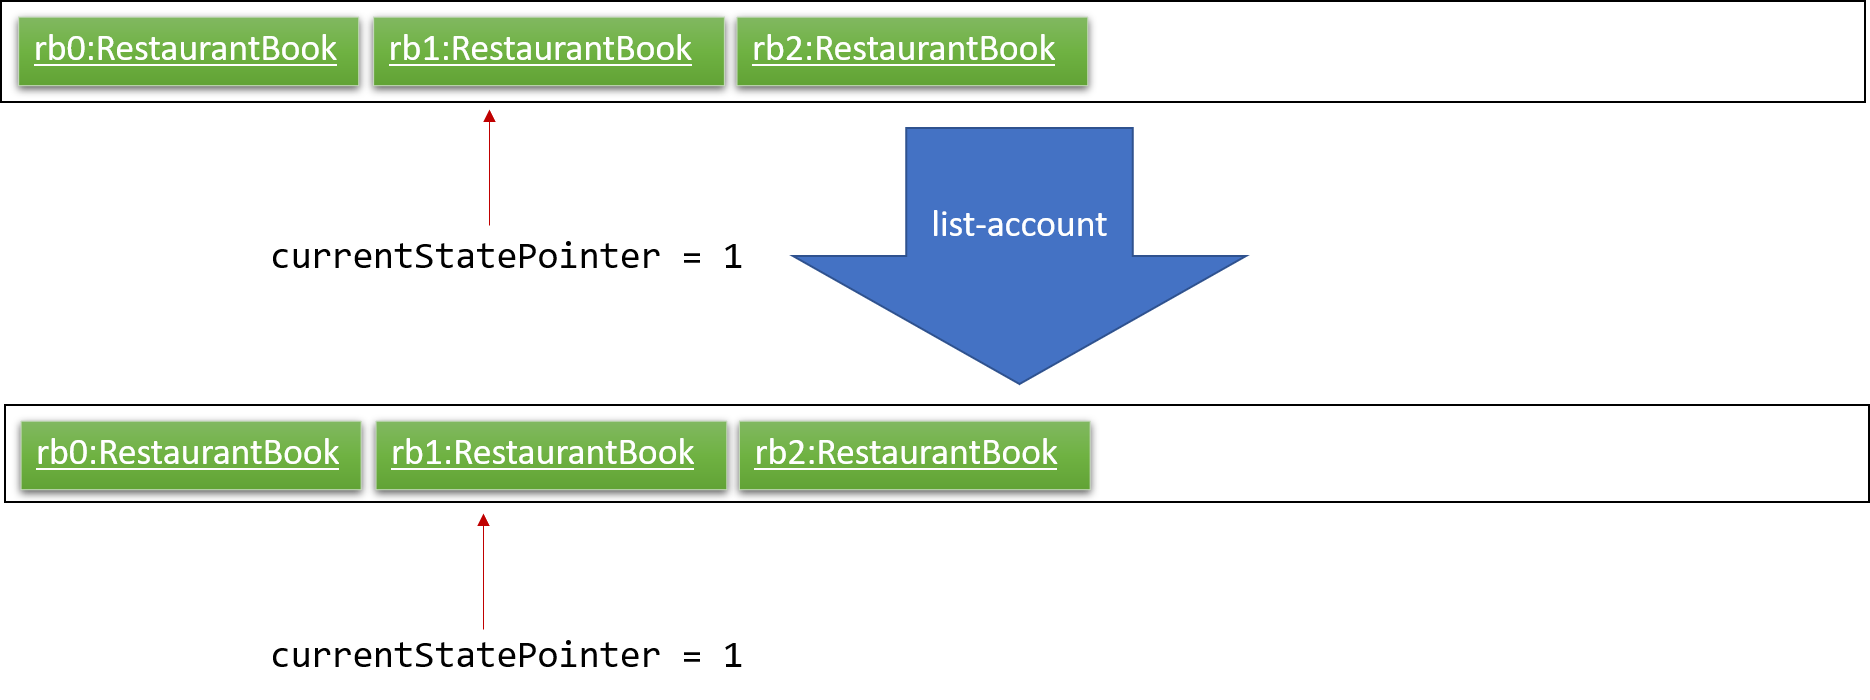
Step 1. The user launches the application for the first time. The VersionedRestaurantBook will be initialized with the initial restaurant book state, and the currentStatePointer pointing to that single restaurant book state.

Step 2. The user executes deregister id/azhikai command to delete the account with the username of azhikai from the
restaurant book. The deregister command calls Model#commitRestaurantBook(), causing the modified state of the
restaurant book after the deregister id/azhikai command executes to be saved in the restaurantBookStateList, and
the currentStatePointer is shifted to the newly inserted restaurant book state.
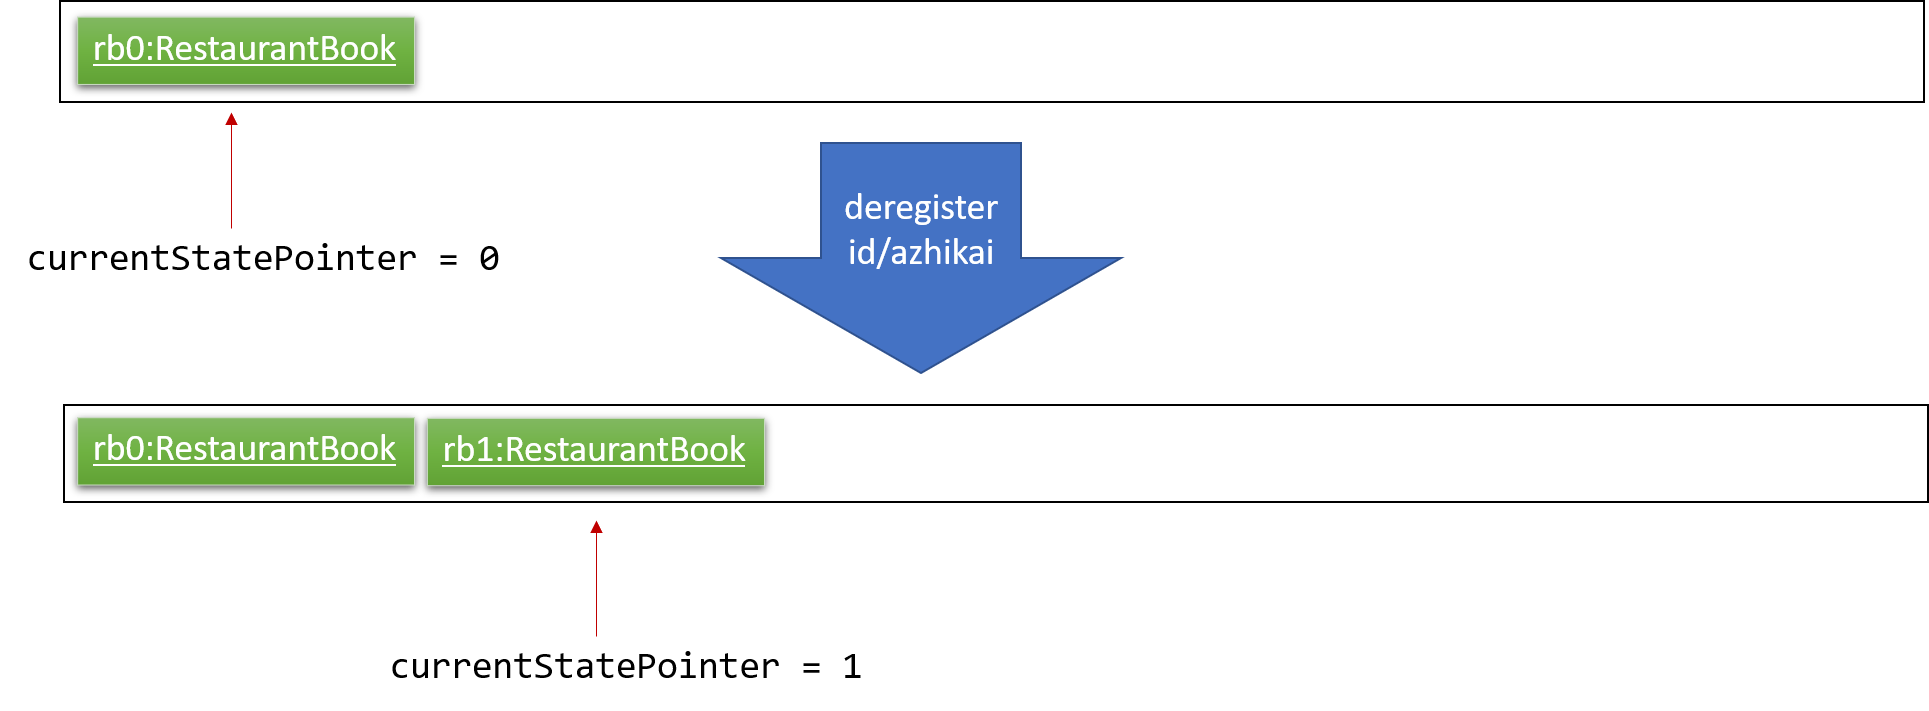
Step 3. The user executes register id/azhikai … to add a new account. The register command also calls
Model#commitRestaurantBook(), causing another modified restaurant book state to be saved into the restaurantBookStateList.
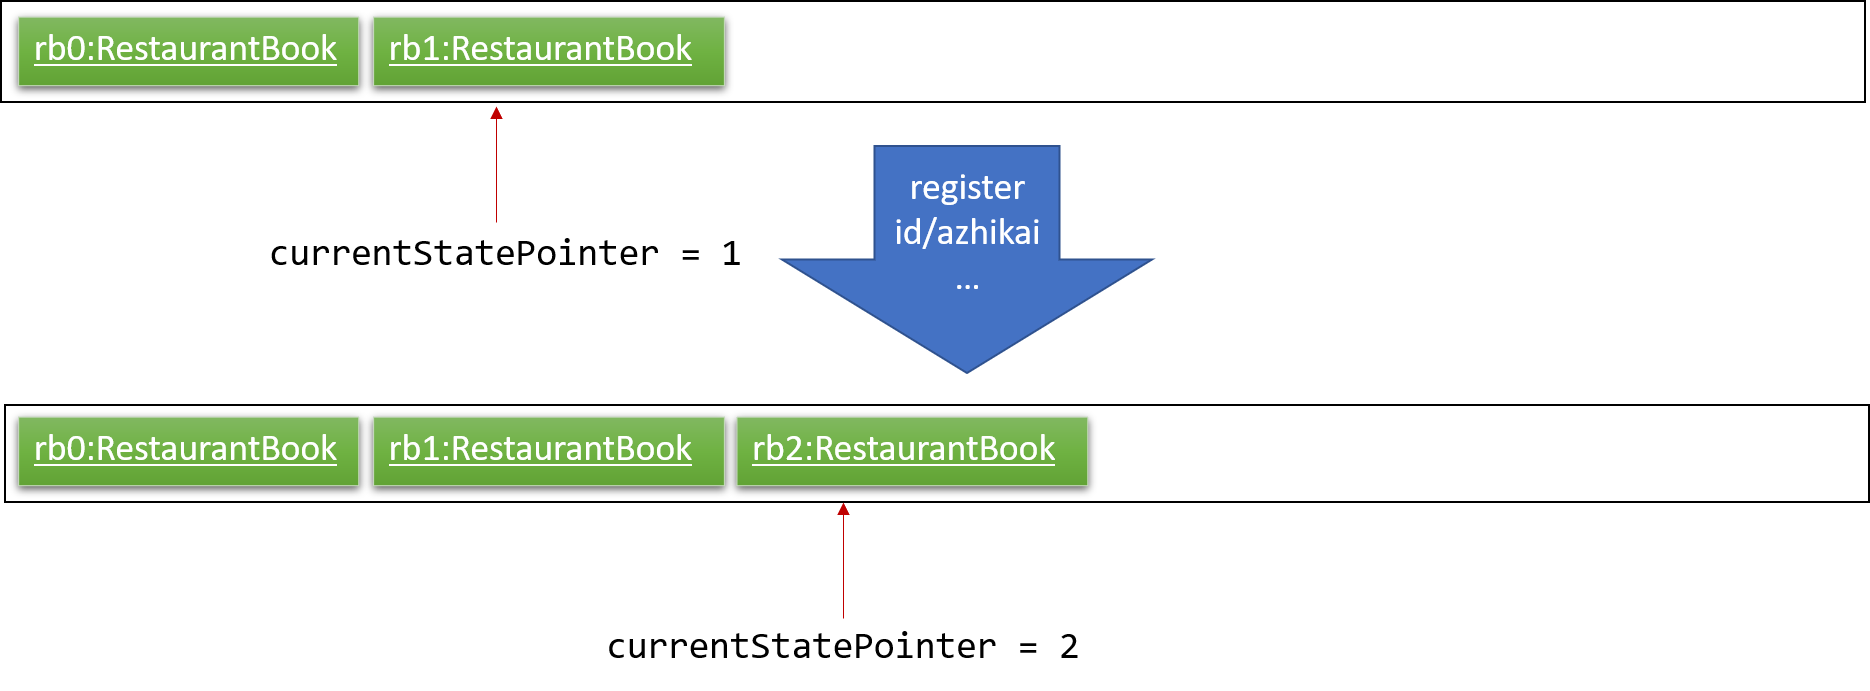
If a command fails its execution, it will not call Model#commitRestaurantBook(), so the restaurant book state will not be saved into the restaurantBookStateList.
|
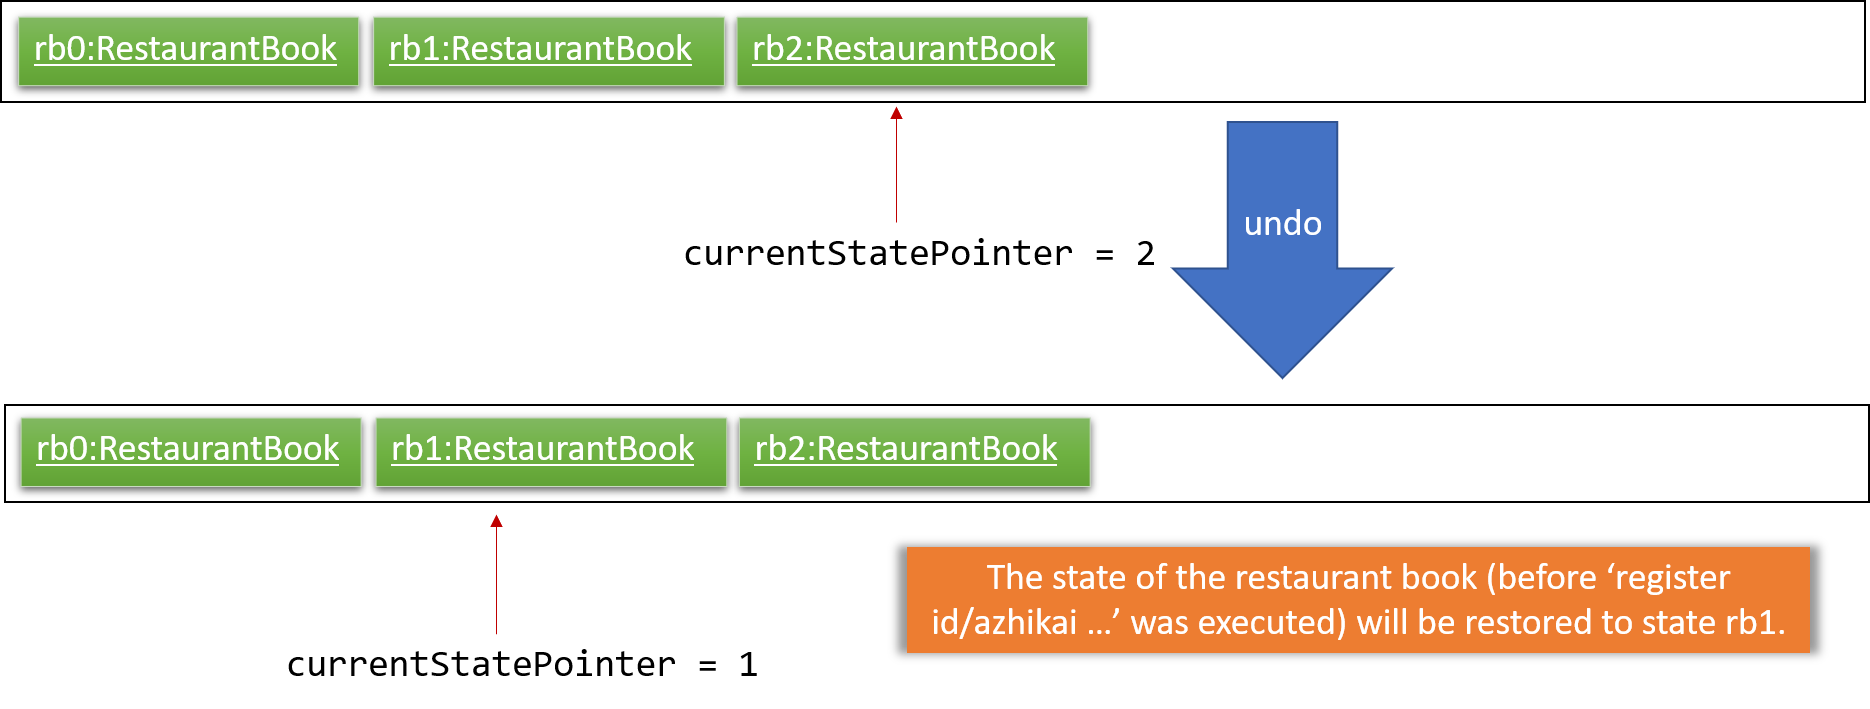
Step 4. The user now decides that adding the account was a mistake, and decides to undo that action by executing the
undo command. The undo command will call Model#undoRestaurantBook(), which will shift the currentStatePointer
once to the left, pointing it to the previous restaurant book state, and restores the restaurant book to that state.
If the currentStatePointer is at index 0, pointing to the initial restaurant book state, then there are no previous
restaurant book states to restore. The undo command uses Model#canUndoRestaurantBook() to check if this is the
case. If so, it will return an error to the user rather than attempting to perform the undo.
|
The following sequence diagram shows how the undo operation works:
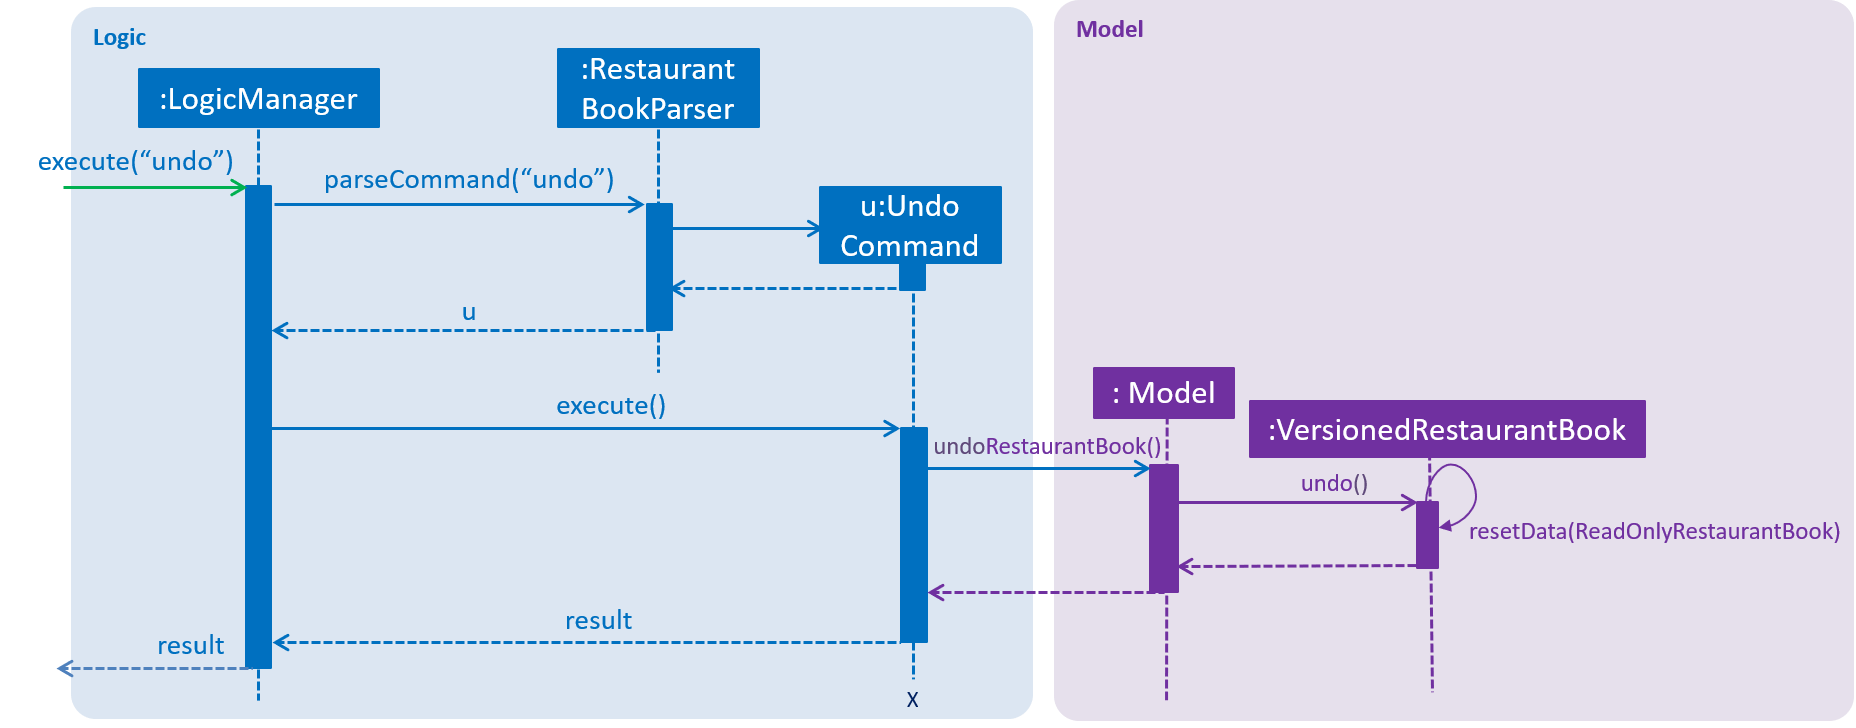
Figure 4.1.1.1: Structure of the Storage Component
The redo command does the opposite — it calls Model#redoRestaurantBook(), which shifts the currentStatePointer
once to the right, pointing to the previously undone state, and restores the restaurant book to that state.
If the currentStatePointer is at index restaurantBookStateList.size() - 1, pointing to the latest restaurant book
state, then there are no undone restaurant book states to restore. The redo command uses
Model#canRedoRestaurantBook() to check if this is the case. If so, it will return an error to the user rather than
attempting to perform the redo.
|
Step 5. The user then decides to execute the command list. Commands that do not modify the restaurant book, such as
list, will usually not call Model#commitRestaurantBook(), Model#undoRestaurantBook() or
Model#redoRestaurantBook(). Thus, the restaurantBookStateList remains unchanged.
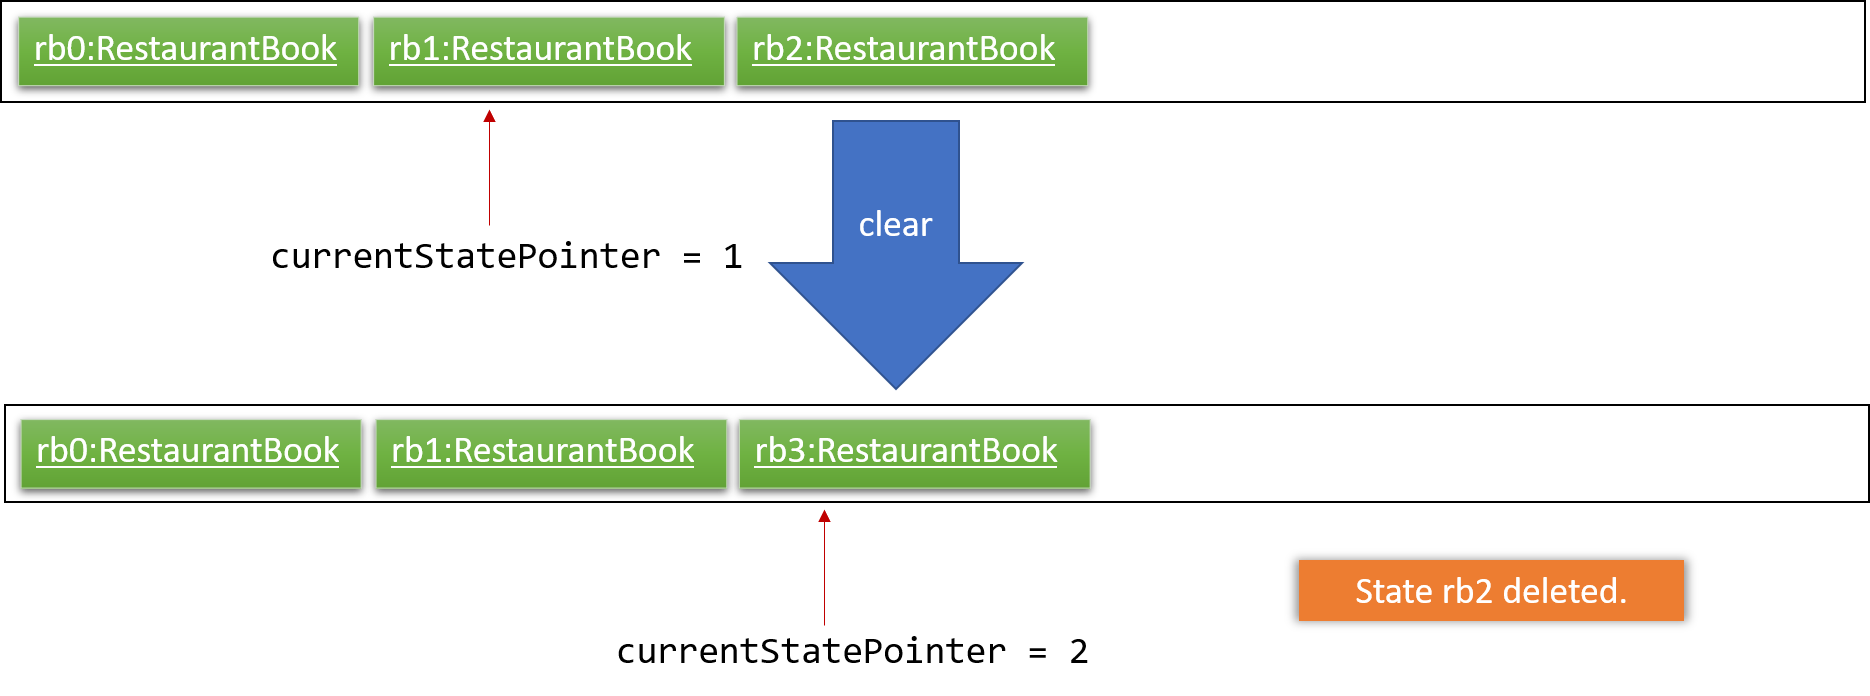
Step 6. The user executes clear, which calls Model#commitRestaurantBook(). Since the currentStatePointer is not
pointing at the end of the restaurantBookStateList, all restaurant book states after the currentStatePointer will be purged. We designed it this way because it no longer makes sense to redo the add n/David … command. This is the behavior that most modern desktop applications follow.
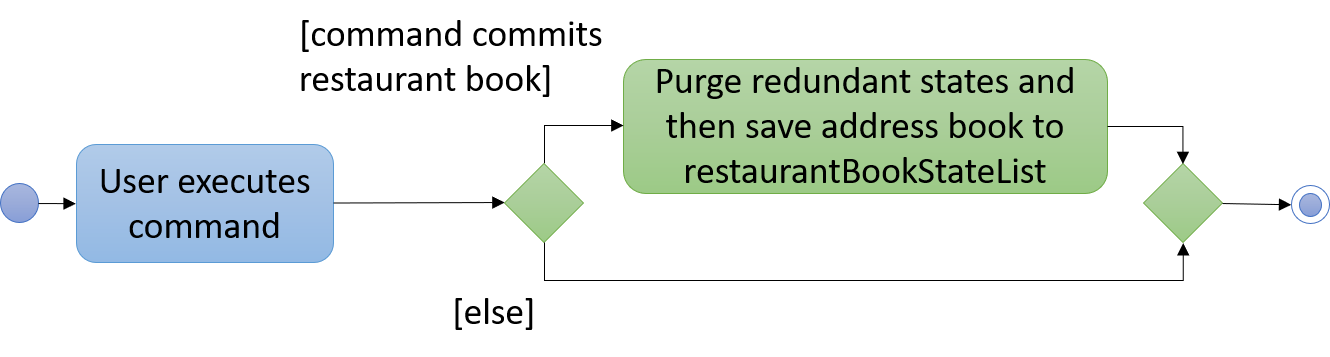
The following activity diagram summarizes what happens when a user executes a new command:
4.1.2. Design Considerations
Aspect: How undo & redo executes
-
Alternative 1 (current choice): Saves the entire restaurant book.
-
Pros: Easy to implement.
-
Cons: May have performance issues in terms of memory usage.
-
-
Alternative 2: Individual command knows how to undo/redo by itself.
-
Pros: Will use less memory (e.g. for
deregister, just save the account being deleted). -
Cons: We must ensure that the implementation of each individual command are correct.
-
Aspect: Data structure to support the undo/redo commands
-
Alternative 1 (current choice): Use a list to store the history of restaurant book states.
-
Pros: Easy for new Computer Science student undergraduates to understand, who are likely to be the new incoming developers of our project.
-
Cons: Logic is duplicated twice. For example, when a new command is executed, we must remember to update both
HistoryManagerandVersionedRestaurantBook.
-
-
Alternative 2: Use
HistoryManagerfor undo/redo-
Pros: We do not need to maintain a separate list, and just reuse what is already in the codebase.
-
Cons: Requires dealing with commands that have already been undone: We must remember to skip these commands. Violates Single Responsibility Principle and Separation of Concerns as
HistoryManagernow needs to do two different things.
-
4.2. User account feature
4.2.1. Current Implementation
The user account mechanism is facilitated by RestaurantBook. Additionally, it implements the following operations:
-
RestaurantBook#getAccount(Account)— Retrieves the account. -
RestaurantBook#addAccount(Account)— Saves the new account. -
RestaurantBook#updateAccount(Account, Account)— Update the existing account. -
RestaurantBook#removeAccount(Account)— Removes the account.
These operations are exposed in the Model interface as Model#getAccount(Account), Model#addAccount(Account),
Model#updateAccount(Account, Account) and Model#removeAccount(Account). The following commands will
invoke the aforementioned operations:
-
Command#LoginCommand()— InvokesModel#getAccount(Account). -
Command#RegisterCommand()— InvokesModel#addAccount(Account). -
Command#DeregisterCommand()— InvokesModel#removeAccount(Account). -
Command#ChangePasswordCommand()— InvokesModel#updateAccount(Account, Account).
Given below are example usage scenarios and how each of the command and its respective operations behave at each
step which involves two components, Logic which is responsible for parsing the user input and Model which is
responsible for manipulating the list, if necessary. Both components are extended by LogicManager and
ModelManager respectively.
The following sequence diagram shows how the register command works:
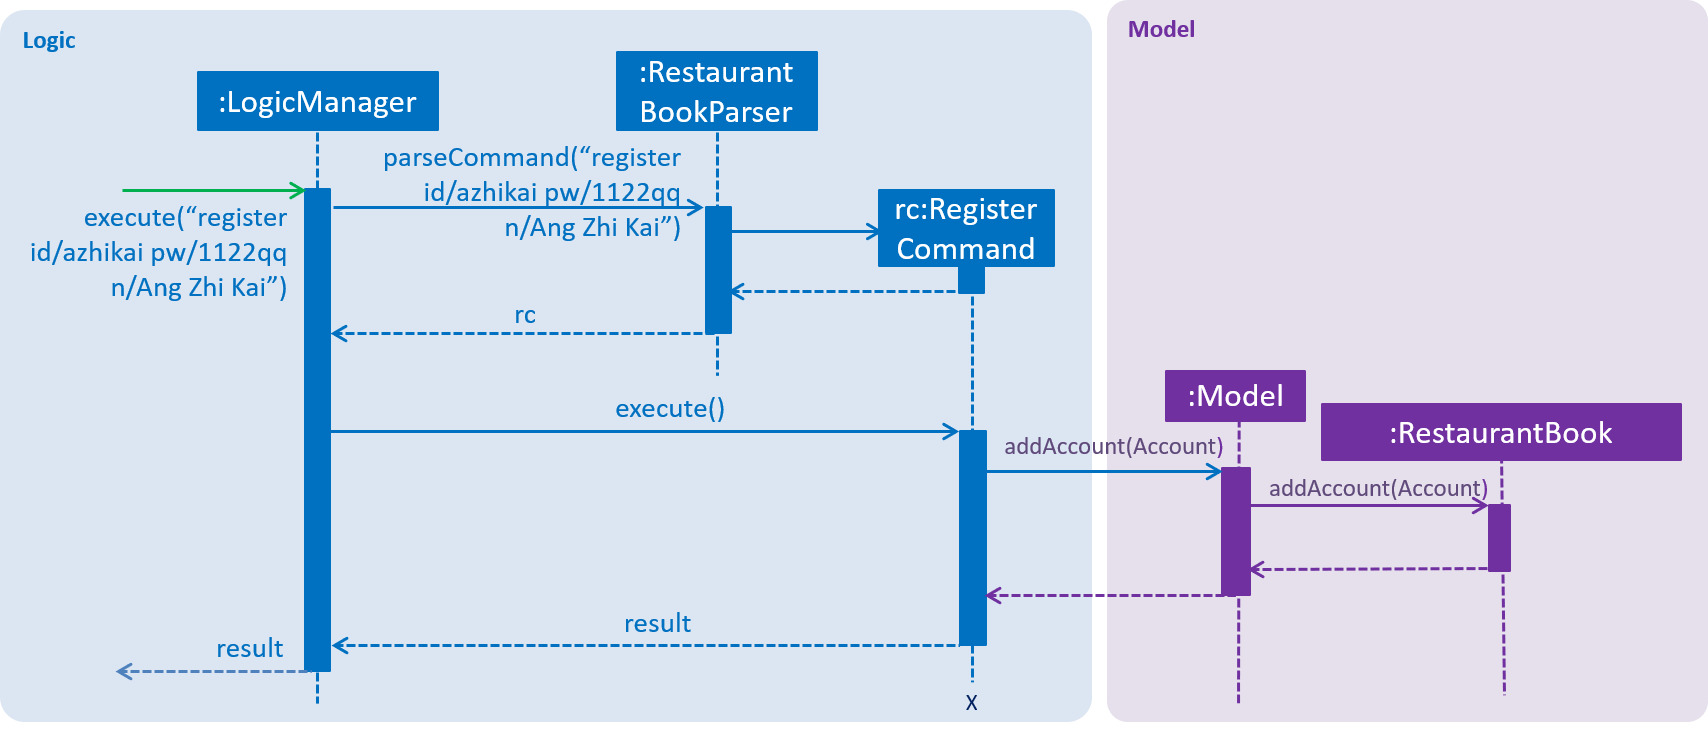
Figure 4.2.1.1: Sequence diagram to illustrate component interactions for the register command
|
Step 1. The user executes register id/azhikai pw/1122qq n/Ang Zhi Kai command to create a new user account.
Step 2. LogicManager invokes the RestaurantBookParser#parseCommand() method which takes in the user input
as arguments.
Step 3. When the command is parsed, the Command#RegisterCommand() will be created which is returned to the
LogicManager.
Step 4. LogicManager invokes the execute() method of the Command#RegisterCommand(), rc which is instantiated in
Step 3. The Model component will be involved as the Command#RegisterCommand() invokes a request to add the account
into the storage by calling Model#addAccount(Account).
Step 5: The new account is added into the storage. Then, a CommandResult is generated and returned to
LogicManager which is used to display the result to the user.
The following sequence diagram shows how the login command works:
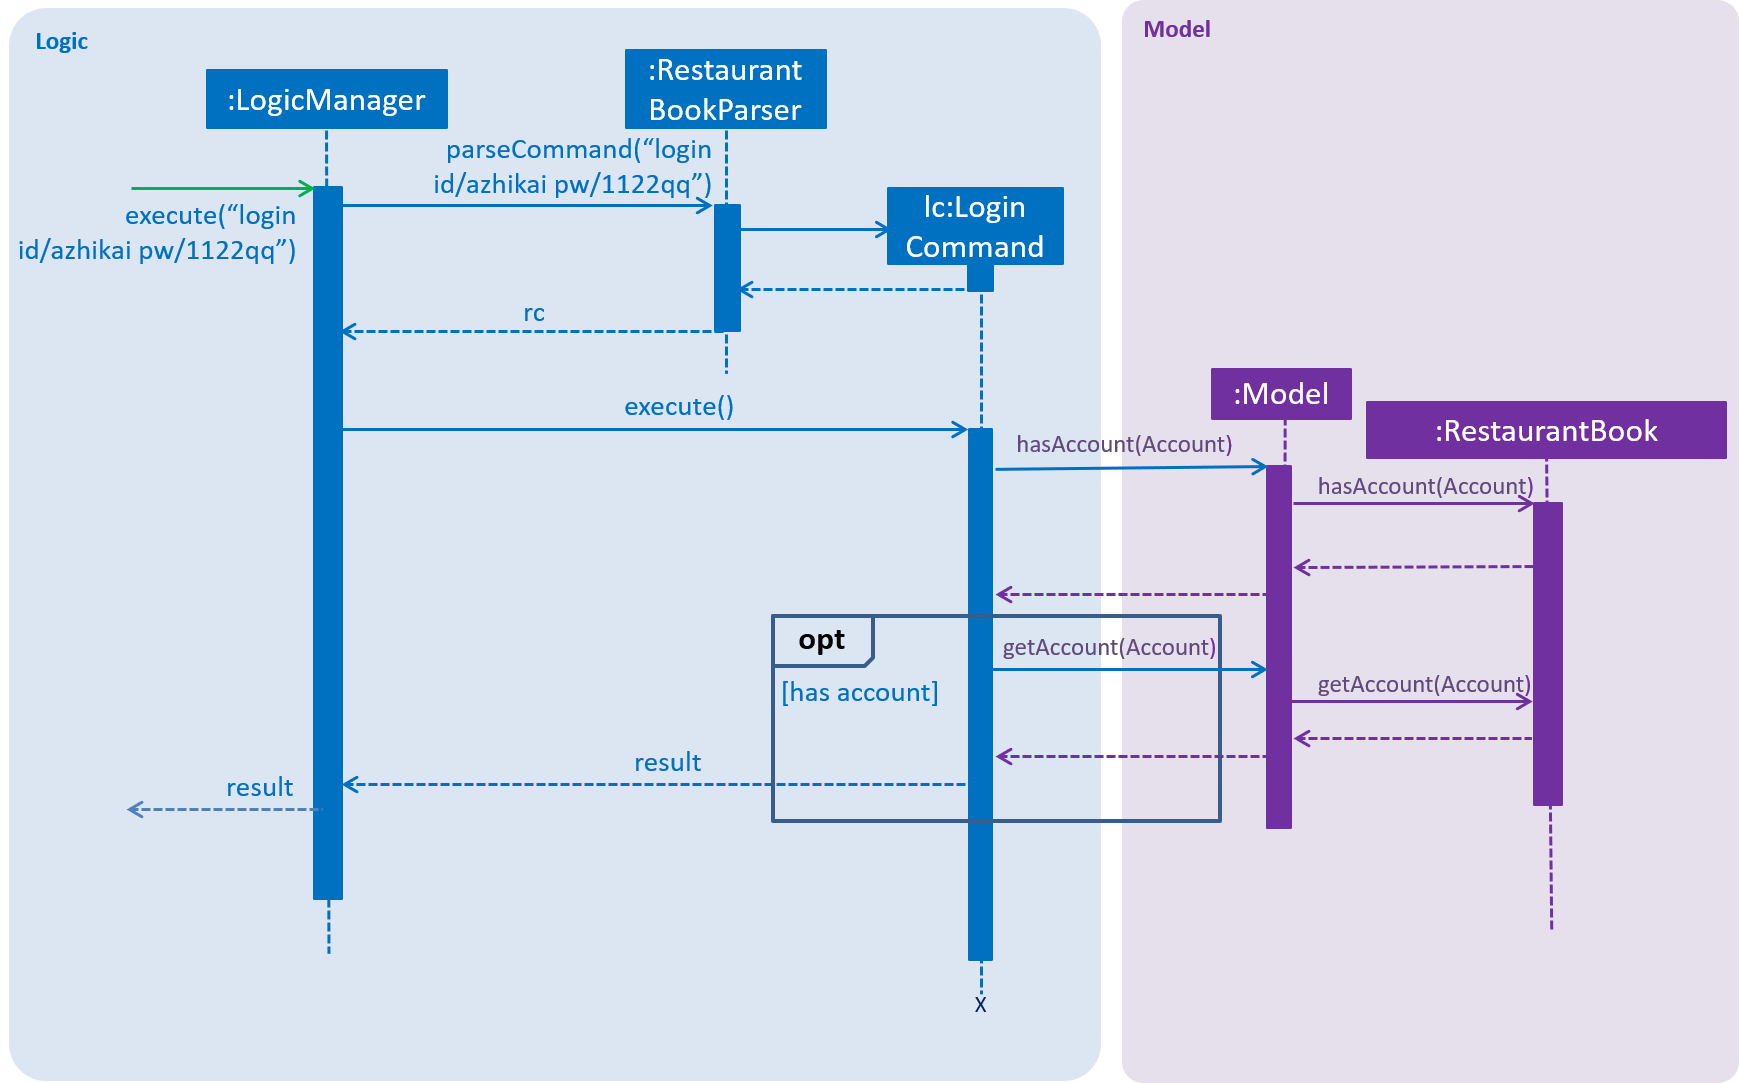
Figure 4.2.1.2: Sequence diagram to illustrate component interactions for the login command
| We assume the user will enter the correct password. Otherwise, warning message will be shown to the user to re-enter the credential |
Step 1. The user executes login id/azhikai pw/1122qq command to login to an existing user account.
Step 2. LogicManager invokes the RestaurantBookParser#parseCommand() method which takes in the user input
as arguments.
Step 3. When the command is parsed, the Command#LoginCommand() will be created which is returned to the
LogicManager.
Step 4. LogicManager invokes the execute() method of the Command#LoginCommand(), lc which is instantiated in
Step 3. The Model component will be involved as the Command#LoginCommand() invokes a request to retrieve an account
based on the username. If it exists, the account will be retrieved and the password hash will be compared. If it
matches, then the credential is valid and the user is authenticated.
The following activity diagrams summarize how password is processed during the login and registration process:
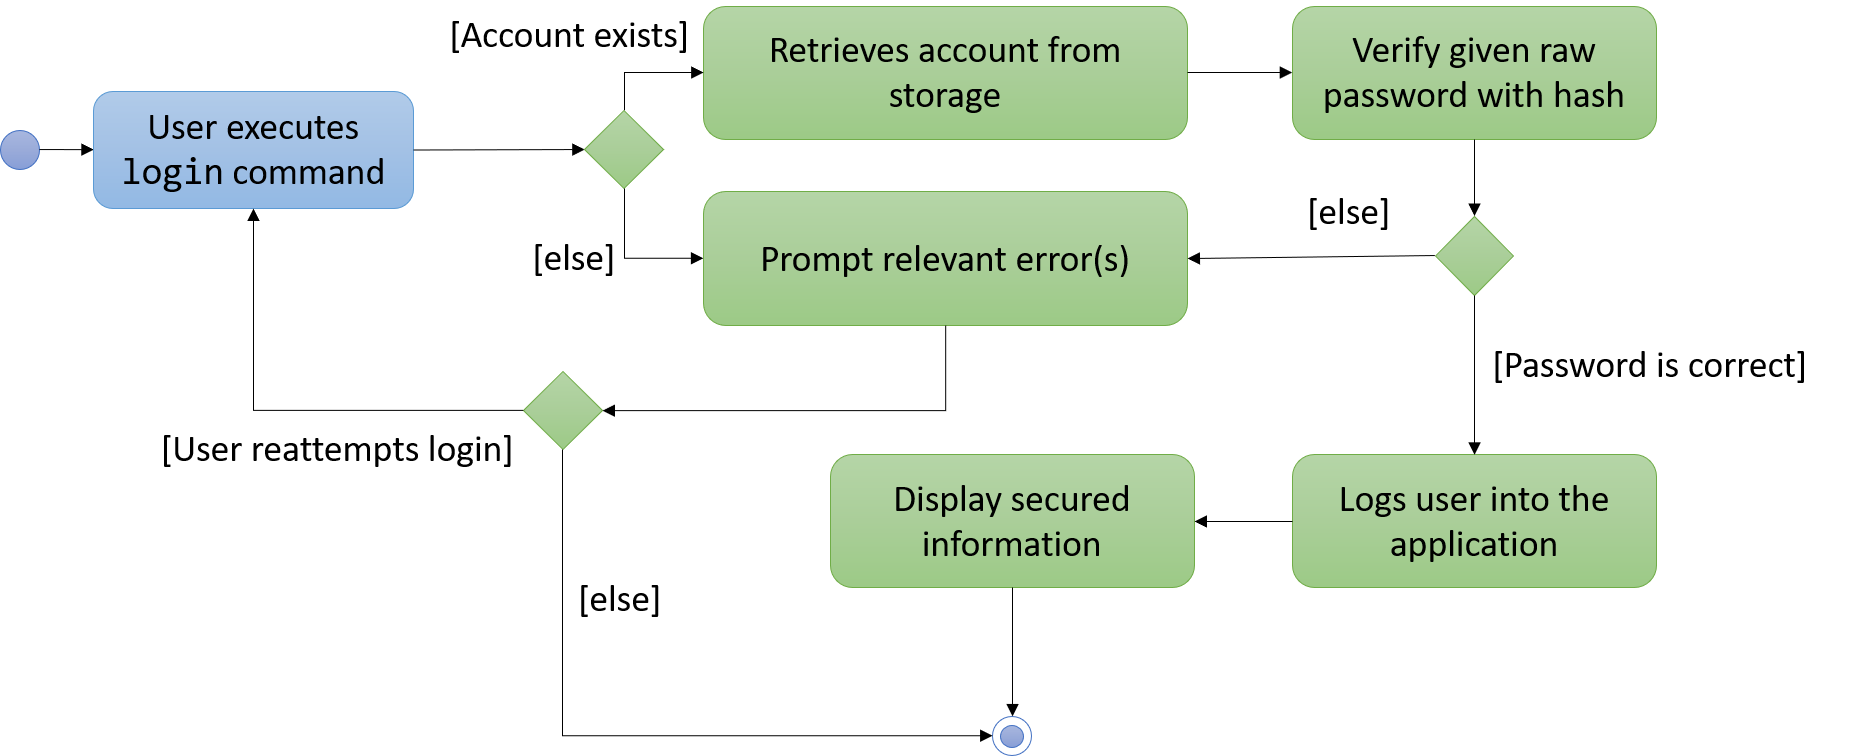
Figure 4.2.1.3: Activity diagram to illustrate how password is processed for the login command
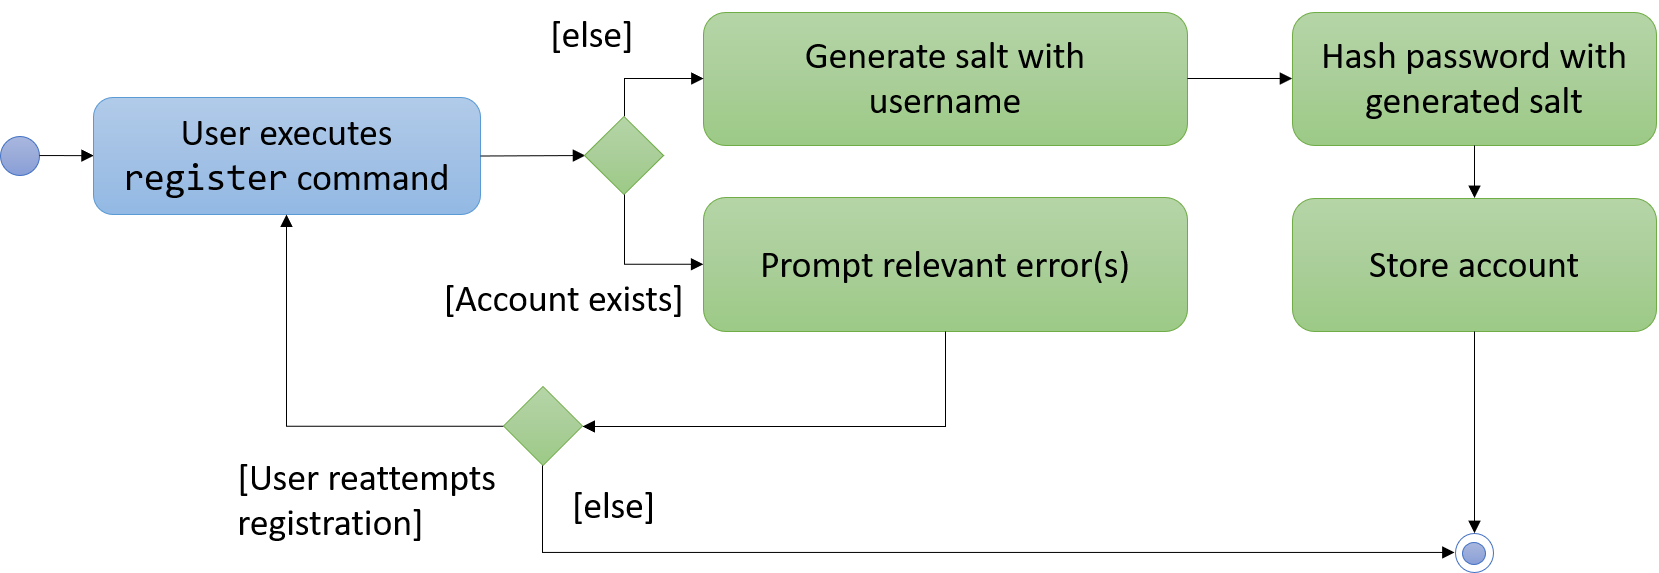
Figure 4.2.1.4: Activity diagram to illustrate how password is processed for the register command
4.2.2. Design Considerations
Aspect: How password is secured
-
Alternative 1 (current choice): Use username to generate cryptographic salt.
-
Rationale: If we allow the
bcryptlibrary to generate the salt, testing ability will be limited as the salt is generated based on system time by default. This means that despite testing the same account with the same raw password, its equality will never match. Hence, a workaround is to generate the salt based on its username which is unique to each account. -
Pros: Easy to implement and improves testing ability.
-
Cons: If an attacker knows how the salt is generated, it could pose a security risk.
-
-
Alternative 2: Use salt generated by the
bcryptlibrary with high cost factor.-
Pros: Higher cost factor makes hashing of the password harder. Ideally, the cost factor should as high as the system can tolerate, given the other tasks the system must otherwise fulfill.
-
Cons: More processing resources used and existing test cases must be updated.
-
4.3. User session feature
4.3.1. Current Implementation
|
If a privileged command is executed when a session is not set, an error will be shown. For more information on which commands are guest-executable, see the UserGuide.adoc for more information |
The application’s user session state is facilitated by UserSession. This is triggered by raising a Login or
Logout event upon executing the Command#LoginCommand() or Command#LogoutCommand() respectively.
Additionally, it implements the following static operations:
-
UserSession#create(Account)— Set a user session. -
UserSession#destroy()— Removes the existing user session. -
UserSession#update(Account)— Updates the existing user session. -
UserSession#isAuthenticated()— Checks if there is an existing login session.
The following activity diagram summarizes how the user session is modified when a user logs in or out:
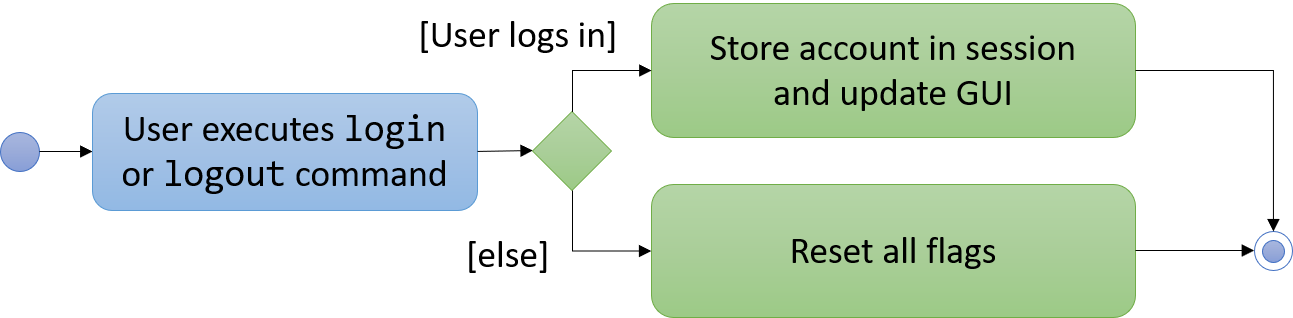
Figure 4.3.1.1: Activity diagram to illustrate the user session
The following code snippet demonstrates how these static methods are implemented:
/**
 * Stores this {@link Account} info as part of this session.
 *
 * @param account logged in for this session.
 */
public static void create(Account acc) {
    if (!isAuthenticated) {
        isAuthenticated = true;
        account = acc;
    }
}

/**
 * Logs out of this account which releases this session.
 */
public static void destroy() {
        isAuthenticated = false;
        account = null;
}

/**
 * Updates the session with the new account info, such as updating of account password.
 *
 * @param acc that has been updated.
 */
public static void update(Account acc) {
    if (isAuthenticated) {
        account = acc;
    }
}
4.3.2. Design Considerations
Aspect: How user session is handled
-
Alternative 1 (current choice): Use static flags and methods.
-
Pros: Easy to implement, given the constraints.
-
Cons: Can only support one user at any time. If another user wants to login, the current logged in user must log out. In addition, since it is a global class object, test cases may be affected when testing both guest and privileged commands which requires user to be logged out and logged in respectively.
-
-
Alternative 2: Store a list of user sessions to allow multiple login.
-
Pros: More user can login and manage the systems concurrently. Potentially able to resolve the global dependency of the current solution which might affect the test ability.
-
Cons: More memory usage to track each user session as the application scales with more users.
-
4.4. Auto-ingredient update feature
The auto-ingredient update mechanism is facilitated by RecordSalesCommand and triggers whenever the "record-sales"
command is invoked. A SalesRecord will be instantiated based on the information given and attempts to compute
the ingredients used before deducting them from the ingredient list automatically.
4.4.1. Current Implementation
A SalesRecord is associated with 6 attributes - Date, ItemName, QuantitySold, Price, Revenue and
IngredientUsed.
The success of the auto-ingredient update mechanism is subjected to the following conditions:
1) ItemName exists in the Menu.
2) The required ingredients to make one unit of ItemName is specified in the Menu.
3) The required ingredients exist in the Ingredient list.
4) There are sufficient ingredients to make QuantitySold units of ItemName in the Ingredient list.
| If any of the above conditions are not satisfied, sales volume will be recorded without updating the ingredient list |
If conditions 1 and 2 are satisfied, RecordSalesCommand will compute all the ingredients used and store the data in
IngredientUsed attribute of SalesRecord
|
This mechanism is aided by methods from the Menu and Ingredient components, all of which are exposed in the
Model interface. Given below is an example scenario and how the auto-ingredient update mechanism behaves at each step.
Step 1. The user executes record-sales d/11-01-2018 n/Fried Rice q/35 p/5.50 command to record the sales volume of
Fried Rice on 11-01-2018. A SalesRecord would be instantiated based on the command arguments given.
Step 2. RecordSalesCommand will request for the item Fried Rice from Menu. This is done through the Item
findItem (Name) method given in Menu component. This also checks if condition 1 is satisfied.
Step 3. RecordSalesCommand then proceeds to request for the required ingredients to make a unit of Fried Rice
from Menu. This is done through the Map<IngredientName, Integer> getRequiredIngredients(Item) method given
in Menu. This also checks if condition 2 is satisfied.
Step 4. With the required ingredients per unit data now at hand, RecordSalesCommand will compute the total
ingredients used in making 35 units of Fried Rice. The IngredientUsed attribute in SalesRecord will then be updated.
Step 5. RecordSalesCommand will then pass the computed IngredientUsed to Ingredient component to request for
an update of ingredients. This is done through the void consumeIngredients(Map<IngredientName, Integer>) method
given in Ingredient component. This checks for condition 3 & 4.
Step 6. The SalesRecord is then finally added into UniqueRecordList via the void addRecord(SalesRecord)
method given in Sales component of Model.
An exception will be thrown in step 2, 3 or 5 should the conditions be violated. In such scenario,
RecordSalesCommand will jump to step 6 instantly and omit the remaining steps
|
The following activity diagram (Figure 4.4.1.1) summarizes what happens when a user executes record-sales command:
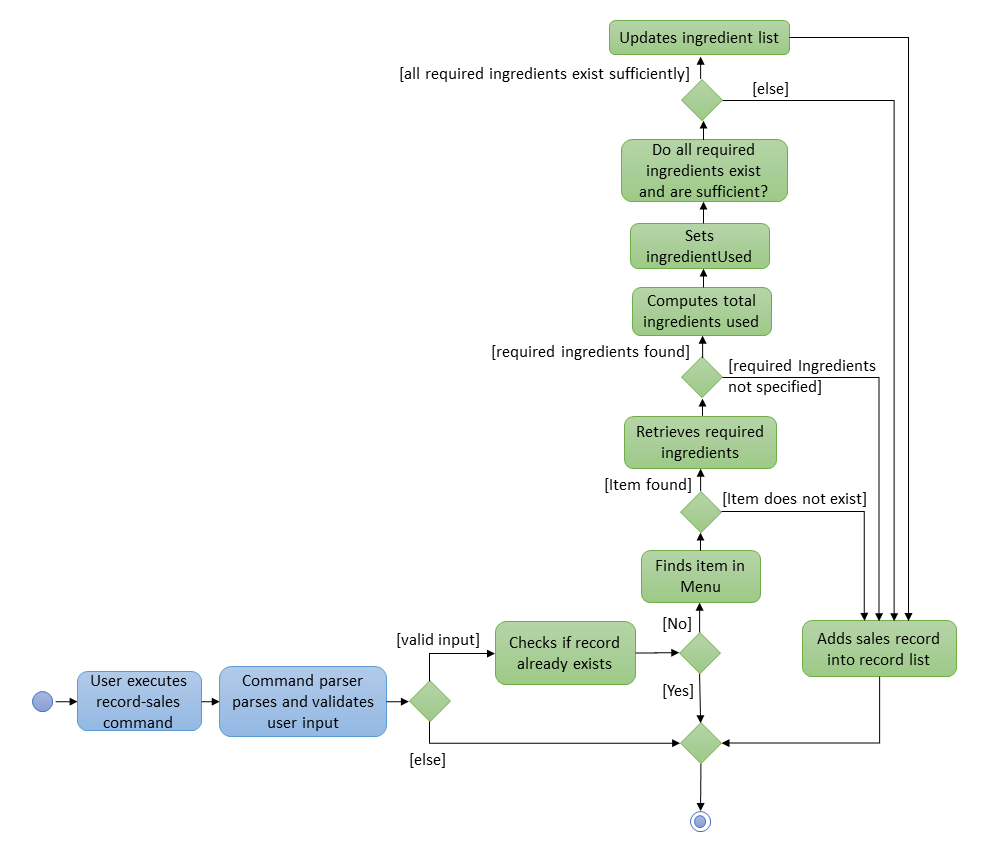
Figure 4.4.1.1: Activity Diagram for record-sales command
4.4.2. Design Considerations
Aspect: Should the auto-ingredient update mechanism be incorporated when deleting sales record?
-
Alternative 1 (current choice):
DeleteSalesCommanddoes not update the ingredient list. That is, it does not "return" the ingredients which may have been deducted duringrecord-sales.-
Pros: Remove the possibility of unwanted updates to the ingredient list. This is apparent when deleting an obsolete record. We do not want the ingredients to "magically appear" in the ingredient list.
-
Cons: If user accidentally recorded sales by mistake and triggered the update mechanism, deleting sales will not help him/her recover the deducted ingredients. Instead, user will have to rely on the
Undocommand.
-
-
Alternative 2:
DeleteSalesCommand"returns" any deducted ingredients to the ingredient list.-
Pros: Resolves the issue stated in "Alternative 1 - Cons".
-
Cons: Brings about the issue stated in "Alternative 1 - Pros".
-
Aspect: Should the auto-ingredient update mechanism be incorporated when editing sales record?
-
Alternative 1 (current choice):
EditSalesCommanddoes not update the ingredient list. That is, it does not "return" the ingredients which may have been deducted duringrecord-salesand does not attempt to re-compute or re-deduct the ingredient used. Since theIngredientUsedattribute of theSalesRecordis now outdated, it will be removed permanently.-
Pros: Easy to implement. Avoids the implementation complexity as stated in "Alternative 2 - Cons".
-
Cons: If user accidentally made an error when recording sales in the past, editing sales will not help him/her alter the ingredients deducted. What was deducted previously will stay as it is. Also, the
IngredientUsedattribute will no longer be available.
-
-
Alternative 2:
EditSalesCommand"returns" the ingredients which may have been deducted, re-computes theIngredientUsedattribute and re-deduct the ingredients from the ingredient list. TheIngredientUsedattribute of theSalesRecordwill be updated.-
Pros: Resolves the issue stated in "Alternative 1 - Cons".
-
Cons: Must take time into consideration when re-computing the
IngredientUsedsincerequired ingredients per unitof an item may change over time.-
Option 1: Use
required ingredients per unitdata available during record-sales in the past.
Analysis: We would need a repository to save different versions ofMenuin the past. The entireMenumust be saved whenever a sales record is added. This is so that if user were to edit theItemNameattribute of that particular sales record in the future, we would be able to retrieve the item’srequired ingredients per unitdata (which might not even have been specified) at the time ofrecord-sales.
Verdict: This option would take up a massive amount of memory space in the long run. -
Option 2: Use
required
ingredients per unit
data available during edit-sales at the present.
Analysis: Let us assume that a glass of orange juice takes 1 orange to make at the time of record-sales (past), and 3 oranges to make at the time of edit-sales (present). If the user edits theQuantitySoldattribute from 1 (past) to 10 (present), it would be illogical for (3*10-1*1 = 29) oranges to be deducted from the ingredient list since it only took (1*10 = 10) oranges.
Verdict: This option is irrational.
-
-
4.5. Display sales report feature
4.5.1. Current Implementation
The display sales report mechanism is facilitated by the Model, UI and Event components of the App. A SalesReport
class encapsulates the attributes of a sales report to be displayed.
The sales report is internally generated by generateSalesReport(Date) in UniqueRecordList. It then
propagates up the Model call hierarchy to getSalesReport(Date) in ModelManager, which is exposed in the Model
interface.
The following sequence diagram (Figure 4.5.1.1) illustrates how the display sales report operation works when the
user enters display-sales 25-12-2017:
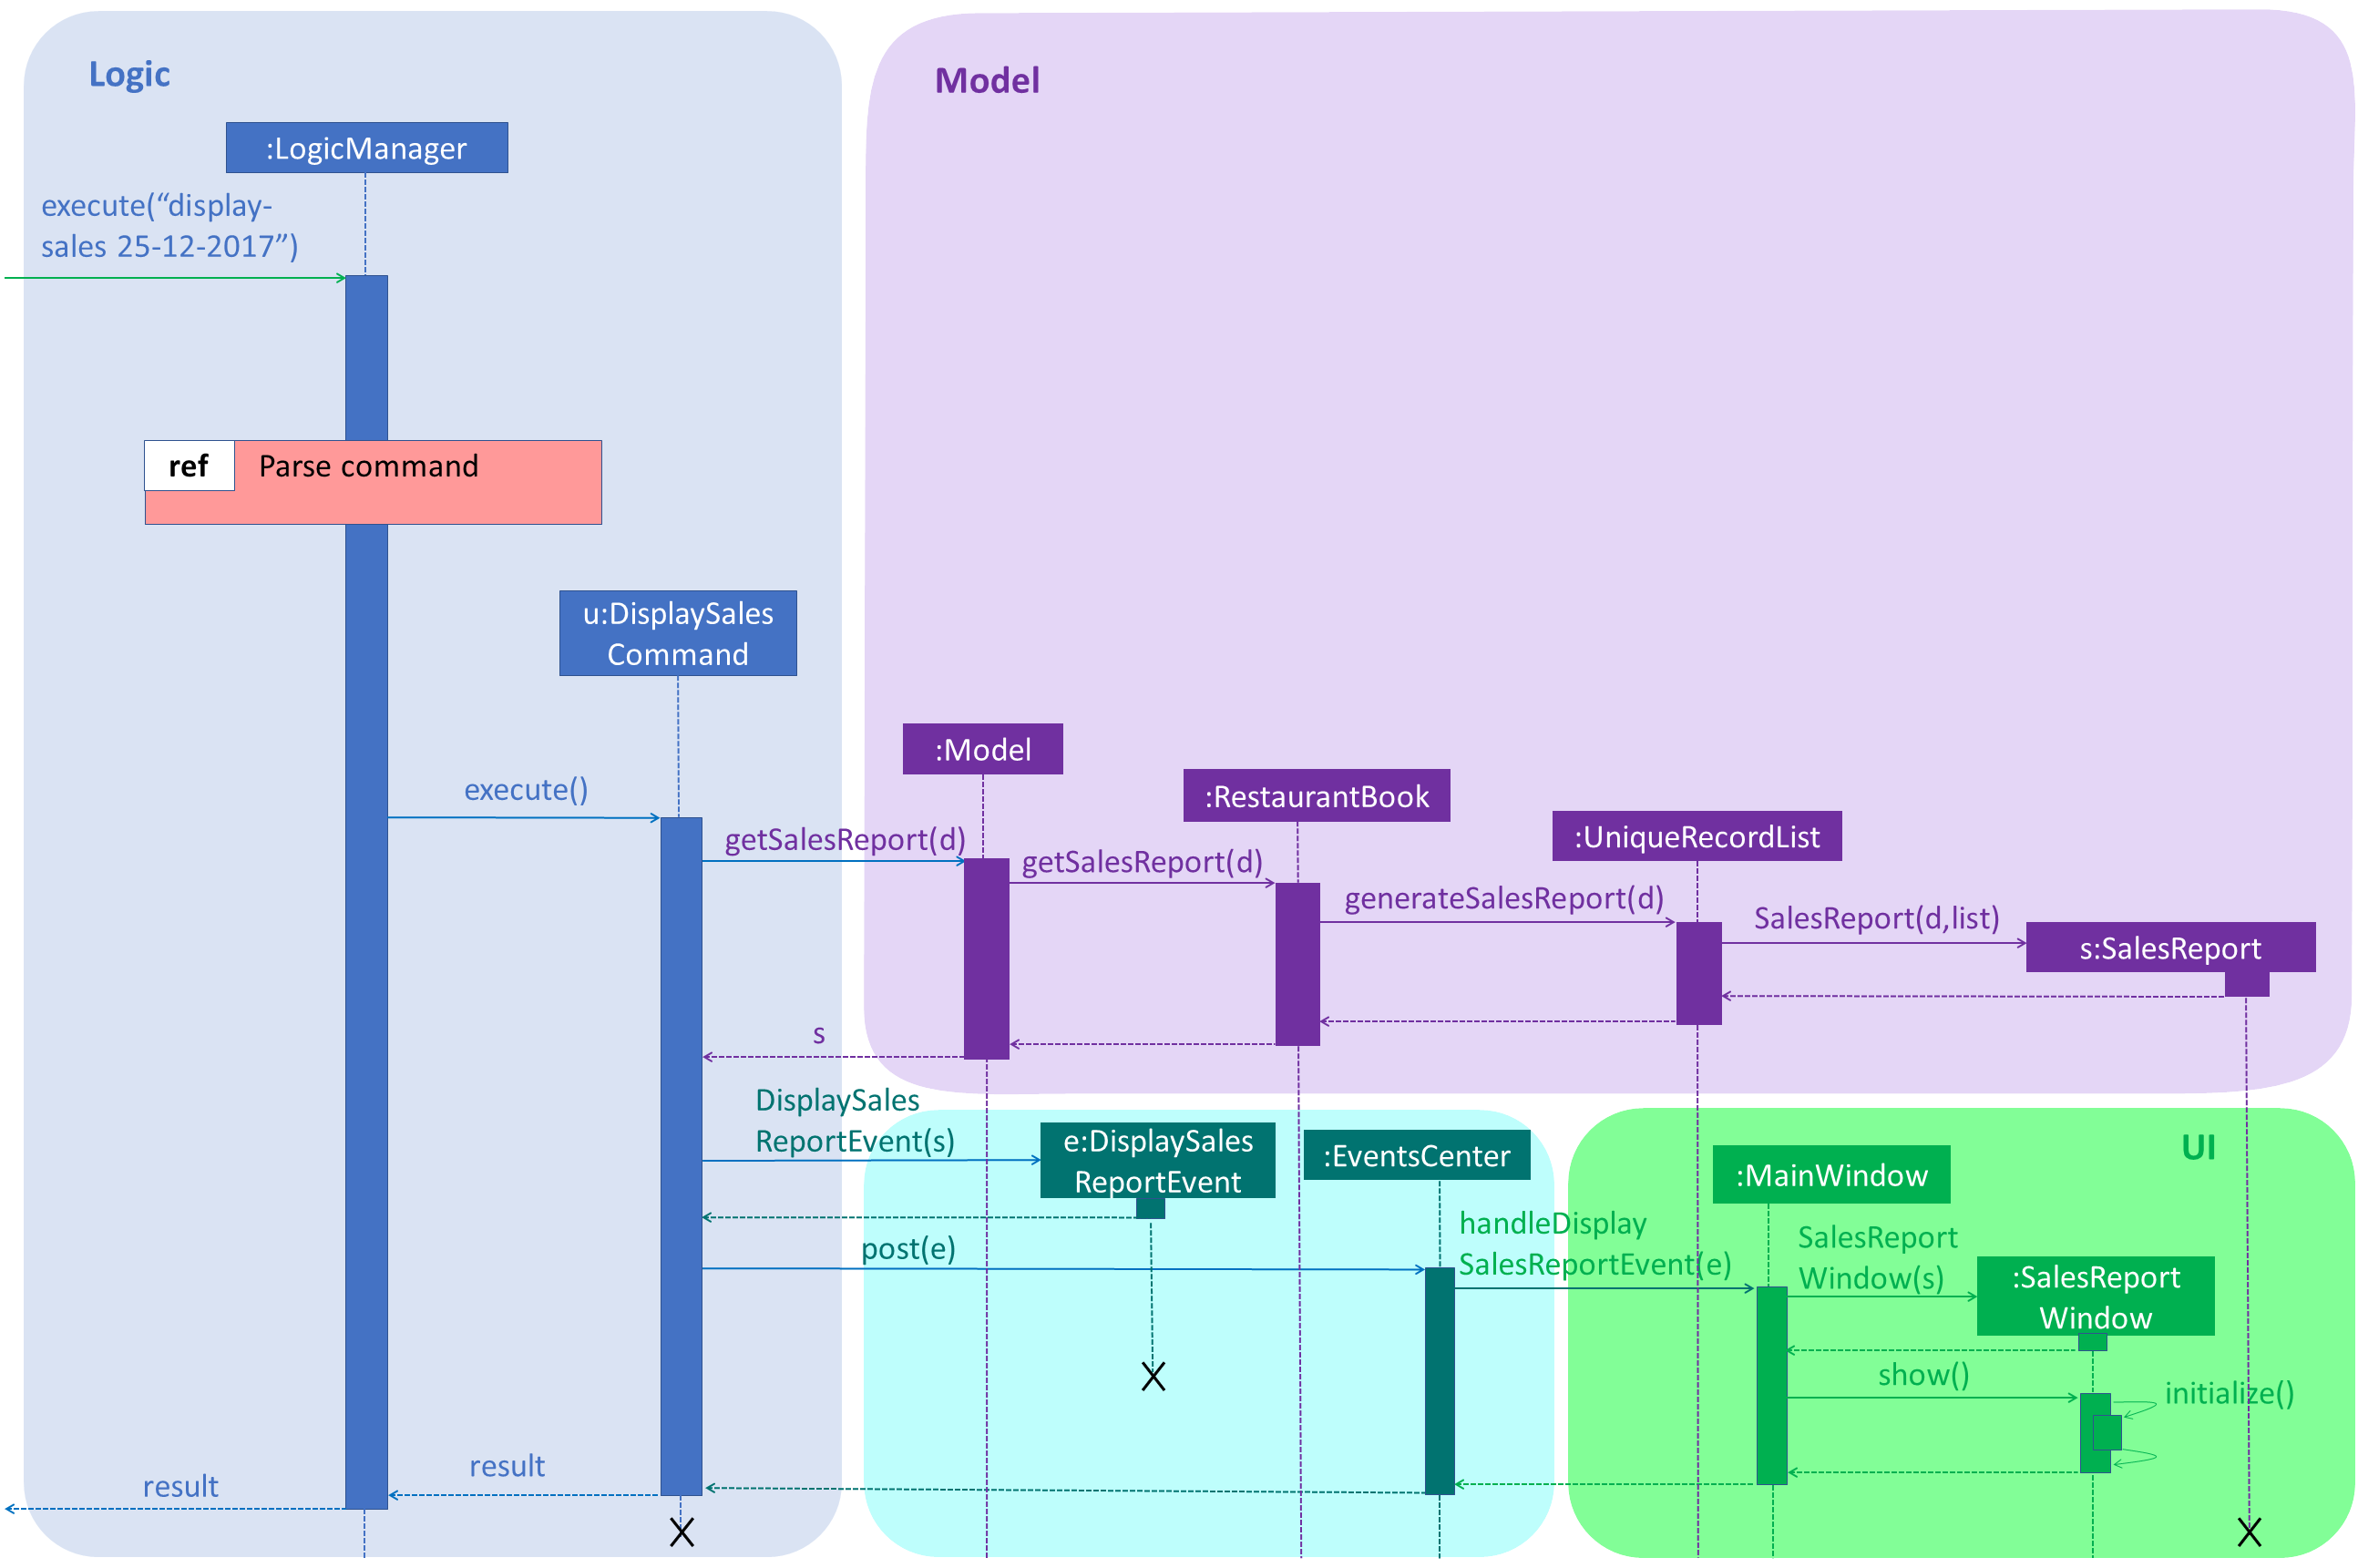
Figure 4.5.1.1: Sequence Diagram for display-sales command
The sequence diagram for the "Parse Command" reference frame above is shown below in Figure 4.5.1.2:
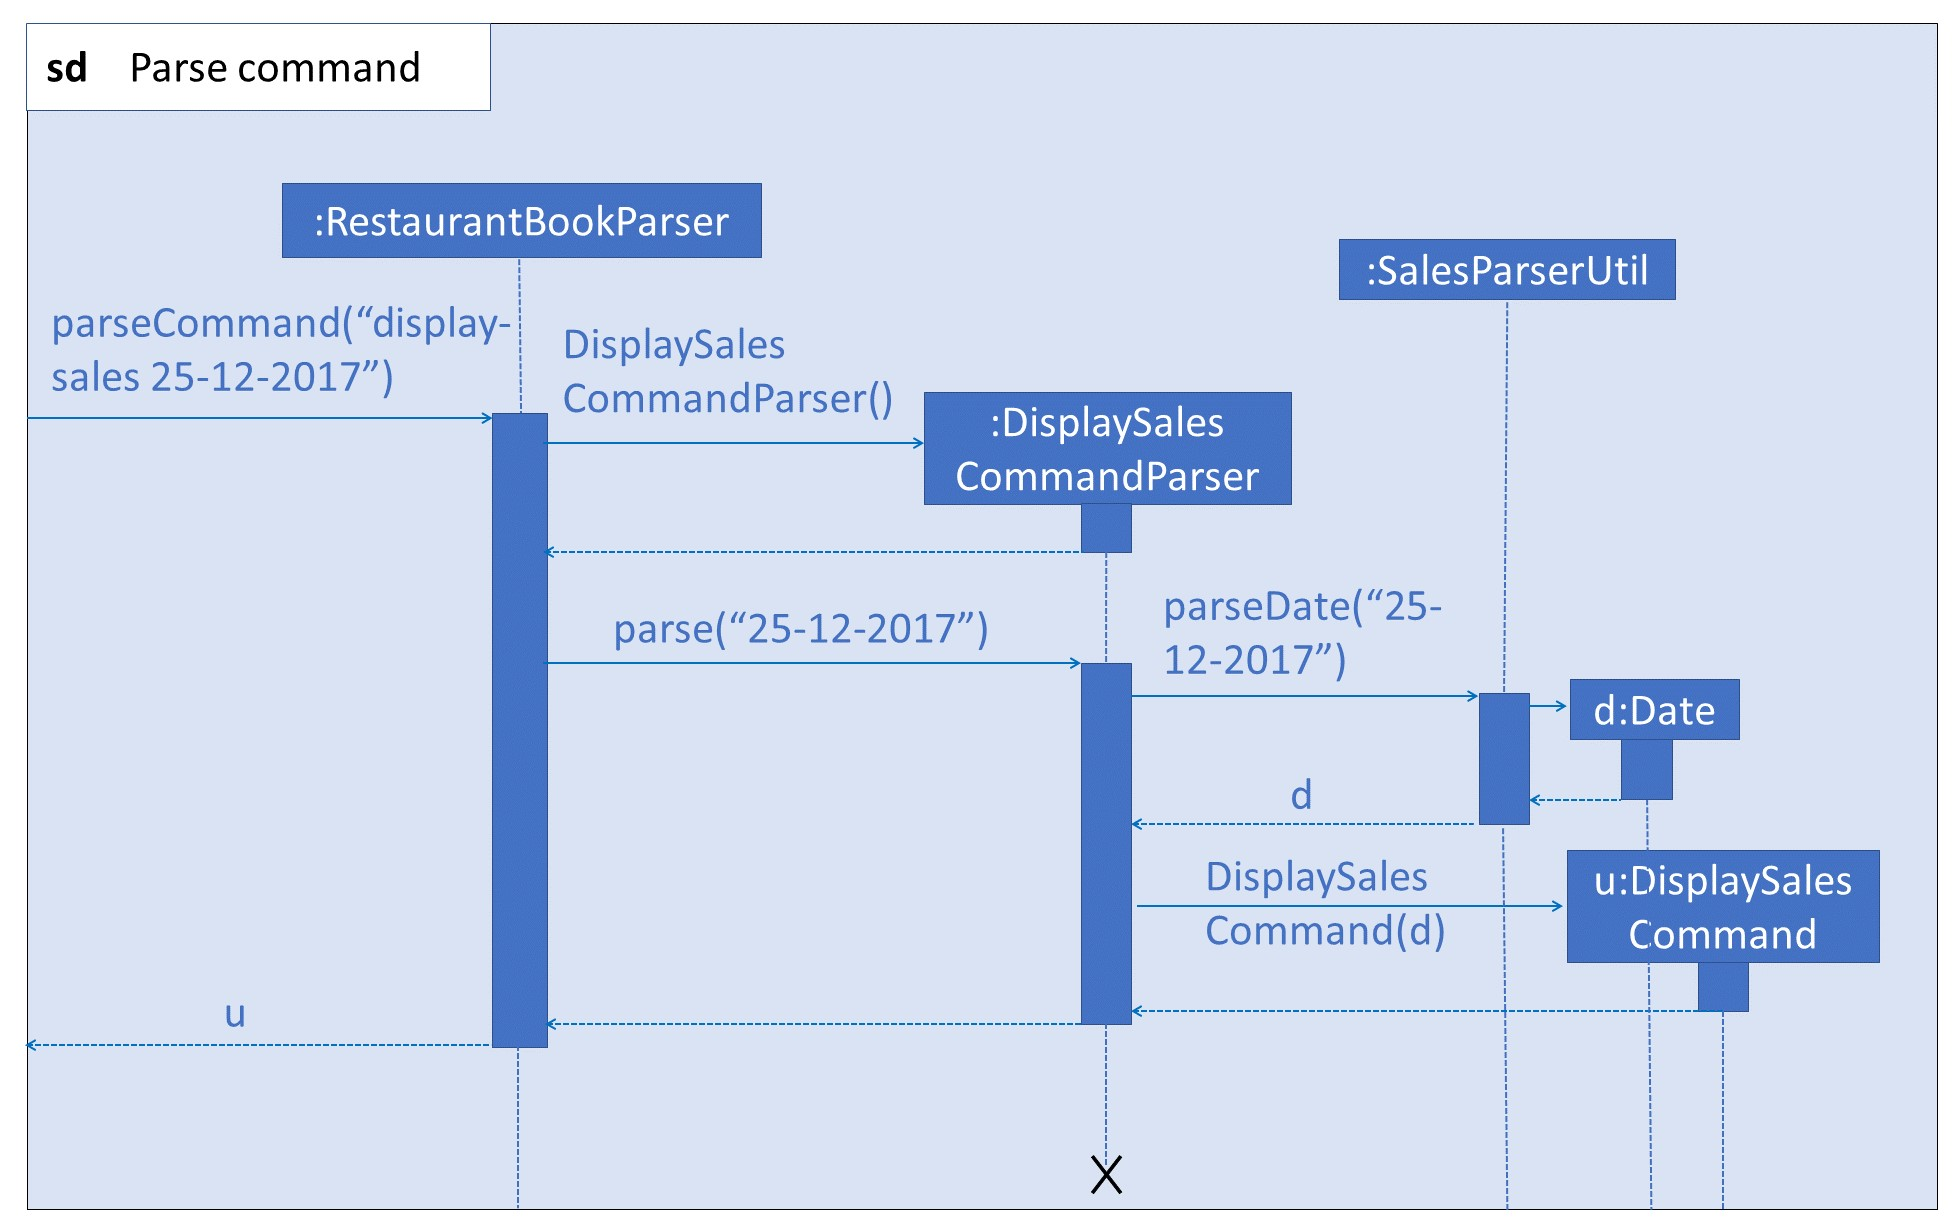
Figure 4.5.1.2: Sequence Diagram for "Parse Command" reference frame
Given below is an example usage scenario and how the display sales report operation behaves at each step.
Step 1. The user executes display-sales 25-12-2017 command to request for the sales report dated 25-12-2017. The
display-sales command calls Model#getSalesReport(Date), passing in the date "25-12-2017", and gets the generated
SalesReport in return.
display-sales command will not call Model#getSalesReport(Date) if the specified date is invalid
|
If no sales record associated with the given Date is found, an empty SalesReport will be
returned. In such cases, the command will terminate with a message notifying the user about the absence of such record
|
Step 2. The display-sales command then raises the DisplaySalesReportEvent event, which also encapsulates the
generated SalesReport in step 1.
Step 3. The EventsCenter reacts to the above event, which results in handleDisplaySalesReportEvent(Event)
in UI’s MainWindow being called. This method instantiates a SalesReportWindow object by passing in the
SalesReport to its constructor. This SalesReportWindow acts as the controller for the sales report window.
Step 4. The SalesReportWindow is then initialized and displayed on user’s screen.
4.5.2. Design Considerations
Aspect: How SalesReport is generated internally
-
Alternative 1 (current choice):
generateSalesReport(Date)inUniqueRecordListfilters the entire record list. Records that match the givenDateare added into aList<SalesRecord>. TheSalesReportis generated based on this list.-
Pros: Easy to implement.
-
Cons: Execution is of linear time complexity and would be considerably slow should the list size be very large.
-
-
Alternative 2: Maintain another list that sorts itself by date every time it is modified. Conduct a binary search to fill in the
List<SalesRecord>every time a sales report is requested.-
Pros:
SalesReportcan be generated with a O(logN) time complexity. -
Cons: Sorting after every input would require O(NlogN) time which is slow. Additionally, the sorted list also takes up an O(N) memory space.
-
4.6. Delete ingredient feature
This feature allows the user to delete an ingredient from the ingredient list, specified by its name or index.
4.6.1. Current Implementation
The delete ingredient mechanism is facilitated by DeleteIngredientCommand. It is implemented as an abstract class
with the following abstract methods:
-
DeleteIngredientCommand#execute()– Removes a specified ingredient from the list -
DeleteIngredientCommand#equals()– Checks if twoDeleteIngredientCommandinstances have the same attributes
DeleteIngredientByIndexCommand and DeleteIngredientByNameCommand extends DeleteIngredientCommand and implement
their own behaviour for these methods.
-
DeleteIngredientCommandByIndexCommand#execute()- Removes an ingredient specified by a valid index -
DeleteIngredientCommandByNameCommand#execute()- Removes an ingredient specified by a valid name
The following sequence diagrams illustrate how the delete operation works.
-
Diagram 1: When user enters
delete-ingredient 1
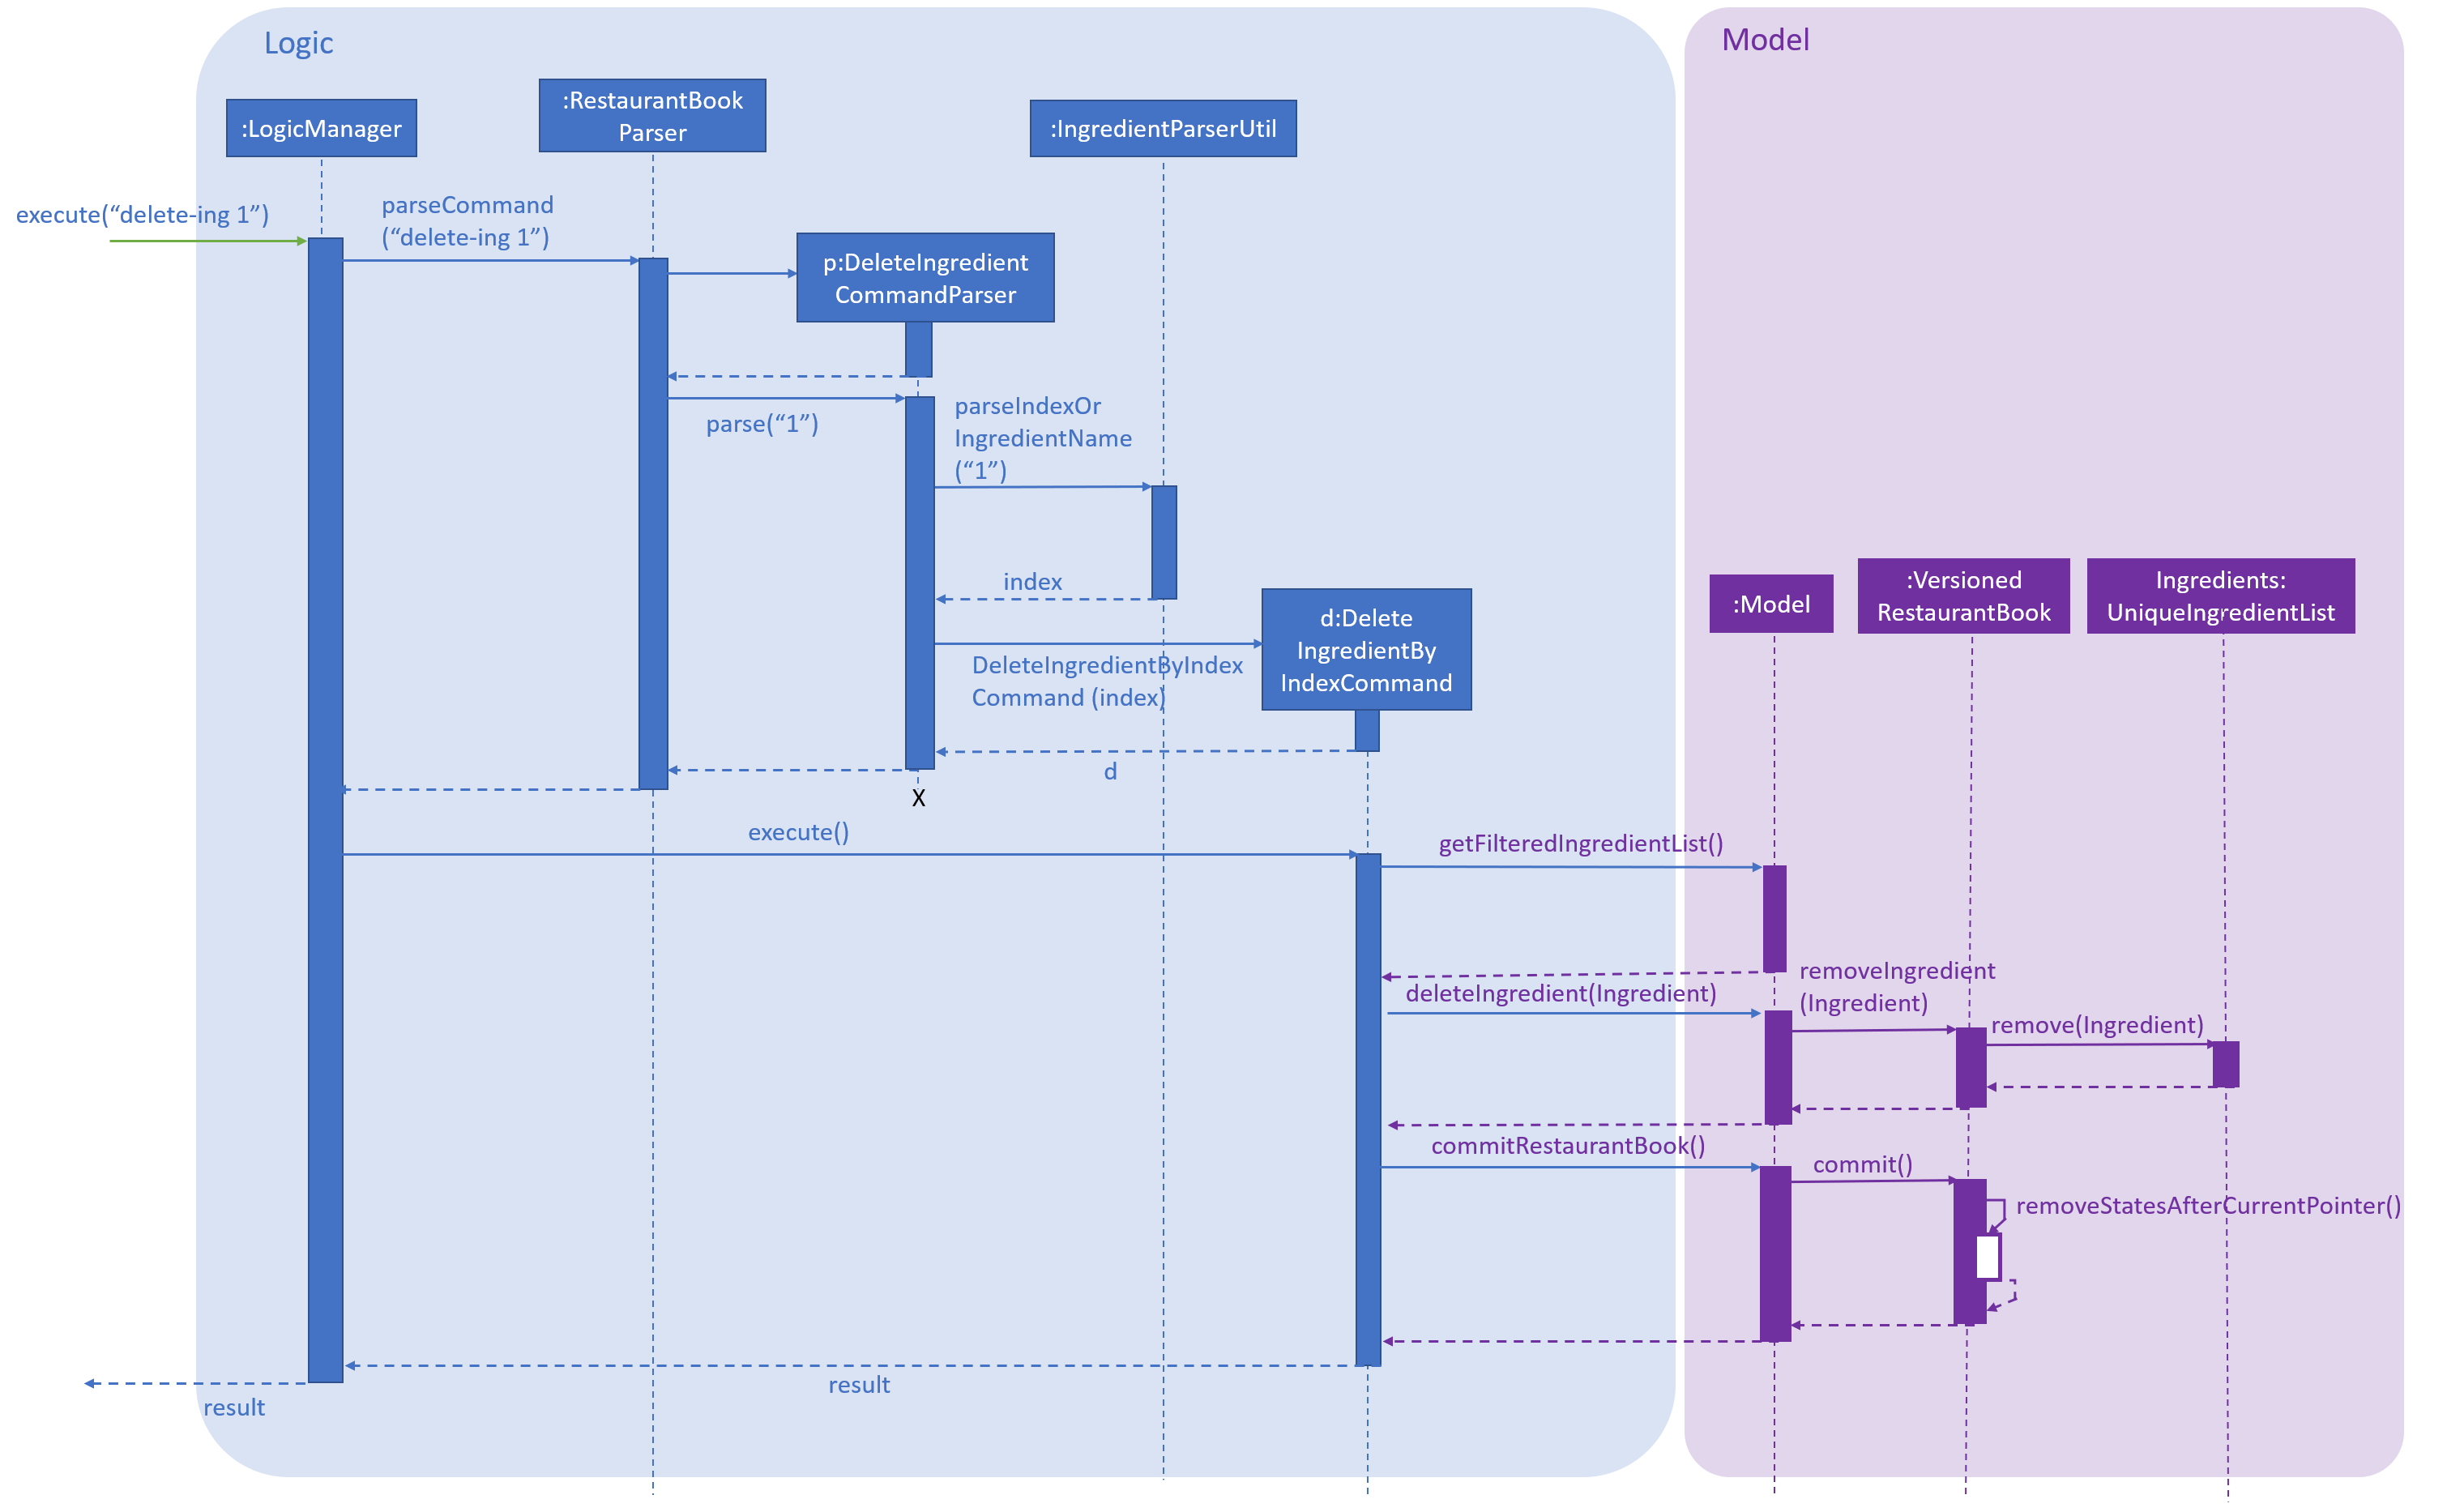
Figure 4.6.1.1: Component interactions for delete-ingredient 1 command
-
Diagram 2: When user enters
delete-ingredient apple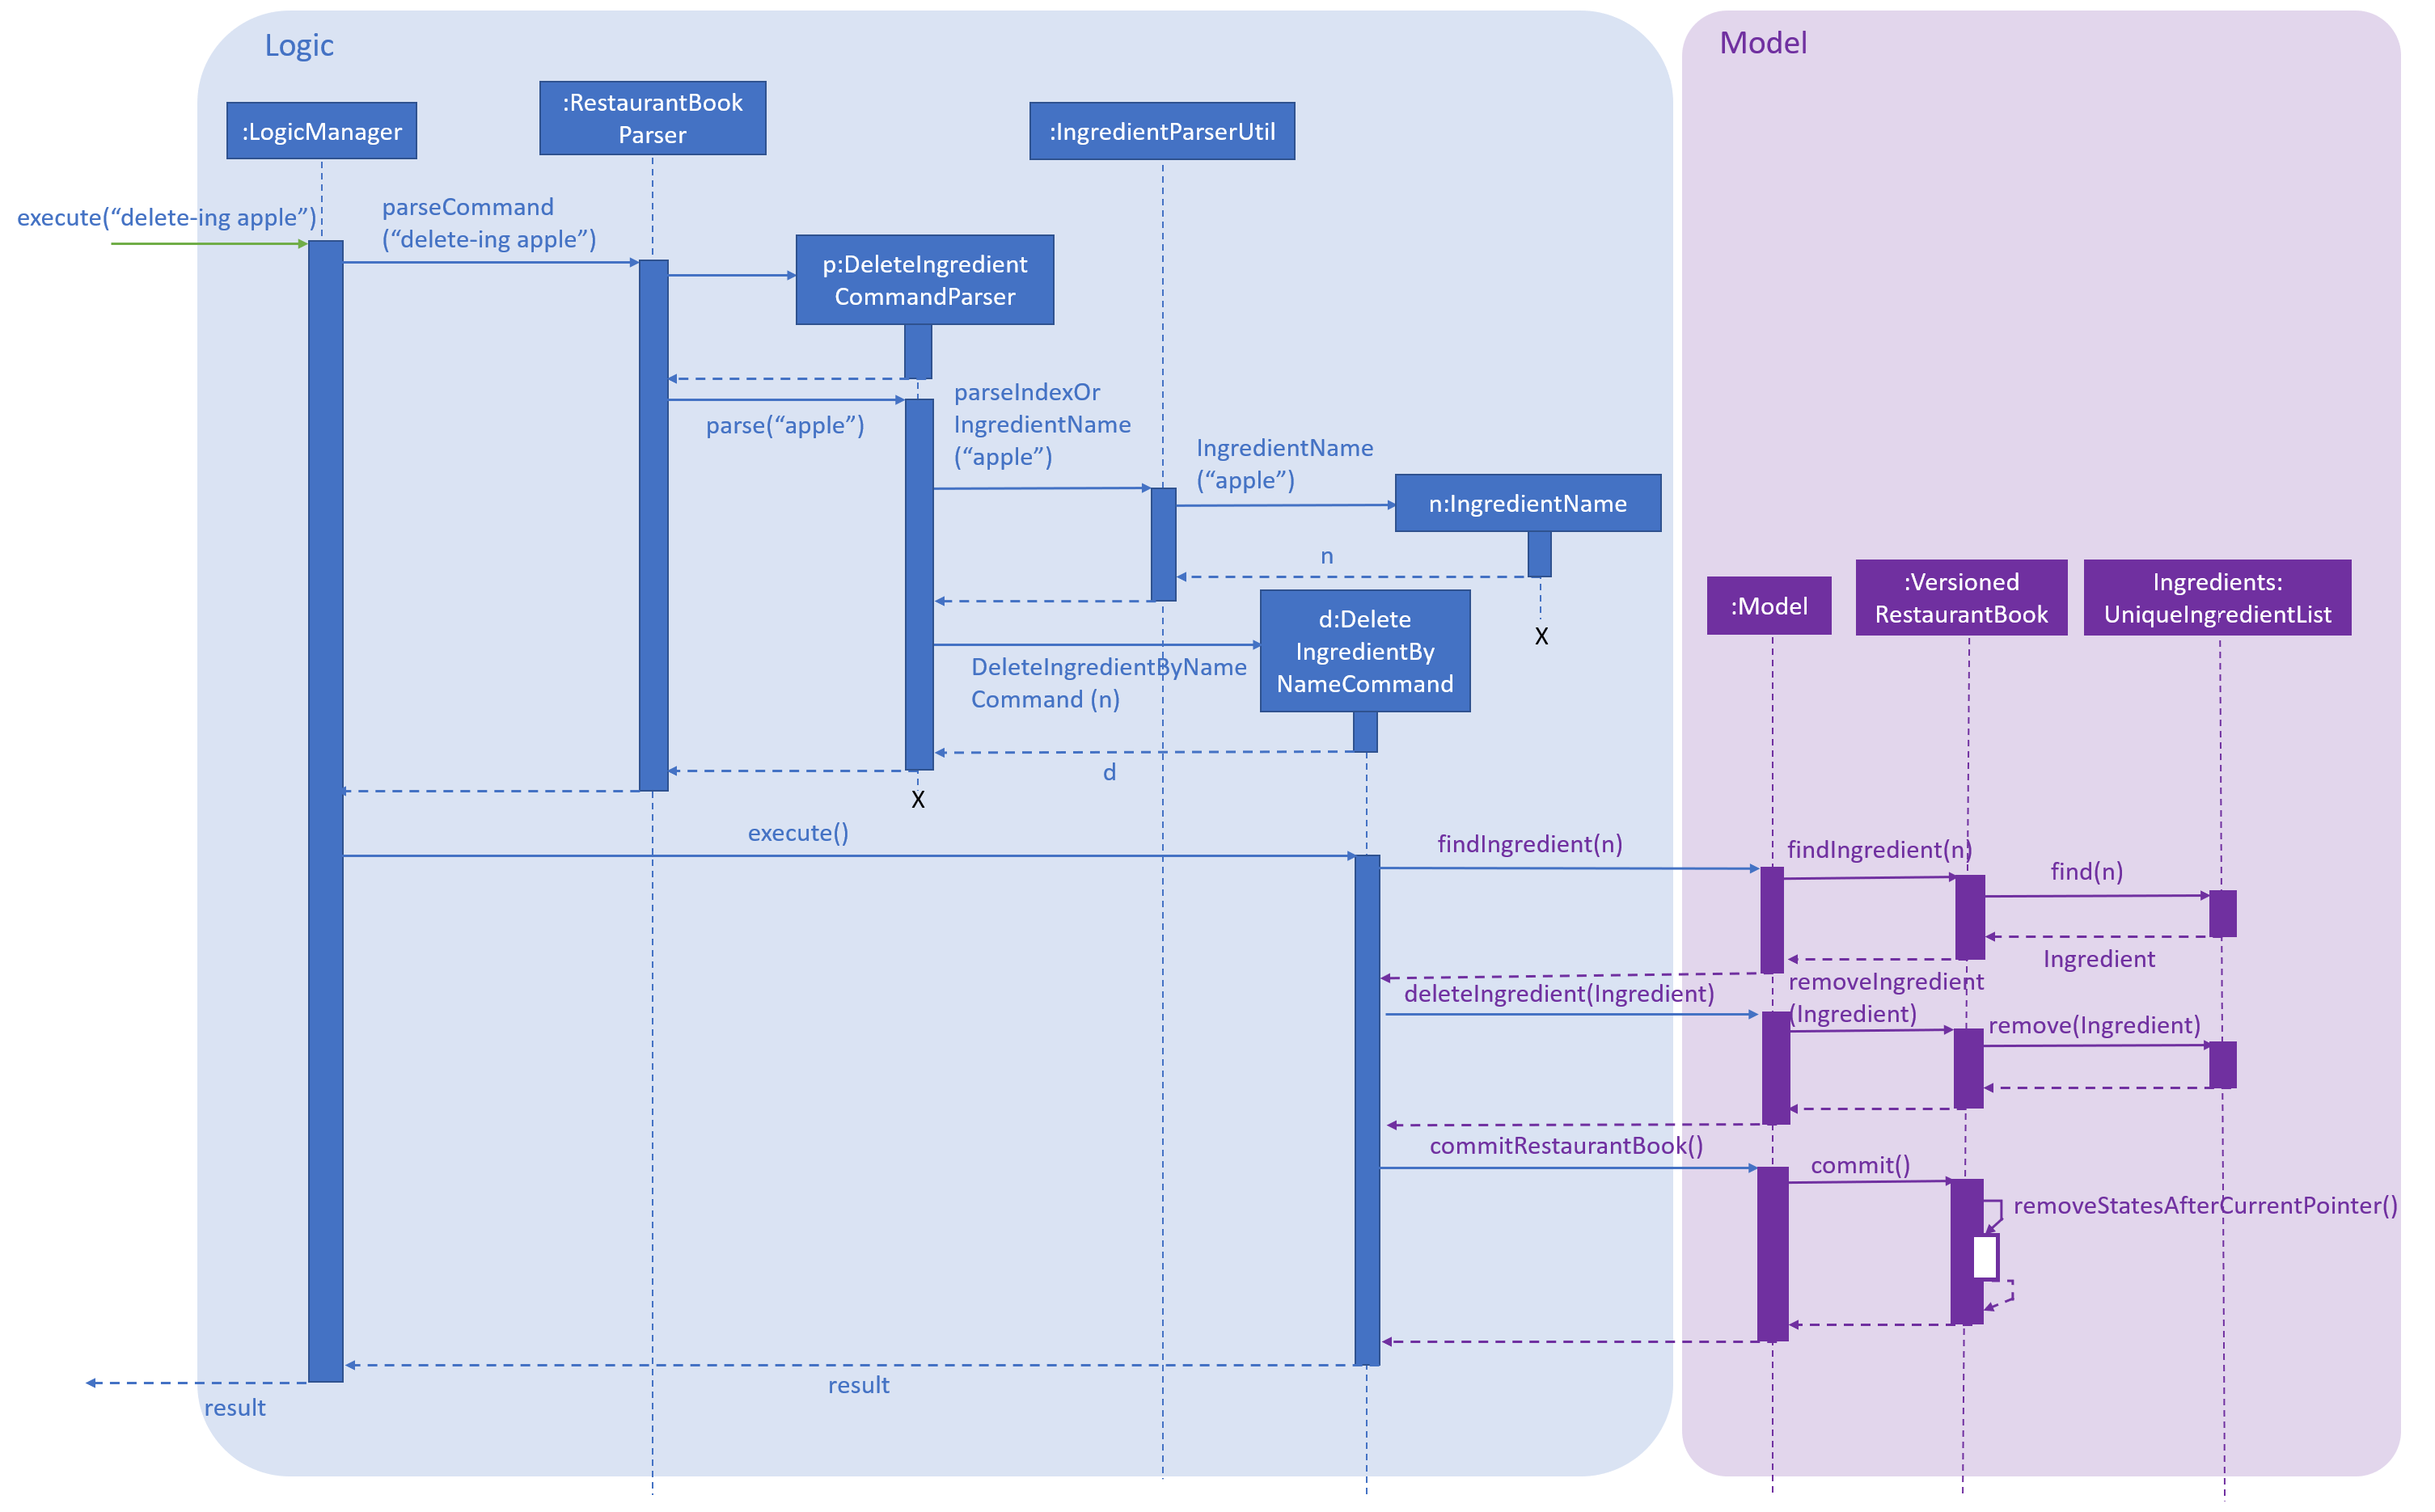
Figure 4.6.1.2: Component interactions for
delete-ingredient applecommand
4.6.2. Design Considerations
Aspect: Implementation of delete ingredient command
Two different implementations were considered.
-
Alternative 1 (current choice): Separate classes to handle deleting by index and deleting by name.
-
Pros: Allows different attributes and method implementation for each class.
-
Cons: Tight coupling between
DeleteIngredientCommandand the inheriting classes
-
-
Alternative 2: Single class to handle deleting by both index and name.
-
Pros: Less coupling since the methods related to the delete ingredient command are confined to a single class.
-
Cons: Two attributes are required, but only one has a value while the other has to be set to
null. This makes theequals()method difficult to implement.
-
4.7. Stock up ingredient feature
This feature allows the user to stock up one or more ingredients in the ingredient list.
4.7.1. Current Implementation
The Stock Up mechanism involves mainly the StockUpCommandParser, StockUpCommand and the Model
interface. The StockUpCommandParser parses the command input from the user, creating a HashMap mapping
IngredientName keys to NumUnits values. This HashMap represents the ingredients to be stocked up, and their
respective stock up amounts. With this HashMap, the StockUpCommandParser creates a StockUpCommand object. The
StockUpCommand executes the stock up operation, which is exposed in the Model interface as
Model#stockUpIngredients().
| The operation is atomic, thus if it fails for one ingredient, none of the ingredients will be stocked up and an exception is thrown |
The following activity diagram shows what happens when the user executes the stockup command:

Figure 4.7.1.1: Flow of events after a user executes the stockup command
4.7.2. Design Considerations
Aspect: Implementation of Stock Up command
Two different implementations were considered.
-
Alternative 1 (current choice): Create a stock up operation exposed in the
Model. A list of ingredients is passed as aHashMapargument to the model interface to perform the stock up on all ingredients.-
Pros: Maintains good abstraction. The sales feature can call upon the stock up operation of the interface without needing to know its implementation or creating any Ingredient objects.
-
Cons: Additional code has to be written and maintained, as opposed to using existing methods.
-
-
Alternative 2: Use the edit operation of the
Modelinterface exposed asModel#updateIngredient(). For each ingredient to be stocked up, a new ingredient with the updated number of units is created and then passed as an argument toupdateIngredient().-
Pros: Simple to implement, by using the existing
updateIngredient()method. -
Cons: Difficult to integrate different features while maintaining abstraction. The auto-update-ingredient feature would require the sales component to create each updated ingredient, before calling the
updateIngredient()method. This means poor abstraction and possibly a violation of the Law of Demeter.
-
4.8. Menu management feature
Menu management feature extends MeNUS with a menu and provides the users with the ability to add items to the
menu, edit items and remove items from the menu.
4.8.1. Current Implementation
The menu is stored internally as items, which is a UniqueItemList object that contains a list of Item objects.
The menu management feature implements the following operations:
-
add-itemcommand — Adds an item to the menu. The item must not already exist in the menu. -
edit-itemcommand — Replaces the target item with the editedItem. Target item must be in the menu and editedItem must not be the same as another existing item in the menu. -
delete-item-indexordelete-item-namecommand — Removes the equivalent item(s) from the menu. The item(s) must exist in the menu. -
list-itemscommand — Lists all the items in the menu. -
clear-menucommand — Removes all items from the menu. -
select-itemcommand — Selects an item in the menu and loads the page of the selected item. -
sort-menu— Sorts the menu by name or price. The user must specify the sorting method. -
find-itemcommand — Finds items whose names contain any of the given keywords. -
filter-menucommand — Finds items whose tags contain any of the given keywords. -
today-specialcommand — Finds items whose tags contain theDAY_OF_THE_WEEK. -
discount-itemcommand — Gives discount to the equivalent item(s) in the menu. The item(s) must exist in the menu. -
recipe-itemcommand — Adds a recipe to the equivalent item in the menu. The item must exist in the menu. -
add-required-ingredientscommand — Adds the required ingredients to the equivalent item in the menu. The item must exist in the menu.
Each Item object consists of Name, Price, Recipe, Set<Tag> and Map<IngredientName, Integer>
4.8.2. sort-menu Command
The sort-menu command is facilitated by SortMenuCommand and SortMenuCommandParser. The command takes in
user input for the sorting method.
| Currently only sort by name or price |
The SortMenuCommandParser will parse the user input and checks if the input is valid. If the input is valid, it
constructs an SortMenuCommand object.
If the input is not valid, it will throw a ParseException
|
The SortMenuCommand object will indirectly call the UniqueItemList#sortItemsByName() or
UniqueItemList#sortItemsByPrice() and the sorts the menu.
After sorting the menu, it will save the current state for undo/redo.
The following activity diagram summarizes what happens when a user executes sort-menu command:
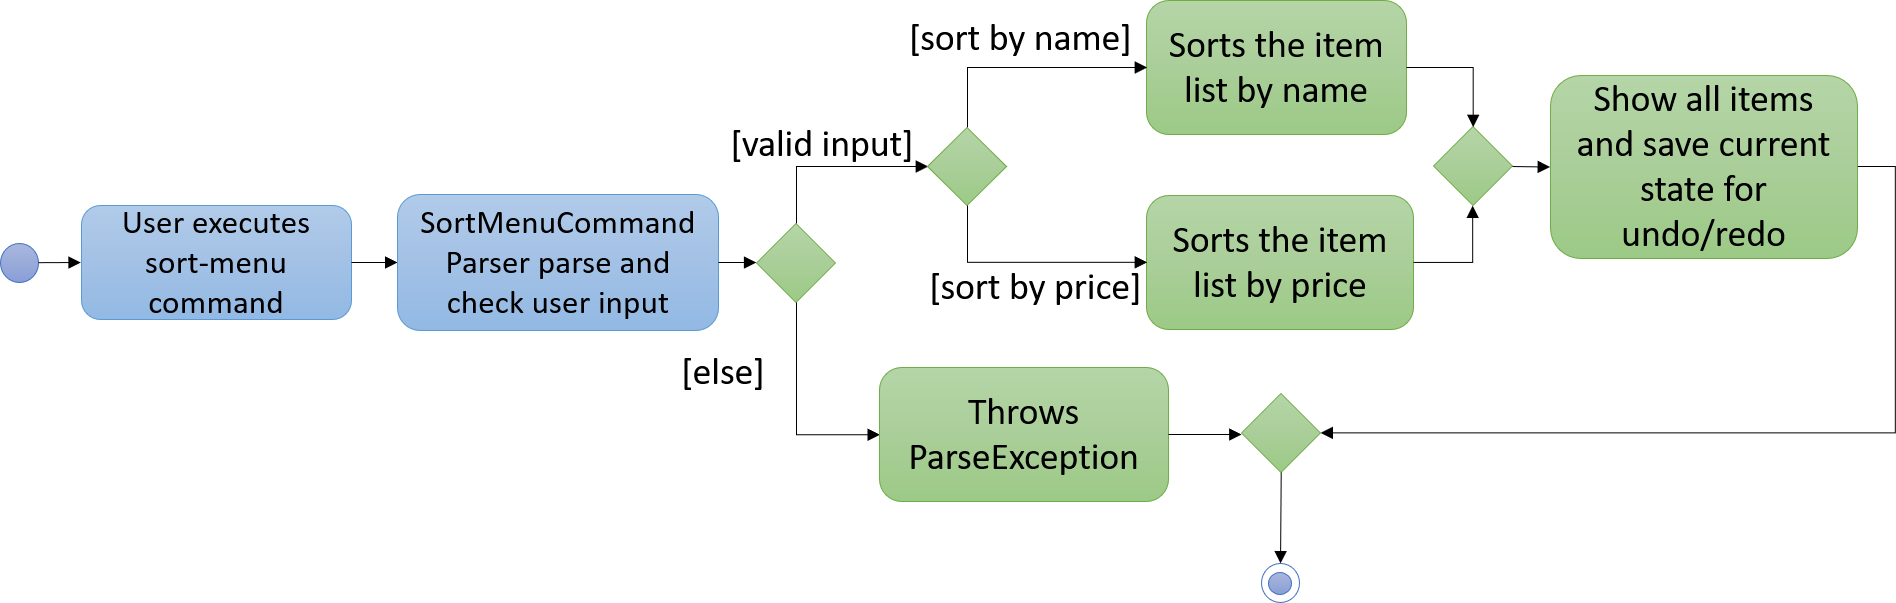
Figure 4.8.2.1: SortMenu Activity diagram
The following sequence diagram shows how the sort-menu command works:
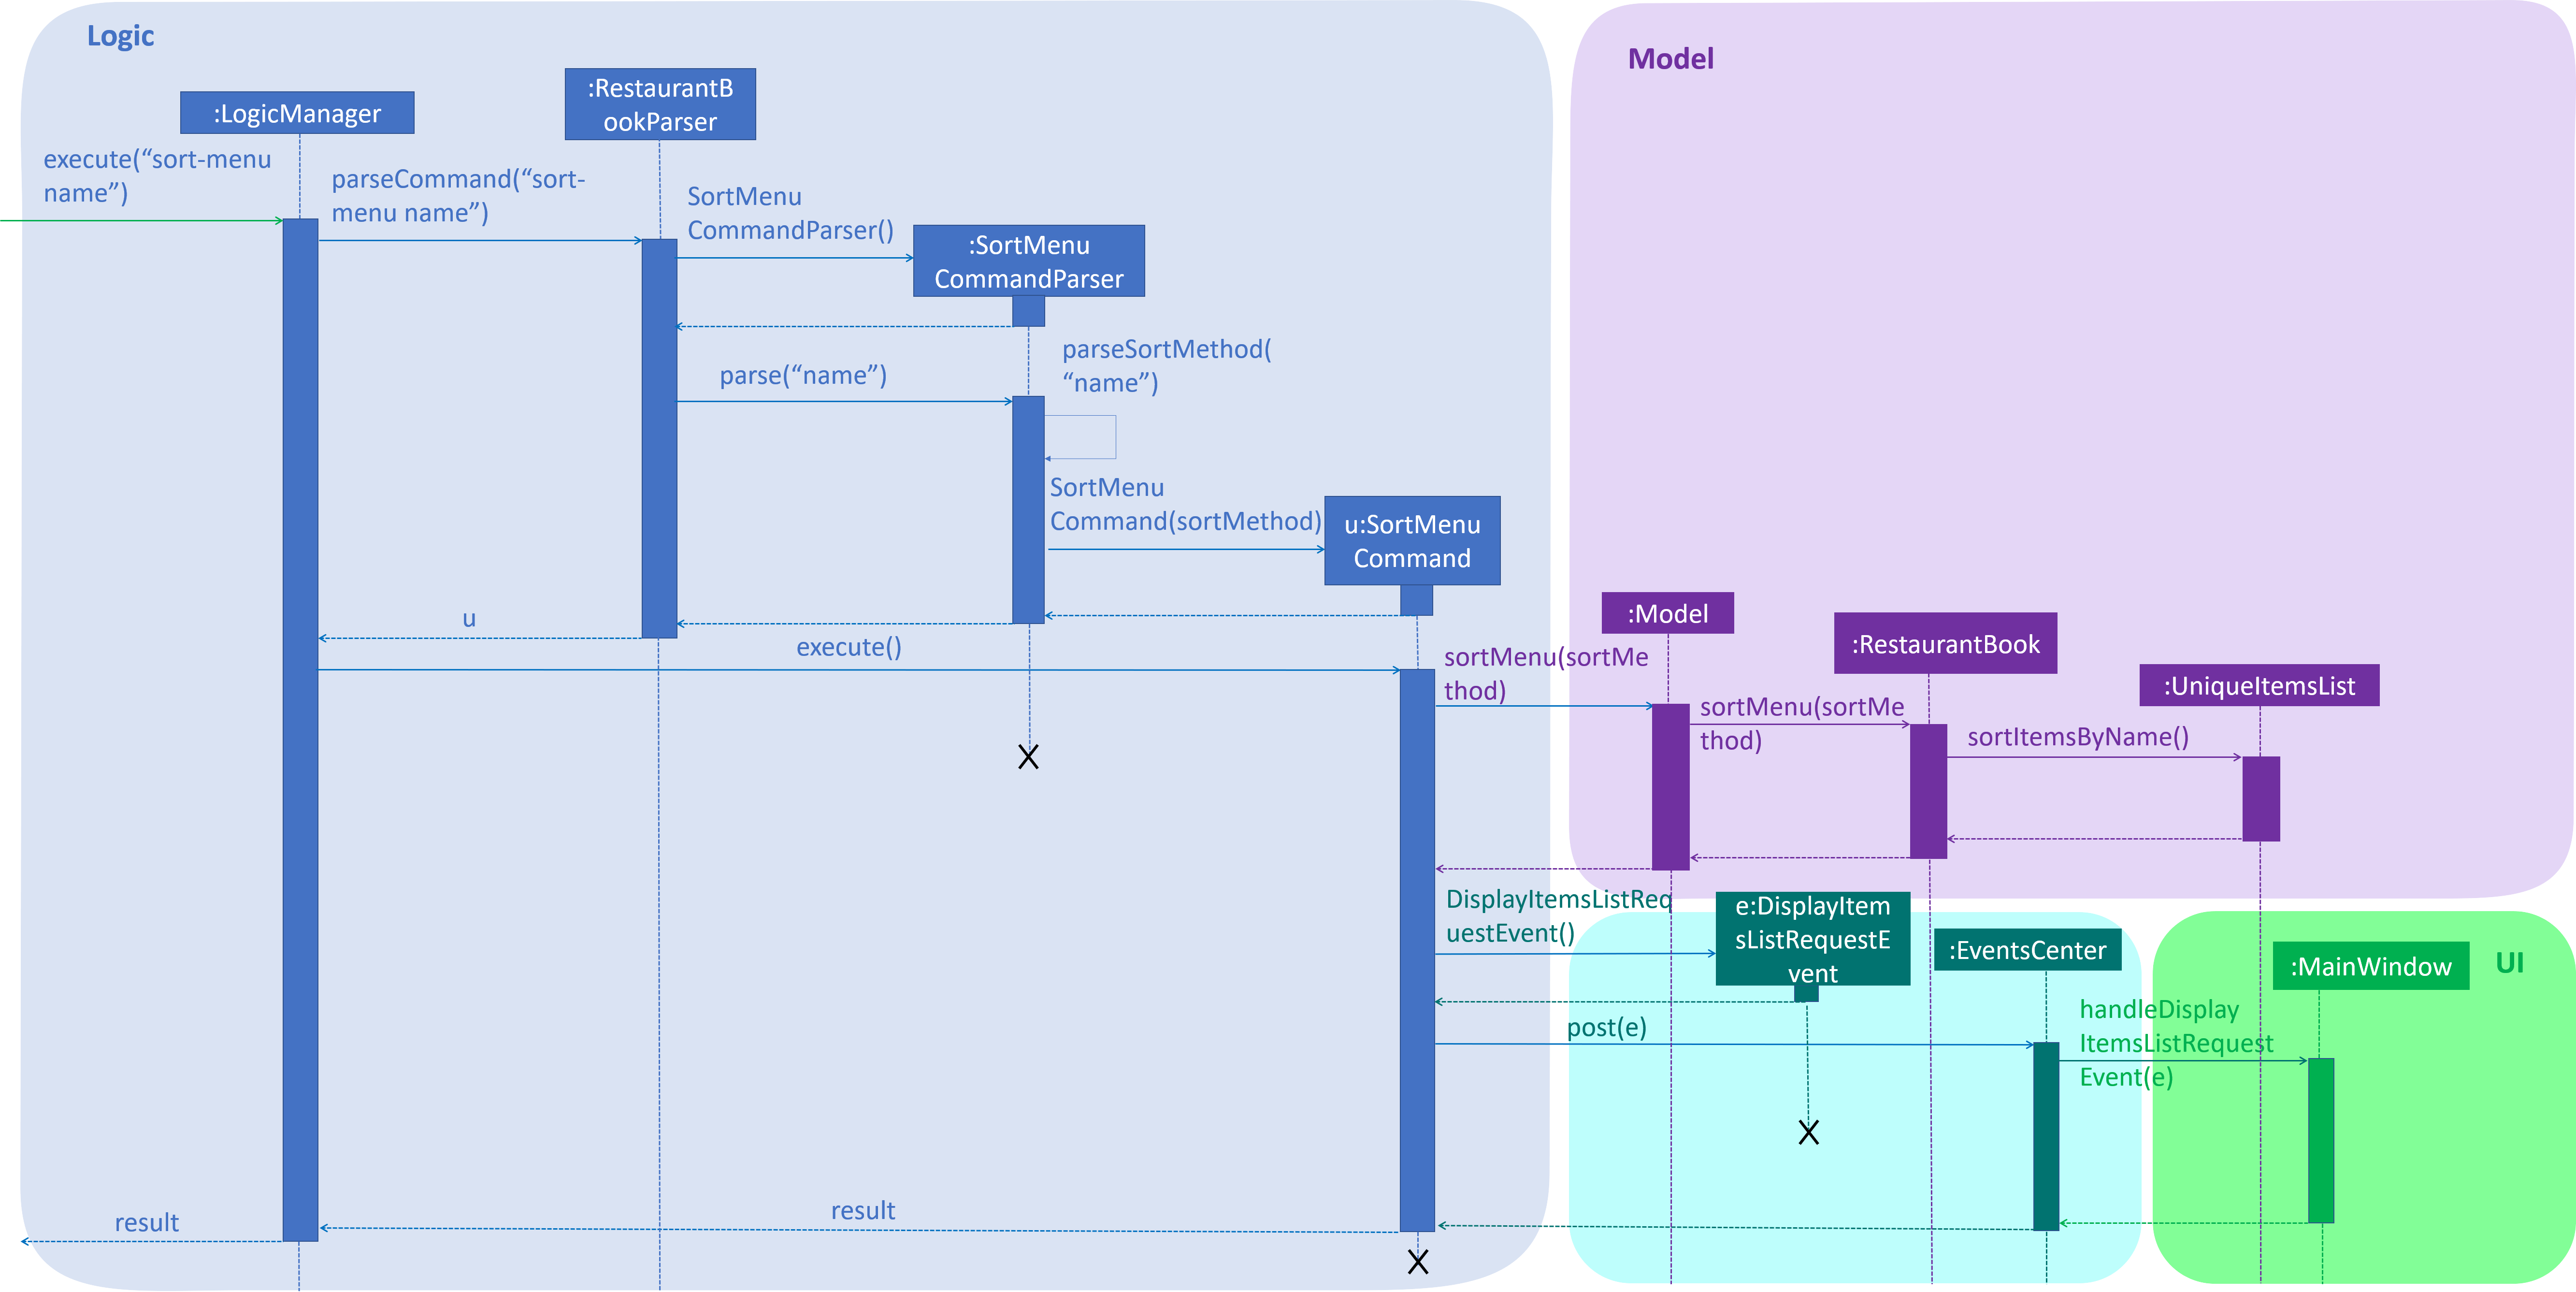
Figure 4.8.2.2: SortMenu Sequence diagram
4.8.3. discount-item Command
The discount-item command is facilitated by DiscountItemCommand and DiscountItemCommandParser. The command
takes in user input for discount percentage and index or the keyword all.
The DiscountItemCommandParser will parse the user input and checks if the input is valid. It will check if the
keyword all is entered. If keyword all is entered, DiscountItemCommandParser will construct an
DiscountItemCommand object with isAll set to true. If index or a range of index is entered, it will construct an
DiscountItemCommand object with isAll set to false.
If the inputs are not valid, it will throw a ParseException
|
The DiscountItemCommand object will check if isAll is true. If isAll is true, it will give the discount to all
items in the UniqueItemList. Otherwise, it will give the discount to the item(s) specified by the index or the
range of index. The DiscountItemCommand object create an Item with discounted price and indirectly call
UniqueItemList#setItem(Item target, Item editedItem) to update the Item with Item with discounted price. It will
then save the current state for undo/redo.
The following activity diagram summarizes what happens when a user executes discount-item command:
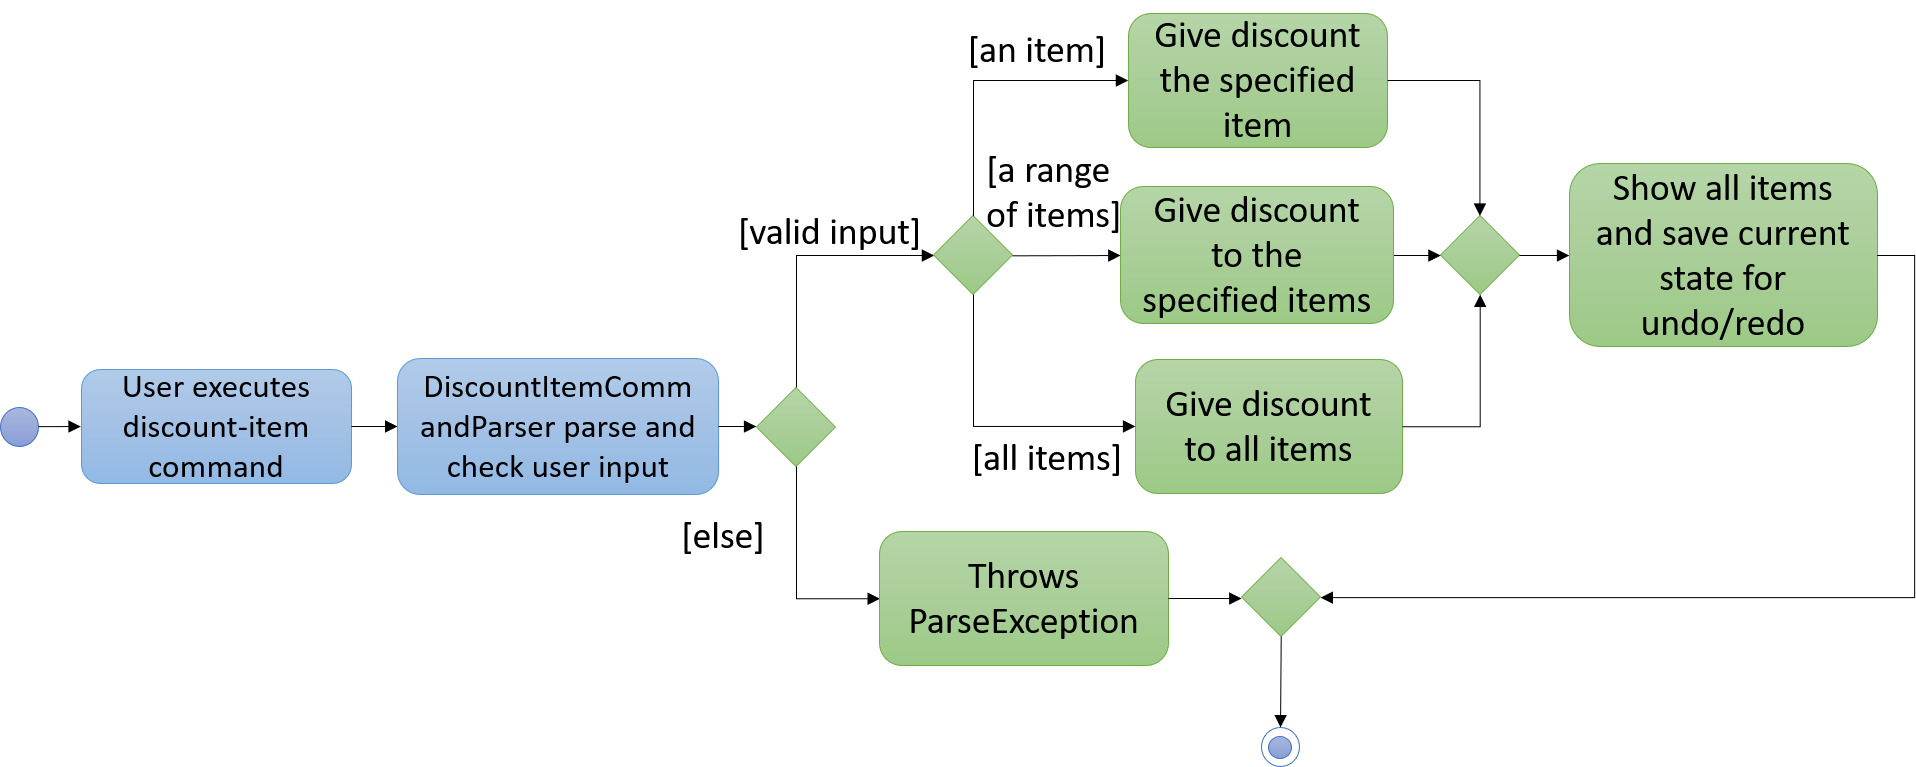
Figure 4.8.3.1: DiscountItem Activity diagram
4.8.4. Design Considerations
Aspect: How Price is parsed
-
Alternative 1 (current choice):
Priceis parsed without the currency symbol.-
Pros: Easy to implement.
-
Cons: Only able to display
Pricewith$with 2 decimal place.
-
-
Alternative 2: Allow users to enter the currency symbol
-
Pros: Able to display the different currencies.
-
Cons: Harder to parse as currencies have different decimal places. Additional checks need to be implemented to check if the currency symbol and price entered are valid.
-
4.9. Reservations feature
The Reservations feature allows users to store customer reservations, view them, and to cancel them.
4.9.1. Current Implementation
The Reservations feature currently contains 6 commands to modify the UniqueReservationsList stored in ModelManager.
-
add-reservationcommand - Adds reservations to the reservations list. -
edit-reservationcommand - Edits existing reservations in the reservations list. -
delete-reservationcommand - Deletes existing reservations in the reservations list. -
list-reservationcommand - Lists reservations in the reservations list. -
select-reservationcommand - Select existing reservations in the reservations list. -
sort-reservationcommand - Sorts existing reservations in the reservations list.
Each Reservation object contains Name, Pax, Date and Time.
4.9.2. add-reservation Command
The command takes in 3 parameters, Name, Pax,Date and Time to create a Reservation object.
|
The Dates are parsed using the |
|
Due to the way As a temporary workaround, the If it is, then it will be parsed using |
After the Reservation Object is created, RestaurantBook#addReservation(Reservation reservation) is called to add the
Reservation Object to the UniqueReservationsList.
The following activity diagram summarizes what happens when a user executes add-reservation command:
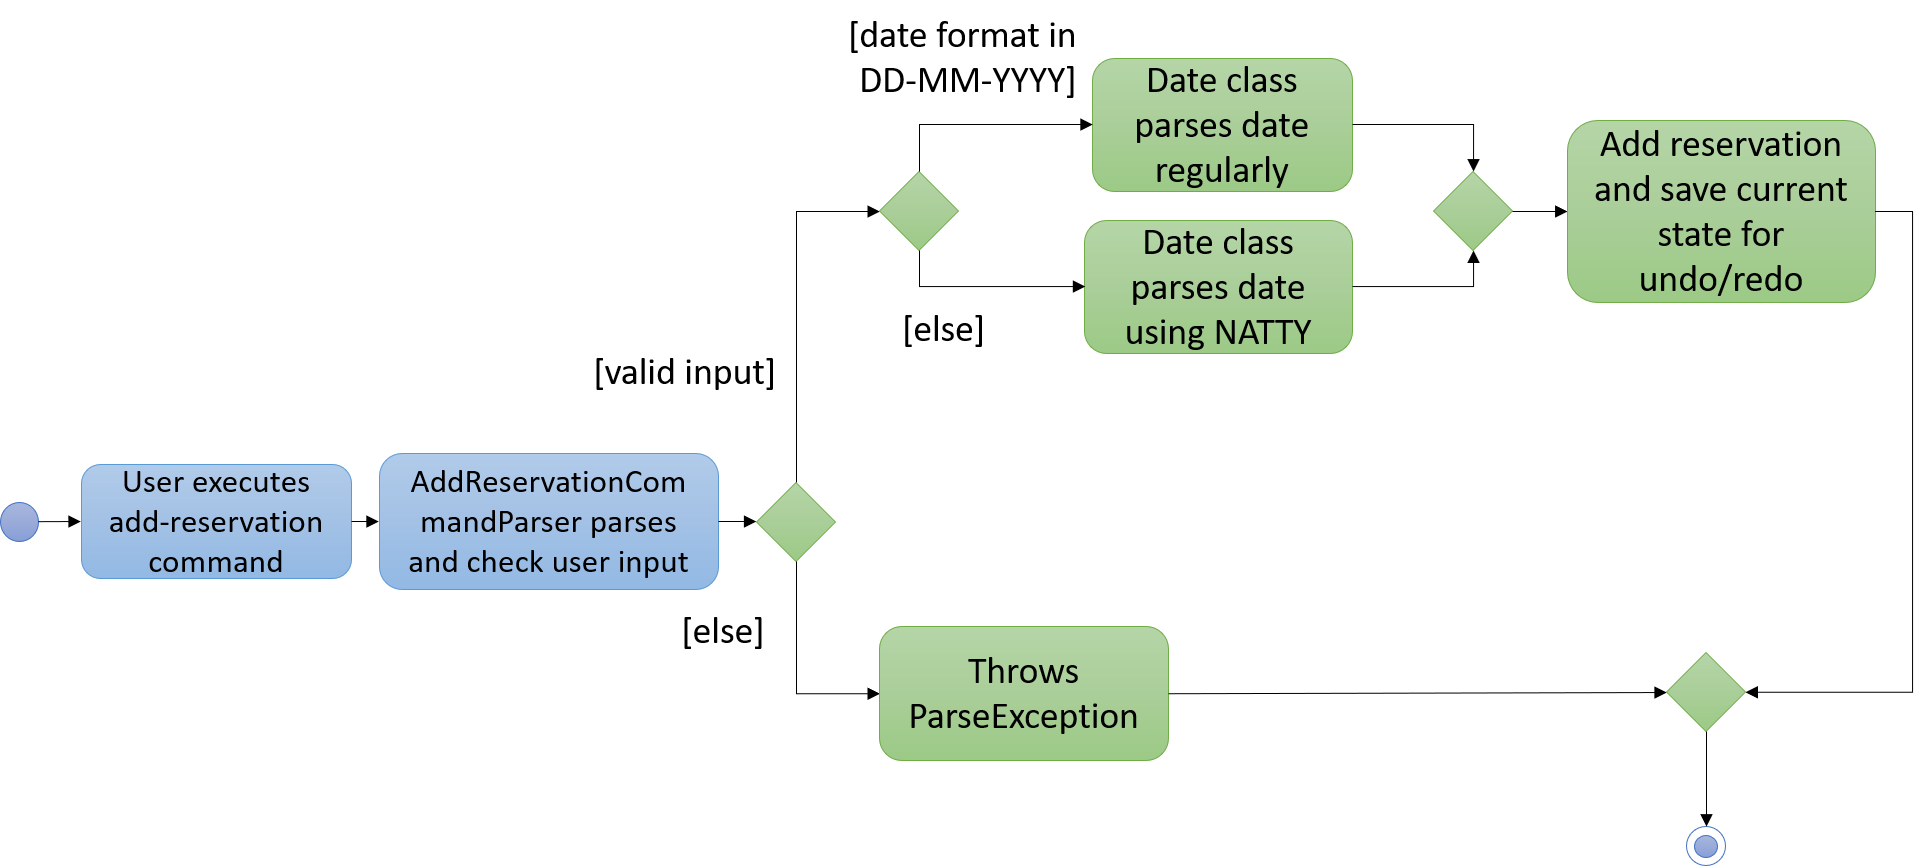
Figure 4.9.2.1: Activity diagram to illustrate the add-reservation command
4.9.3. edit-reservation Command
The command takes in 1 mandatory parameter, Index, followed by 1 or more of the following optional parameters,
Name, Pax, Date, Time.
The Reservation associated with the given Index is then identified within the internal UniqueReservationsList,
then has its values updated to the new values specified by the Name, Pax,Date, and Time parameters.
4.9.4. delete-reservation Command
The command takes in 1 parameter, Index.
The Reservation associated with the given Index is then identified, then deleted from the internal
UniqueReservationsList.
4.9.5. list-reservations Command
The command does not require any additional parameters.
A DisplayReservationListRequestEvent is posted to the EventsCenter, which will call the
handleDisplayReservationListRequestEvent method of the MainWindow. The Reservations List will then be shown on
the UI.
The following sequence diagram shows how the list-reservations command works:
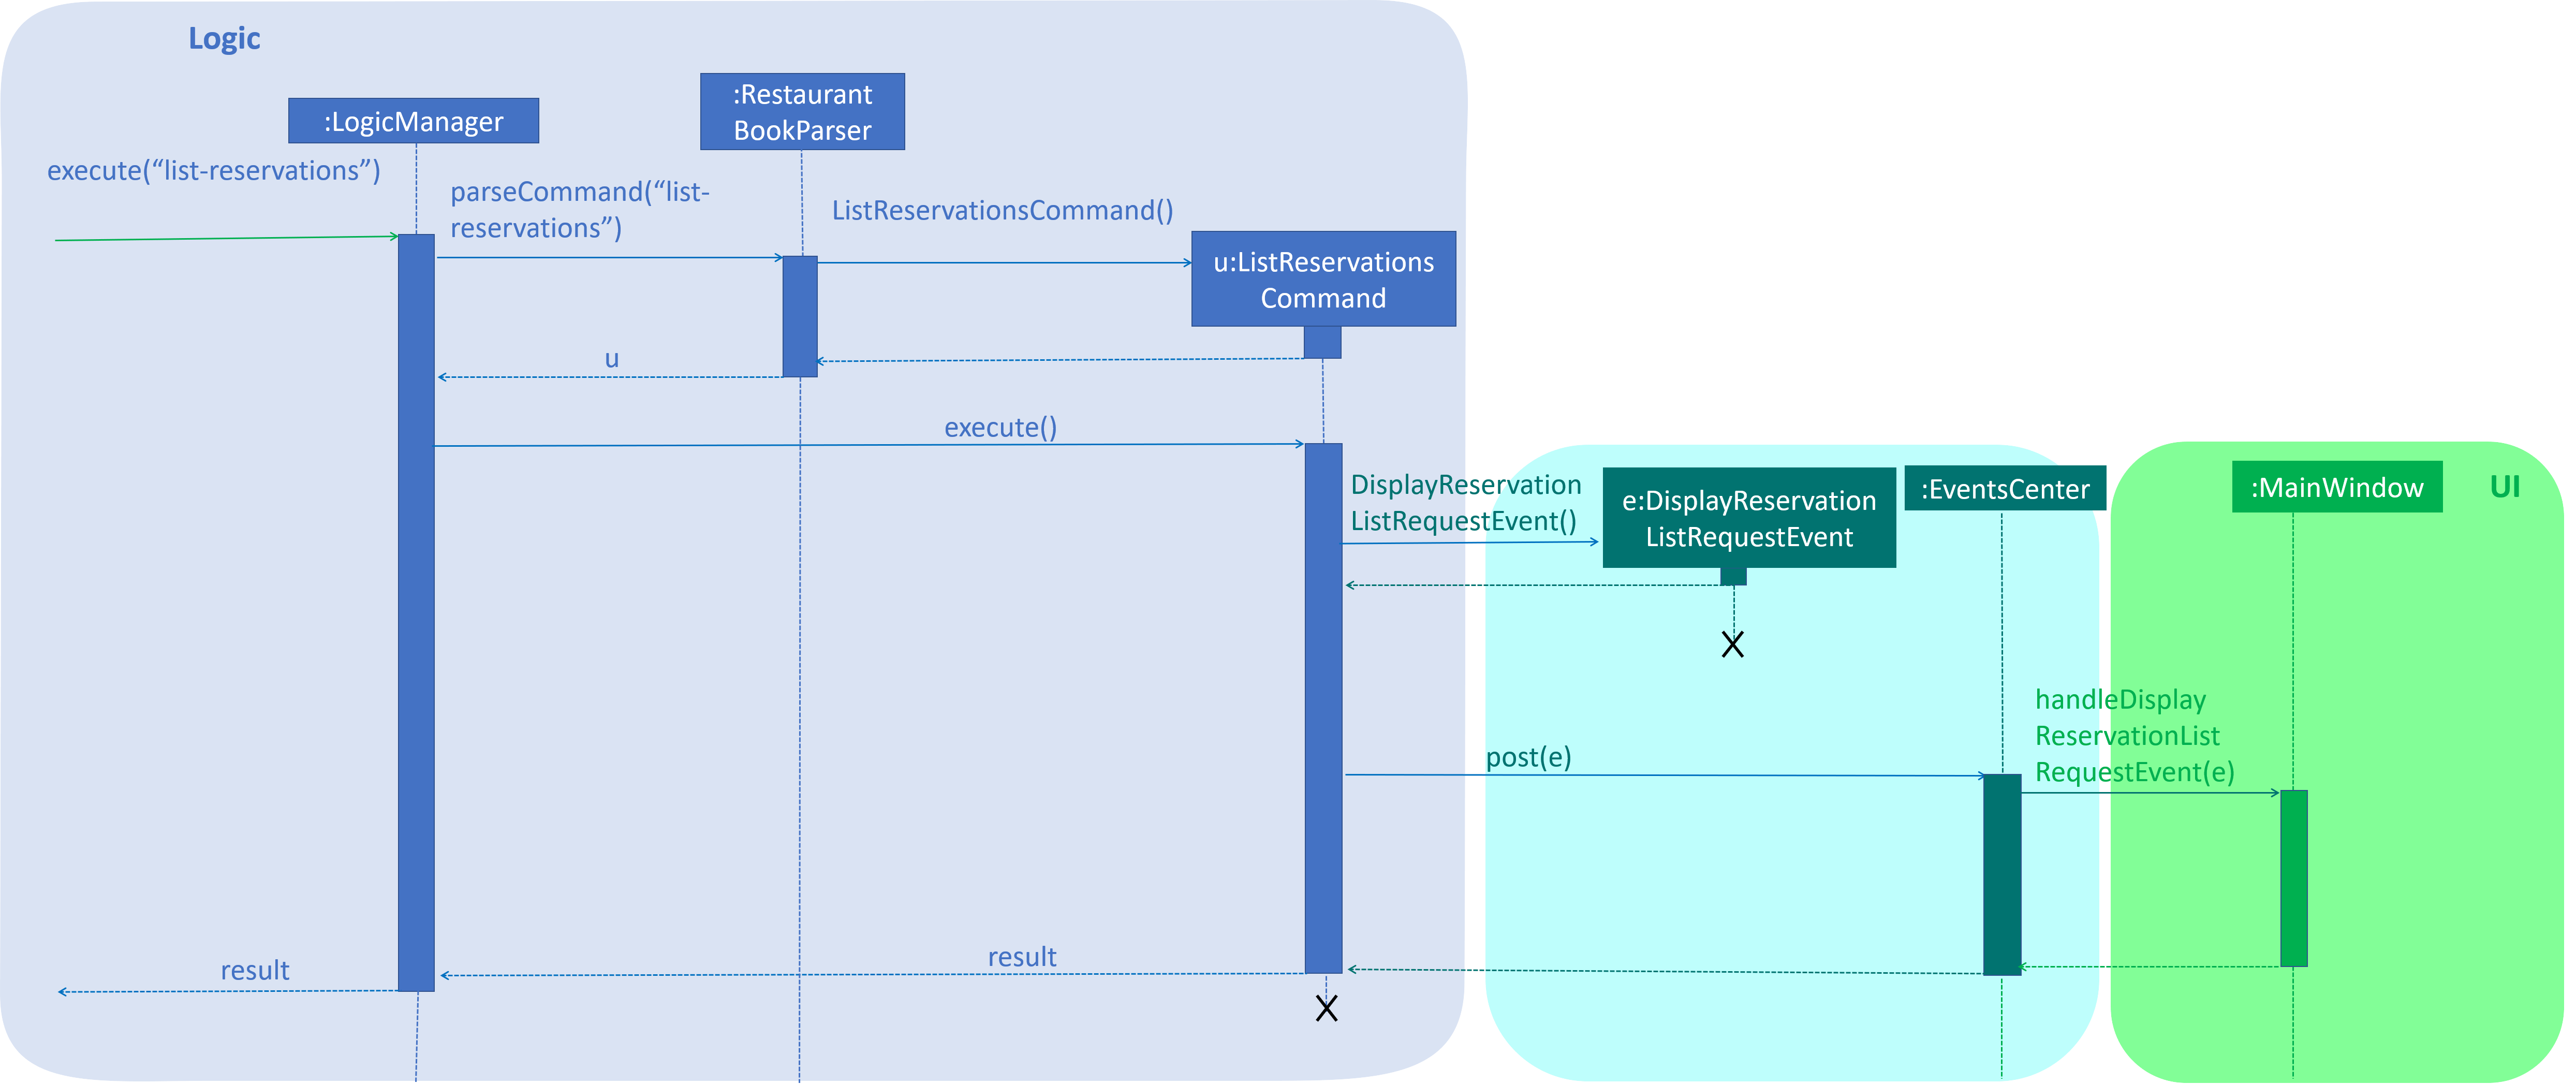
Figure 4.9.5.1: Sequence diagram to illustrate the list-reservations command
4.9.6. Design Considerations
Aspect: How Date and Time are parsed
-
Alternative 1 (current choice):
DateandTimeare parsed using Natty.-
Pros: Easy to implement as it only requires importing the Natty library with minimal configuration.
-
Cons: Natty will sometimes try to "guess" unexpected
Datevalues.
-
-
Alternative 2: Configure the Natty library to avoid unexpected parse results.
-
Pros: The parser will be able to provide more accurate
DateandTimevalues. -
Cons: Difficult to implement as it requires deep understanding of how the Natty library works.
-
4.10. Logging
We are using java.util.logging package for logging. The LogsCenter class is used to manage the logging levels and logging destinations.
-
The logging level can be controlled using the
logLevelsetting in the configuration file (See Section 4.11, “Configuration”) -
The
Loggerfor a class can be obtained usingLogsCenter.getLogger(Class)which will log messages according to the specified logging level -
Currently log messages are output through:
Consoleand to a.logfile.
Logging Levels
-
SEVERE: Critical problem detected which may possibly cause the termination of the application -
WARNING: Can continue, but with caution -
INFO: Information showing the noteworthy actions by the App -
FINE: Details that is not usually noteworthy but may be useful in debugging e.g. print the actual list instead of just its size
4.11. Configuration
Certain properties of the application can be controlled (e.g App name, logging level) through the configuration file (default: config.json).
5. Documentation
We use asciidoc for writing documentation.
| We chose asciidoc over Markdown because asciidoc, although a bit more complex than Markdown, provides more flexibility in formatting. |
5.1. Editing Documentation
See UsingGradle.adoc to learn how to render .adoc files locally to preview the end result of your edits.
Alternatively, you can download the AsciiDoc plugin for IntelliJ, which allows you to preview the changes you have made to your .adoc files in real-time.
5.2. Publishing Documentation
See UsingTravis.adoc to learn how to deploy GitHub Pages using Travis.
5.3. Converting Documentation to PDF format
We use Google Chrome for converting documentation to PDF format, as Chrome’s PDF engine preserves hyperlinks used in webpages.
Here are the steps to convert the project documentation files to PDF format.
-
Follow the instructions in UsingGradle.adoc to convert the AsciiDoc files in the
docs/directory to HTML format. -
Go to your generated HTML files in the
build/docsfolder, right click on them and selectOpen with→Google Chrome. -
Within Chrome, click on the
Printoption in Chrome’s menu. -
Set the destination to
Save as PDF, then clickSaveto save a copy of the file in PDF format. For best results, use the settings indicated in the screenshot below.
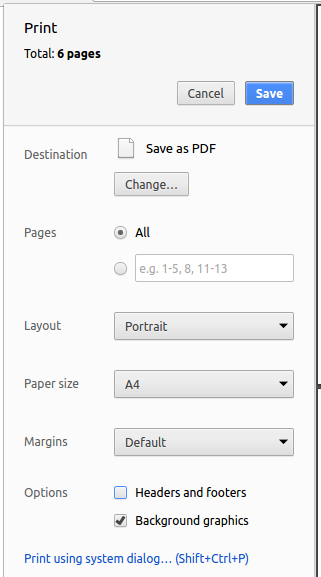
Figure 5.3.1.: Saving documentation as PDF files in Chrome
5.4. Site-wide Documentation Settings
The build.gradle file specifies some project-specific asciidoc attributes which affects how all documentation files within this project are rendered.
Attributes left unset in the build.gradle file will use their default value, if any.
|
| Attribute name | Description | Default value |
|---|---|---|
|
The name of the website. If set, the name will be displayed near the top of the page. |
not set |
|
URL to the site’s repository on GitHub. Setting this will add a "View on GitHub" link in the navigation bar. |
not set |
|
Define this attribute if the project is an official SE-EDU project. This will render the SE-EDU navigation bar at the top of the page, and add some SE-EDU-specific navigation items. |
not set |
5.5. Per-file Documentation Settings
Each .adoc file may also specify some file-specific asciidoc attributes which affects how the file is rendered.
Asciidoctor’s built-in attributes may be specified and used as well.
Attributes left unset in .adoc files will use their default value, if any.
|
| Attribute name | Description | Default value |
|---|---|---|
|
Site section that the document belongs to.
This will cause the associated item in the navigation bar to be highlighted.
One of: * Official SE-EDU projects only |
not set |
|
Set this attribute to remove the site navigation bar. |
not set |
5.6. Site Template
The files in docs/stylesheets are the CSS stylesheets of the site.
You can modify them to change some properties of the site’s design.
The files in docs/templates controls the rendering of .adoc files into HTML5.
These template files are written in a mixture of Ruby and Slim.
|
Modifying the template files in |
6. Testing
6.1. Running Tests
There are three ways to run tests.
| The most reliable way to run tests is the 3rd one. The first two methods might fail some GUI tests due to platform/resolution-specific idiosyncrasies. |
Method 1: Using IntelliJ JUnit test runner
-
To run all tests, right-click on the
src/test/javafolder and chooseRun 'All Tests' -
To run a subset of tests, you can right-click on a test package, test class, or a test and choose
Run 'ABC'
Method 2: Using Gradle
-
Open a console and run the command
gradlew clean allTests(Mac/Linux:./gradlew clean allTests)
| See UsingGradle.adoc for more info on how to run tests using Gradle. |
Method 3: Using Gradle (headless)
Thanks to the TestFX library we use, our GUI tests can be run in the headless mode. In the headless mode, GUI tests do not show up on the screen. That means the developer can do other things on the Computer while the tests are running.
To run tests in headless mode, open a console and run the command gradlew clean headless allTests (Mac/Linux: ./gradlew clean headless allTests)
6.2. Types of tests
We have two types of tests:
-
GUI Tests - These are tests involving the GUI. They include,
-
System Tests that test the entire App by simulating user actions on the GUI. These are in the
systemtestspackage. -
Unit tests that test the individual components. These are in
seedu.restaurant.uipackage.
-
-
Non-GUI Tests - These are tests not involving the GUI. They include,
-
Unit tests targeting the lowest level methods/classes.
e.g.seedu.restaurant.commons.StringUtilTest -
Integration tests that are checking the integration of multiple code units (those code units are assumed to be working).
e.g.seedu.restaurant.storage.StorageManagerTest -
Hybrids of unit and integration tests. These test are checking multiple code units as well as how the are connected together.
e.g.seedu.restaurant.logic.LogicManagerTest
-
6.3. Troubleshooting Testing
Problem: HelpWindowTest fails with a NullPointerException.
-
Reason: One of its dependencies,
HelpWindow.htmlinsrc/main/resources/docsis missing. -
Solution: Execute Gradle task
processResources.
Problem: Test failed with Missing newline at end of file.
-
Reason: A newline is missing in the file.
-
Solution:
File>Settings…>Editor>General>Ensure line feed at file end on Save.
7. Dev Ops
7.1. Build Automation
See UsingGradle.adoc to learn how to use Gradle for build automation.
7.2. Continuous Integration
We use Travis CI and AppVeyor to perform Continuous Integration on our projects. See UsingTravis.adoc and UsingAppVeyor.adoc for more details.
7.3. Coverage Reporting
We use Coveralls to track the code coverage of our projects. See UsingCoveralls.adoc for more details.
7.4. Documentation Previews
When a pull request has changes to asciidoc files, you can use Netlify to see a preview of how the HTML version of those asciidoc files will look like when the pull request is merged. See UsingNetlify.adoc for more details.
7.5. Making a Release
Here are the steps to create a new release.
-
Update the version number in
MainApp.java. -
Generate a JAR file using Gradle.
-
Tag the repo with the version number. e.g.
v0.1 -
Create a new release using GitHub and upload the JAR file you created.
7.6. Managing Dependencies
A project often depends on third-party libraries. For example, Restaurant Book depends on the Jackson library for XML parsing. Managing these dependencies can be automated using Gradle. For example, Gradle can download the dependencies automatically, which is better than these alternatives.
a. Include those libraries in the repo (this bloats the repo size).
b. Require developers to download those libraries manually (this creates extra work for developers).
Appendix A: Product Scope
Target user profile:
-
is a owner of one or more restaurant in National University of Singapore.
-
prefers having PC application to handle his/her restaurant.
-
can type reasonably fast.
-
prefers typing over mouse input.
-
is reasonably comfortable using CLI apps.
Value proposition: efficiently and effectively manage restaurant without the need to invest in a complicated and expensive system.
Appendix B: User Stories
Priorities: High (must have) - * * *, Medium (nice to have) - * *, Low (unlikely to have) - *
| Priority | As a … | I want to … | So that I can… |
|---|---|---|---|
|
restaurant owner |
have my system protected |
ensure only authorised staffs can access the system |
|
restaurant owner |
modify staff account |
update my staff’s data |
|
restaurant owner |
delete staff account |
remove system access for an ex-staff |
|
restaurant owner |
assign role to a staff account |
ensure only authorised staff can access certain parts of the system |
|
new restaurant owner |
see usage instructions |
refer to instructions when I forget how to use the application |
|
forgetful restaurant owner |
see usage instructions |
refer to instructions when I forget how to use the application |
|
restaurant owner |
check the current availability of ingredients |
manage my ingredients easily |
|
restaurant owner |
see which ingredients are low in stock count |
know which ingredients to restock promptly |
|
restaurant owner |
record sales volume of an item within a day |
analyse an item’s sales performance in the future |
|
restaurant owner |
keep track of daily sales |
meet revenue goals, improve the menu and track inventory |
|
restaurant owner |
modify past sales records |
update any mistakes / refunds / cancelled booking |
|
analytical restaurant owner |
see the sales chart of revenue against date |
have an overview of my restaurant financial performance and oversee its growth in the long run |
|
profit-driven restaurant owner |
know the items that are bringing in the greatest revenue |
employ marketing strategies to maximise profit |
|
profit-driven restaurant owner |
know the days in which revenue are greatest |
employ marketing strategies to maximise profit |
|
restaurant owner |
add a new item to the menu |
introduce new dishes |
|
restaurant owner |
delete an item from the menu |
remove entries that I no longer need |
|
restaurant owner |
edit an item from the menu |
update the entries of the menu |
|
restaurant owner |
find an item by name |
locate details of items without having to go through the entire list |
|
restaurant owner |
filter items by tag |
filter and find items without having to go through the entire list |
|
restaurant owner |
give an item discount |
have discount for items in menu |
|
restaurant owner |
view menu |
see the changes made to the menu |
|
restaurant owner |
clear menu |
revamp my menu when there is a need |
|
restaurant owner |
add a reservation |
keep track of who booked a table in my restaurant |
|
restaurant owner |
edit a reservation |
make changes when a customer requests to do so |
|
restaurant owner |
sort reservations |
easily see the reservations in chronological order |
|
restaurant owner |
delete a reservation |
get rid of reservations that I don’t need anymore |
|
restaurant owner |
check which dishes are not able to be cooked due to lack of ingredients |
remove them from the daily menu |
|
lazy restaurant owner |
save regular restocks and consumption data as the default |
do not need to key in the same entries every time |
|
forgetful restaurant owner |
set reminders for the next restock |
remember to restock |
Appendix C: Use Cases
(For all use cases below, the System is the App and the Actor is the user, unless
specified
otherwise)
Use case: UC101 - Create account
Pre-conditions:
-
User has to be logged in.
-
User must be an administrator.
Guarantees:
-
A new account will be created.
MSS
-
User requests to create a new user account.
-
App create the new user account.
-
App returns a success message confirming that the user account has been created.
Use case ends.
Extensions
-
2a. Username already exists.
-
2a1. App returns an error message.
-
2a2. User enters new data.
Steps 2a1-2a2 are repeated until the data entered are correct.
Use case resumes at step 3.
-
-
2b. Username or Password length not fulfilled.
-
2b1. App returns an error message.
-
2b2. User enters new data.
Steps 2b1-2b2 are repeated until the data entered are correct.
Use case resumes at step 3.
-
Use case: UC102 - Login
Pre-conditions:
-
User must not be logged in.
Guarantees:
-
User will be logged into the App.
MSS
-
User requests to login.
-
App authenticates the user.
-
App returns a success message confirming that the user has been logged in.
Use case ends.
Extensions
-
2a. Credential is invalid.
-
2a1. App requests for the correct data.
-
2a2. User enters new data.
Steps 2a1-2a2 are repeated until the data entered is correct.
Use case resumes at step 3.
-
Use case: UC103 - Logout
Pre-conditions:
-
User must be logged in.
Guarantees:
-
User will be logged out of the App.
MSS
-
User requests to logout.
-
App logs out the user.
-
App returns a success message confirming that the user has been logged out.
Use case ends.
Use case: UC104 - Change password
Pre-conditions:
-
User has to be logged in.
Guarantees:
-
Account data will remain intact if nothing changes OR
-
Account data will be updated.
MSS
-
User requests to change password.
-
App edit the user account.
-
App returns a success message confirming that the user account has been edited.
Use case ends.
Extensions
-
2a. New password is invalid.
-
2a1. App requests for the correct data.
-
2a2. User enters new data.
Steps 2a1-2a2 are repeated until the data entered is correct.
Use case resumes at step 3.
-
Use case: UC201 - Add ingredient
MSS
-
User requests to add a new ingredient.
-
App adds the ingredient specified to the ingredient list.
-
App returns a success message confirming the new ingredient has been added.
Use case ends.
Extensions
-
1a. The user enters an invalid command format.
-
1a1. App returns a message telling user that the command format is invalid.
-
1a2. User requests to add ingredient again.
Steps 1a1-1a2 are repeated until a valid command format is entered.
Use case resumes at step 2.
-
-
2a. The ingredient name entered is already in the ingredient list.
-
2a1. App returns a message telling user the ingredient name already exists.
-
2a2. User requests to add ingredient again.
Steps 2a1-2a2 are repeated until an ingredient name which does not exist is entered.
Use case resumes at step 3.
-
Use case: UC202 - Delete ingredient
MSS
-
User requests to list ingredients.
-
App shows a list of ingredients.
-
User requests to delete a specific ingredient by its index in the ingredient list, or the ingredient name.
-
App deletes the ingredient.
Use case ends.
Extensions
-
2a. The list is empty.
Use case ends.
-
3a. The given index or name is invalid.
-
3a1. App returns a message telling user the index or name entered is invalid.
-
3a2. User requests to delete ingredient again.
Steps 3a1-3a2 are repeated until a valid index or name is entered.
Use case resumes at step 4.
-
-
3b. The ingredient name does not exist.
-
3b1. App returns a message telling user that the ingredient cannot be found.
-
3b2. User requests to delete ingredient again.
Steps 3b1-3b2 are repeated until an existing ingredient name is entered.
Use case resumes at step 4.
-
-
3c. The user enters an invalid format.
-
3c1. App returns a message telling user that the command format is invalid.
-
3c2. User requests to add ingredient again.
Steps 3c1-3c2 are repeated until a valid command format is entered.
Use case resumes at step 4.
-
Use case: UC203 - Edit ingredient
MSS
-
User requests to edit a specific ingredient.
-
App edits the specified ingredient with the updated values.
-
App returns a success message confirming the specified ingredient has been edited.
Use case ends.
Extensions
-
1a. The given index or name is invalid.
-
1a1. App returns a message telling user the index or name entered is invalid.
-
1a2. User requests to edit ingredient again.
Steps 1a1-1a2 are repeated until a valid index or name is entered.
Use case resumes at step 2.
-
-
1b. None of the optional fields are specified.
-
1b1. App returns a message telling user at least one optional field has to be specified.
-
1b2. User requests to edit ingredient again.
Steps 1b1-1b2 are repeated until at least one optional field is entered.
Use case resumes at step 2.
-
-
2a. The ingredient name does not exist.
-
2a1. App returns a message telling user that the ingredient cannot be found.
-
2a2. User requests to edit ingredient again.
Steps 2a1-2a2 are repeated until an existing ingredient name is entered.
Use case resumes at step 3.
-
Use case: UC204 - Stock up ingredient
MSS
-
User requests to stock up a specific ingredient.
-
App updates the count of the specified ingredient.
-
App returns a success message confirming the specified ingredient has been stocked up.
Use case ends.
Extensions
-
1a. The user enters an invalid format.
-
1a1. App returns a message telling user that the command format is invalid.
-
1a2. User requests to stock up ingredient again.
Steps 1a1-1a2 are repeated until a valid command format is entered.
Use case resumes at step 2.
-
-
2b. The ingredient name does not exist.
-
2b1. App returns a message telling user that the ingredient does not exist.
-
2b2. User requests to stock up ingredient again.
Steps 2b1-2b2 are repeated until a valid ingredient name is entered.
Use case resumes at step 3.
-
Use case: UC301 - Add item to menu
MSS
-
User requests to add item to menu.
-
App adds the item to menu.
-
App returns a success message confirming the new item has been added.
Use case ends.
Extensions
-
1a. Invalid argument given for the command.
-
1a1. App shows an error message that item name or/and item price are invalid.
-
1a2. User requests to add item to menu again.
Steps 1a1-1a2 are repeated until valid item name and valid item price are entered.
Use case resumes at step 2.
-
-
1b. The item name entered is already in the menu.
-
1b1. App shows an error message that the item name already exists.
-
1b2. User requests to add item to menu again.
Steps 1b1-1b2 are repeated until item name that does not exist in the menu is entered.
Use case resumes at step 2.
-
Use case: UC302 - Delete item by index from menu
MSS
-
User requests to list items.
-
App shows a list of items in menu.
-
User requests to delete a specific item in menu.
-
App deletes the item.
-
App returns a success message confirming the specified item has been deleted.
Use case ends.
Extensions
-
2a. The list is empty.
Use case ends.
-
3a. The given index is invalid.
-
3a1. App shows an error message that the given index is invalid.
-
3a2. User requests to delete a specific item in menu again.
Steps 3a1-3a2 are repeated until a valid index is entered.
Use case resumes at step 4.
-
Use case: UC303 - Edit item from menu
MSS
-
User requests to list items.
-
App shows a list of items in menu.
-
User requests to edit a specific item in the list.
-
App edits the item with updated values.
-
App returns a success message confirming the specified item has been edited.
Use case ends.
Extensions
-
2a. The list is empty.
Use case ends.
-
3a. The given index is invalid.
-
3a1. App shows an error message that the given index is invalid.
-
3a2. User requests to delete a specific item in menu again.
Steps 3a1-3a2 are repeated until a valid index is entered.
Use case resumes at step 4.
-
-
3b. None of the optional fields are specified.
-
3b1. App shows an error message that none of the optional fields are specified.
-
3b2. User requests to edit a specific item in menu again.
Steps 3b1-3b2 are repeated until one of the optional fields is entered.
Use case resumes at step 4.
-
Use case: UC304 - Give an item a discount
MSS
-
User requests to list items.
-
App shows a list of items in menu.
-
User requests to give a specific item in the list a discount.
-
App give the item a discount.
-
App returns a success message confirming the specified item has been given a discount.
Use case ends.
Extensions
-
2a. The list is empty.
Use case ends.
-
3a. The given index is invalid.
-
3a1. App shows an error message that the given index is invalid.
-
3a2. User requests to give a specific item in the list a discount again.
Steps 3a1-3a2 are repeated until a valid index is entered.
Use case resumes at step 4.
-
-
3b. The given percentage is invalid.
-
3b1. App shows an error message that the given percentage is invalid.
-
3b2. User requests to give a specific item in the list a discount again.
Steps 3b1-3b2 are repeated until a valid percentage is entered.
Use case resumes at step 4.
-
Use case: UC401 - Add reservation
MSS
-
User requests to add a new reservation.
-
App adds the reservation to the reservations list.
-
App returns a success message confirming the new reservation has been added.
Use case ends.
Extensions
-
2a. The reservation date or time entered has an incorrect format.
-
2a1. App returns a message telling user the date or time format is entered incorrectly.
-
2a2. User requests to add reservation again.
Steps 2a1-2a2 are repeated until a proper date and time are entered.
Use case resumes at step 3.
-
Use case: UC402 - Edit reservation
MSS
-
User requests to edit a specified reservation.
-
App edits the specified reservation with the updated values.
-
App returns a success message confirming the specified reservation has been edited.
Use case ends.
Extensions
-
1a. The given index is invalid.
-
1a1. App returns a message telling user that the index is invalid.
-
1a2. User requests to edit reservation again.
Steps 1a1-1a2 are repeated until a valid index is entered.
Use case resumes at step 2.
-
-
1b. None of the optional fields are specified.
-
1b1. App returns a message telling user at least one optional field has to be specified.
-
1b2. User requests to edit reservation again.
Steps 1b1-1b2 are repeated until at least one optional field is entered.
Use case resumes at step 2.
-
Use case: UC403 - Delete reservation
MSS
-
User requests to list reservations.
-
App shows a list of reservations.
-
User requests to delete a specific reservation in the list.
-
App deletes the reservation.
Use case ends.
Extensions
-
2a. The list is empty.
Use case ends.
-
3a. The given index is invalid.
-
3a1. App returns a message telling user the index is invalid.
-
3a2. User requests to delete reservation again.
Steps 3a1-3a2 are repeated until a valid index is entered.
Use case resumes at step 3.
-
Use case: UC501 - Record sales volume of an item
Guarantees:
-
A new sales record of an item will be appended to the record list.
MSS
-
User requests to record sales volume of an item for a specified day.
-
App computes the ingredients used and updates the ingredient list automatically.
-
App appends the record at the end of record list.
-
App returns a success message confirming that the recording is successful.
Use case ends.
Extensions
-
1a. Invalid command format entered by the user.
-
1a1. App returns a message telling user that the command format is invalid.
-
1a2. User requests to record sales volume again.
Steps 1a1-1a2 are repeated until a valid command format is entered.
Use case resumes at step 2.
-
-
1b. The given date or name or quantity sold or price is invalid.
-
1b1. App returns a message telling user that the date or name or quantity sold or price is invalid.
-
1b2. User requests to record sales volume again.
Steps 1b1-1b2 are repeated until all fields entered by the user are valid.
Use case resumes at step 2.
-
-
1c. Sales record of the same date and item name already exists in the record list.
-
1c1. App returns a message telling user that the item’s record already exists.
-
1c2. User requests to record sales volume again.
Steps 1c1-1c2 are repeated until a record with unique date and item name is entered.
Use case resumes at step 2.
-
-
2a. One or more of the criteria to update ingredient list were not satisfied.
-
2a1. App takes note of which criteria were not satisfied, and appends a notification message after the success message.
Use case resumes at step 3.
-
Use case: UC502 - Editing sales record
Guarantees:
-
Sales record will be updated to the user’s input.
MSS
-
User requests to edit a sales record in the record list.
-
App updates the sales record to that given by the user.
-
App returns a success message confirming that the modification is successful.
Use case ends.
Extensions
-
1a. Invalid command format entered by the user.
-
1a1. App returns a message telling user that the command format is invalid.
-
1a2. User requests to edit sales record again.
Steps 1a1-1a2 are repeated until a valid command format is entered.
Use case resumes at step 2.
-
-
1b. Index specified is invalid.
-
1b1. App returns a message telling user that the index specified is invalid.
-
1b2. User requests to edit sales record again.
Steps 1b1-1b2 are repeated until a valid index is entered.
Use case resumes at step 2.
-
-
1c. None of the optional fields are specified.
-
1c1. App returns a message telling user at least one optional field has to be specified.
-
1c2. User requests to edit sales record again.
Steps 1c1-1c2 are repeated until at least one optional field is entered.
Use case resumes at step 2.
-
-
1d. The new date or name or quantity sold or price entered is invalid.
-
1d1. App returns a message telling user that the date or name or quantity sold or price is invalid.
-
1d2. User requests to edit sales record again.
Steps 1d1-1d2 are repeated until all fields entered by the user are valid.
Use case resumes at step 2.
-
-
1e. Sales record of the same date and item name as the new record already exists in the record list.
-
1e1. App returns a message telling user that the item’s record already exists.
-
1e2. User requests to edit sales record again.
Steps 1e1-1e2 are repeated until a unique record is entered.
Use case resumes at step 2.
-
Use case: UC503 - Deleting sales record
MSS
-
User requests to delete a sales record in the record list.
-
App deletes the sales record.
-
App returns a success message confirming that the deletion is successful.
Use case ends.
Extensions
-
1a. Invalid command format entered by the user.
-
1a1. App returns a message telling user that the command format is invalid.
-
1a2. User requests to delete sales record again.
Steps 1a1-1a2 are repeated until a valid command format is entered.
Use case resumes at step 2.
-
-
1b. Index specified is invalid.
-
1b1. App returns a message telling user that the index specified is invalid.
-
1b2. User requests to delete sales record again.
Steps 1b1-1b2 are repeated until a valid index is entered.
Use case resumes at step 2.
-
Use case: UC504 - Displaying sales report
MSS
-
User requests to display the sales report of a specified date.
-
App generates the sales report.
-
App displays the sales report in a separate window.
Use case ends.
Extensions
-
1a. Invalid command format entered by the user.
-
1a1. App returns a message telling user that the command format is invalid.
-
1a2. User requests to display sales report again.
Steps 1a1-1a2 are repeated until a valid command format is entered.
Use case resumes at step 2.
-
-
1b. The given date is invalid.
-
1b1. App returns a message telling user the date is invalid.
-
1b2. User requests to display sales report again.
Steps 1b1-1b2 are repeated until a valid date is entered.
Use case resumes at step 2.
-
-
2a. The generated sales report is empty. No record associated with the given date is found.
-
2a1. App returns a message telling user no such record is found.
-
2a2. User requests to display sales report again with a new date.
Steps 2a1-2a2 are repeated until a record with the given date is found. (i.e. Sales report generated is not empty.)
Use case resumes at step 3.
-
Use case: UC505 - Ranking items according to total revenue
| The use cases for 1) ranking dates according to total revenue & 2) displaying sales chart are the same |
MSS
-
User requests to rank items according to the total revenue accumulated in past sales records.
-
App generates the ranking.
-
App displays the ranking in a separate window.
Use case ends.
Extensions
-
2a. Record list is empty. No record has ever been added.
-
2a1. App returns a message telling user that the record list is empty.
Use case ends.
-
Appendix D: Non Functional Requirements
-
Should work on any Mainstream OS as long as it has Java
9or higher installed. -
Respond fast to user input and show the respective output within milliseconds.
-
A user with above average typing speed for regular English text (i.e. not code, not system admin commands) should be able to accomplish most of the tasks faster using commands than using the mouse.
-
System must be secured such that only authorised employees can access it and execute commands.
-
System should not require constant maintenance and work off-the-shelf without any installation.
-
JAR file should not exceed 50 MB.
-
Test coverage should be at least 80%.
-
Should always favour security over efficiency in development.
-
Any user who has the basic proficiency of the English language should be able to use the application with the help of the
UserGuide.adoc. -
System should not require any internet access.
-
Only the English language will be used.
Appendix F: Acronyms
- GUI
-
Graphical User Interface allows the use of icons or other visual indicators to interact with electronic devices, rather than using only text via the command line.
- UML
-
Unified Modeling Language is used to specify, visualize, construct and document the artifacts of software systems.
- MSS
-
Main Success Scenario describes the most straightforward interaction for a given use case, which assumes that nothing goes wrong.
Appendix G: Instructions for Manual Testing
Given below are instructions to test the app manually.
| These instructions only provide a starting point for testers to work on; testers are expected to do more exploratory testing |
G.1. Launch and Shutdown
-
Initial launch
-
Download the
jarfile and copy into an empty folder. -
Double-click the
jarfile.
Expected: Shows the GUI with a set of sample data. The window size may not be optimum.
-
-
Saving window preferences
-
Resize the window to an optimum size. Move the window to a different location. Close the window.
-
Re-launch the app by double-clicking the
jarfile.
Expected: The most recent window size and location is retained.
-
G.2. Accounts Management
-
Login
-
Prerequisite: The account must exists in the accounts record. The
rootaccount exists by default. -
Test case:
login id/root pw/1122qq
Expected: User will be logged in to therootaccount, and the username will be set accordingly at the top-right corner of the GUI. -
Test case:
login pw/1122qq id/root
Expected: Same as previous as the parameters can be supplied in any order. -
Test case:
login id/helloworld pw/lalala
Expected: Account does not exists and user will be shown an error message. -
Test case:
login id/root pw/
Expected: User will be prompted to provide a valid password. -
Test case:
login id/ pw/1122qq
Expected: User will be prompted to provide a valid username. -
Test case:
login
Expected: User will be prompted to conform to the command parameters by providing all necessary fields with valid values.
-
-
Logout
-
Prerequisite: User must be logged in first.
-
Test case:
logout
Expected: User will be logged out, and the username will be reset back toGuestat the top-right corner of the GUI.
-
-
Changing password
-
Prerequisite: User must be logged in. The old and new password can be the same.
-
Test case:
change-password npw/newpassword
Expected: User’s password will be updated. The new password must be used for future login. -
Test case:
change-password npw/newpassword npw/evennewerpassword
Expected:evennewerpasswordwill be recorded as the new password. -
Test case:
change-password npw/
Expected: User will be prompted to provide a valid password. -
Test case:
change-password
Expected: User will be prompted to conform to the command parameters by providing all necessary fields with valid values.
-
-
Registering a new account
-
Prerequisite: User must be logged in, and the account must exists in the accounts record. Currently, any user will be able to register a new account as the user role feature will only be implemented in
v2.0. See UserGuide.adoc for more information -
Test case:
register id/johndoe pw/1122qq n/John Doe
Expected: A new account with the idjohndoewill be created. Details ofjohndoewill be shown. The timestamp of the status bar will be updated as well. -
Test case:
register id/john doe pw/1122qq n/
Expected: User will be prompted to provide a valid name. -
Test case:
register id
Expected: User will be prompted to conform to the command parameters by providing all necessary fields with valid values. -
Other incorrect attempts:
register id/ pw/1122qq n/John Doe,register id/johndoe pw/1122 qq n/John Doe
Expected: User will be prompted with a relevant error message to provide a valid value for the field that has an error.
-
-
Deregistering an account
-
Prerequisite: User must be logged in, and the account must exists in the accounts record.
-
Test case:
deregister id/johndoe
Expected: Account with the idjohndoewill be deregistered (i.e. deleted). -
Test case:
deregister id/<current logged in user’s id>
Expected: User will be prompted an error message that they are not allowed to deregister their own account. -
Test case:
deregister
Expected: User will be prompted to conform to the command parameters by providing all necessary fields with valid values.
-
-
Finding account(s)
-
Prerequisite: User must be logged in.
-
Test case:
find-account <ro>
Expected: List all accounts that contain the stringroin its username. -
Test case:
find-account
Expected: User will be prompted to conform to the command parameters by providing all necessary fields with valid values.
-
-
Selecting an account
-
Prerequisite: User must be logged in.
-
Test case:
select-account 1
Expected: The account at index 1 of the list will be selected. -
Other incorrect attempts:
select-accountorselect-account -1orselect-account alphabet
Expected: User will be prompted to conform to the command parameters by providing all necessary fields with valid values.
-
-
Listing accounts
-
Prerequisite: User must be logged in.
-
Test case:
list-accounts
Expected: The list of accounts will be shown at the panel on the left of the GUI.
-
G.3. Ingredient Management
-
Adding an ingredient
-
Pre-requisites: The ingredient must not have the same name as another existing ingredient in the ingredient list and must be logged in.
-
Test case:
add-ing n/Chicken Thigh u/kilogram p/14.00 m/20
Expected: Ingredient is added into the ingredient list. Details of the added ingredient is shown in the status message. Timestamp in the status bar is updated. -
Test case: add-ing n/
Expected: No ingredient is added. Error details are shown in the status message. Status bar remains the same. -
Other incorrect
add-ingcommands to try:add-ing,add-ing n/123 u/kilogram p/14.00 m/20,add-ing n/Chicken Thigh u/+ p/14.00 m/20
Expected: Similar to previous.
-
-
Listing all ingredients
-
Pre-requisites: Must be logged in.
-
Test case:
list-ing
Expected: All ingredients are listed at the panel on the left of the UI.
-
-
Listing all the items that are low on stock
-
Pre-requisites: Must be logged in.
-
Test case:
low-stock
Expected: All ingredients that have a number of units less than its minimum value are listed.
-
-
Deleting an ingredient
-
Pre-requisites: At least one ingredient in the ingredient list and must be logged in.
-
Test case:
delete-ing 1
Expected: The first ingredient in the displayed ingredient list is deleted. Details of the deleted ingredient is shown in the status message. Timestamp in the status bar is updated. -
Test case:
delete-ing Chicken Thigh
Expected: The ingredient with the specified name is deleted. Details of the deleted ingredient is shown in the status message. Timestamp in the status bar is updated. -
Test case:
delete-ing 0
Expected: No ingredient is deleted. Error details are shown in the status message. Status bar remains the same. -
Other incorrect
delete-ingcommands to try:delete-ing,delete-ing x(where x is larger than the ingredient list size)
Expected: Similar to previous.
-
-
Editing an ingredient
-
Pre-requisites: The ingredient to be edited must be an existing entry in the ingredient list and must be logged in. The edited ingredient must not have the same name as another ingredient existing in the ingredient list.
-
Test case:
edit-ing 1 n/Chicken Drumstick
Expected: Edited ingredient replaces the existing ingredient in the ingredient list. Details of the edited ingredient is shown in the status message. Timestamp in the status bar is updated. -
Test case:
edit-ing Chicken Thigh n/Chicken Drumstick
Expected: Similar to previous. -
Test case:
edit-ing n/
Expected: No ingredient is edited. Error details are shown in the status message. Status bar remains the same. -
Other incorrect
edit-ingcommands to try:edit-ing,edit-ing Chicken Drumstick+
Expected: Similar to previous.
-
-
Stocking up an ingredient or multiple ingredients
-
Pre-requisites: The ingredient(s) to be stocked up must be an existing entry or existing entries in the ingredient list and must be logged in.
-
Test case:
stockup n/Chicken Drumstick nu/10
Expected: The number of units of the ingredient increases by the specified number. The name of the ingredient being restocked is shown in the status message. Timestamp in the status bar is updated. -
Test case:
stockup n/Chicken Drumstick nu/10 n/Cheese nu/15
Expected: Similar to previous. -
Test case:
stockup n/Chicken Drumstick
Expected: No ingredient is stocked up. Error details are shown in the status message. Status bar remains the same. -
Other incorrect
stockupcommands to try:stockup,stockup n/Chicken Drumstick n/Cheese nu/10 nu/20
Expected: Similar to previous.
-
-
Selecting an ingredient
-
Pre-requisites: At least one ingredient in the ingredient list and must be logged in.
-
Test case:
select-ing 1
Expected: The first ingredient in the displayed ingredient list is selected. Details of the selected ingredient is shown in the right panel of the UI. -
Test case:
select-ing 0
Expected: No ingredient is selected. Error details are shown in the status message. -
Other incorrect
select-ingcommands to try:select-ing,select-ing x(where x is larger than the ingredient list size) Expected: Similar to previous.
-
G.4. Menu Management
-
Adding a new item with valid name, price and tag
-
Prerequisites: You must not have the item, specified in the test case below, in the menu.
-
Test case:
add-item n/Chicken Rice p/3 t/rice t/chicken
Expected: Item is added to the menu. Details of the item shown in status message. -
Incorrect commands to try:
add-item n/test p/string,add-item n/@@^&@ p/3
-
-
Editing an item with valid name, price and tag
-
Prerequisites: You must have at least 1 item in the menu.
-
Test case:
edit-item 1 n/Duck Rice p/3 t/rice t/duck
Expected: Item specified by the index is updated with new details. New details of the item shown in status message. -
Incorrect commands to try:
edit-item 1 n/test p/string,edit-item n/name p/3
-
-
Deleting an item by index
-
Prerequisites: You must have at least 1 item in the menu.
-
Test case:
delete-item-index 1
Expected: Item specified by the index is deleted from the menu. Number of items deleted shown in status message. -
Incorrect commands to try:
delete-item-index -2,delete-item-index string
-
-
Deleting an item by name
-
Prerequisites: You must have the item, specified in the test case below, in the menu.
-
Test case:
delete-item-name chicken rice
Expected: Item specified by name is deleted from the menu. Details of the deleted item shown in status message. -
Incorrect commands to try:
delete-item-name @@^&@
-
-
Listing all items
-
Test case:
list-items
Expected: List all items in the menu.
-
-
Clearing menu
-
Test case:
clear-menu
Expected: Delete all items in the menu.
-
-
Selecting an item
-
Prerequisites: You must have at least 1 item in the menu.
-
Test case:
select-item 1
Expected: Selects the item specified by the index in the menu. Index of the selected item shown in status message. -
Incorrect commands to try:
select-item -2,select-item string
-
-
Locating items by name
-
Prerequisites: You must have at least 1 item with name matching the keyword specified in the test case below.
-
Test case:
find-item rice
Expected: Finds the item with name matching the keyword in the menu. Number of matched items shown in status message.
-
-
Locating items by tag
-
Prerequisites: You must have at least item with tag matching the keyword specified in the test case below.
-
Test case:
filter-menu duck
Expected: Finds the item with tag matching the keyword in the menu. Number of matched items shown in status message.
-
-
Sorting the menu by name
-
Test case:
sort-menu name
Expected: Sorts the menu by name. Sorting method shown in status message.
-
-
Sorting the menu by price
-
Test case:
sort-menu price
Expected: Sorts the menu by price. Sorting method shown in status message.
-
-
Giving discount to all items in the displayed item list
-
Prerequisites: You must have at least 1 item in the menu.
-
Test case:
discount-item ALL dp/20
Expected: Give all items in the displayed item list a discount. Number of items given a discount shown in status message. -
Incorrect commands to try:
discount-item -2 dp/20,discount-item string dp/20
-
-
Adding a recipe to an item
-
Prerequisites: You must have at least 1 item in the menu.
-
Test case:
recipe-item 1 r/some recipe
Expected: Adds the recipe to the item specified by the index in the menu. Details of specified item shown in status message.
-
-
Adding required ingredients to an item
-
Prerequisites: You must have at least 1 item in the menu.
-
Test case:
add-required-ingredients 1 n/chicken nu/3 n/rice nu/3
Expected: Adds the required ingredients to the item specified by the index in the menu. Details of specified item shown in status message. -
Incorrect commands to try:
add-required-ingredients -2 n/str nu/3,add-required-ingredients 1 n/str nu/-3,add-required-ingredients 1 n/str n/other nu/3 nu/3
-
G.5. Reservations Management
-
Adding a reservation
-
Prerequisites: The reservation to be added must not be a duplicated entry in the reservations list and the user must be logged in.
-
Test case:
add-reservation n/John Doe px/4 d/05-12-2019 ti/10:00 t/Driving
Expected: Reservation will be added into the reservation list. Details of the added reservation will be shown. -
Test case:
add-reservation n/
Expected: Reservation will not be added. Improper format error details shown. -
Test case:
add-reservation n/John Doe px/4 d/01-01-2018 ti/10:00 t/Driving
Expected: Reservation will not be added. "Date should not have passed" error will be shown. -
Other incorrect add-reservation commands to try:
add-reservation,add-reservation n/John Doe px/4@ d/05-12-2019 ti/10:00
Expected: Reservation will not be added. Improper format error details shown.
-
-
Listing reservations
-
Prerequisites: The user must be logged in.
-
Test case:
list-reservations
Expected: The reservations list will be shown.
-
-
Selecting a reservation
-
Prerequisites: The reservations list must contain at least 1 reservation.
-
Test case:
select-reservation 1
Expected: Selects the reservation specified by the index in the reservations list. Index of the selected reservation will be shown. -
Incorrect commands to try:
select-reservation,select-reservation all
-
-
Editing a reservation
-
Prerequisites: The reservation to be edited must be an existing entry in the reservations list and the user must be logged in.
-
Test case:
edit-reservation 1 d/06-10-2020
Expected: Edited reservation will replace the existing reservation in the reservations list. Details of the edited reservation will be shown. -
Test case:
edit-reservation n/
Expected: No reservation is edited. Improper format error details shown. -
Other incorrect edit-reservation commands to try:
edit-reservation,edit-reservation 1 px/4@
Expected: Similar to previous.
-
-
Deleting a reservation
-
Prerequisites: The reservation to be deleted must be an existing entry in the reservations list and the user must be logged in.
-
Test case:
delete-reservation 1
Expected: First reservation will be deleted from the list. Details of the deleted reservation will be shown. -
Test case:
delete-reservation 0
Expected: No reservations are deleted. Improper format error details shown. -
Other incorrect delete-reservation commands to try:
delete-reservation,delete-reservation all
Expected: Similar to previous.
-
-
Sorting reservations
-
Prerequisites: The user must be logged in and the reservations list must be populated with more than one entry.
(and preferably be initially unsorted, to see the effects of thesort-reservationscommand) -
Setup: Enter these commands to populate the reservations list with an unsorted set of reservations.
-
add-reservation n/Mandelbrot px/3 d/06-12-2019 ti/18:00 -
add-reservation n/Benoit px/1 d/05-12-2019 ti/10:00 -
add-reservation n/B px/2 d/05-12-2019 ti/12:00
-
-
Test case:
sort-reservations
Expected: Reservations list will be sorted by Date/Time in ascending order.
-
G.6. Saving data
-
Dealing with missing/corrupted data files
-
To simulate missing/corrupted data file, simply go to the
datafolder, open uprestaurantbook.xmland remove any XML tags, or simply delete therestaurantbook.xmlfile. The next time the application is launched, a cleanrestaurantbook.xmlwill be re-generated.
-